How to build an Arduino Automatic Chicken Coop Door | Arduino code, parts, pictures, wiring diagram and videos included.
I wanted a small door to open automatically (via Arduino / morning/night) to the outside world. Doing this would relieve us from worrying if the chickens were safe at night and to be able to leave the house when we wanted) This door will be located on the side of the coop and will slide open (vertically) so the girls can up & down their ladder about 18″ to the ground level. (although ladders are really not needed as my chickens can fly straight up to the door without trouble)
I’ve lived with the chickens and the coop for some time now and have learned quite a bit… especially about their habits. This is important, because no matter how much I’d like to automate this coop via my Arduino Control Center, the chickens will ultimately dictate how it’s made and how it will operate.
The Installed Arduino Chicken Door
How I built the Automated Chicken Coop Door
Testing the door with the Arduino
The Elements
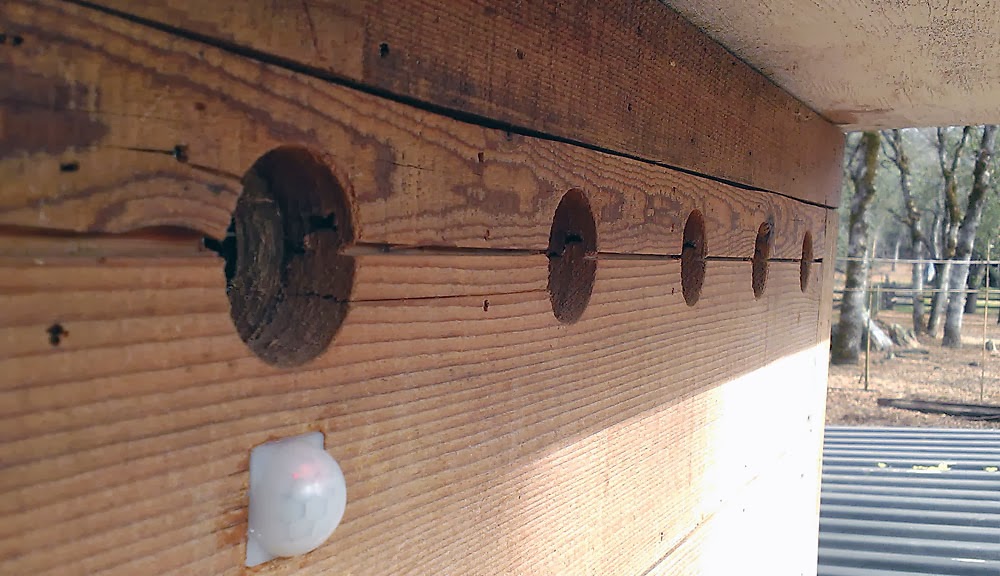
The Photocell

Photocell
When I first started this coop project I wanted to use a real-time clock and an Arduino library called Time Lord, but since I was a newbie to Arduino and struggled with the implementation of Time Lord I decided to go with using a photocell resistor instead. I’m actually glad I did since chickens come home to roost based on light, (not time) and with a photocell I won’t have to worry about a real time clock resetting due to power outages or battery failure, I think it will be less prone to problems.
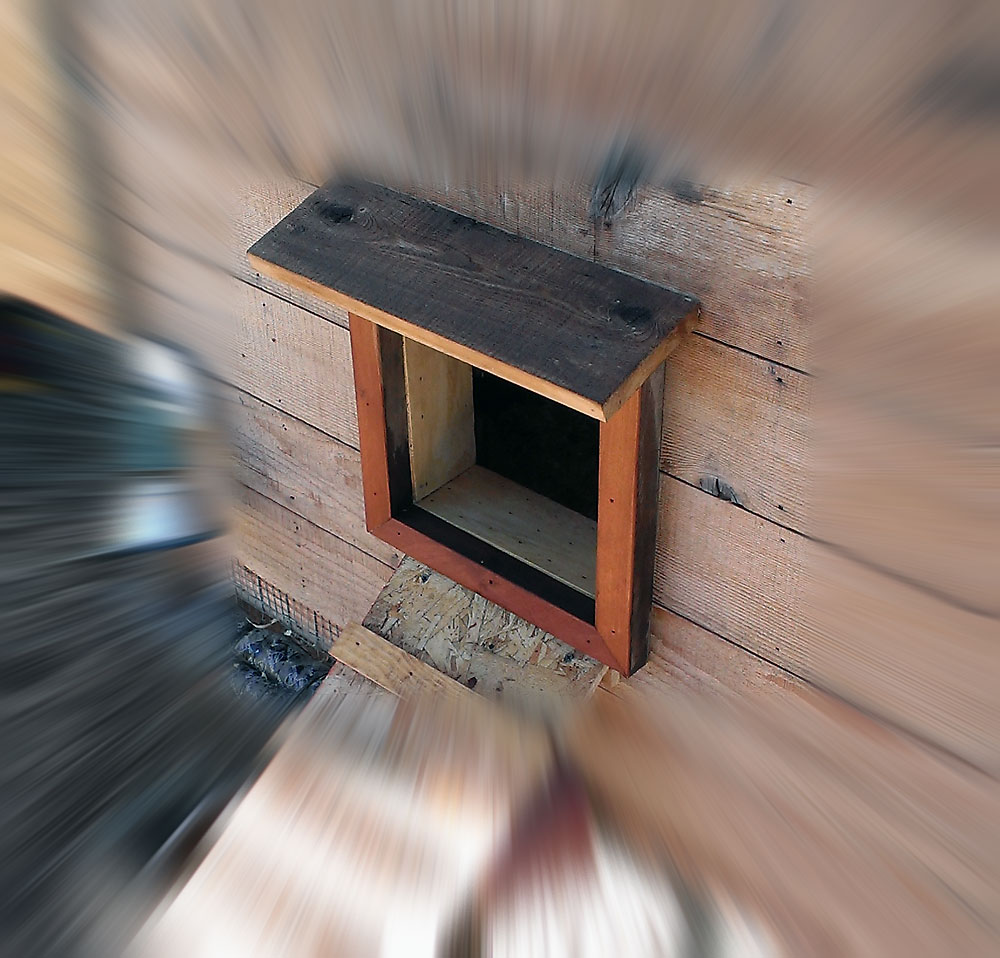
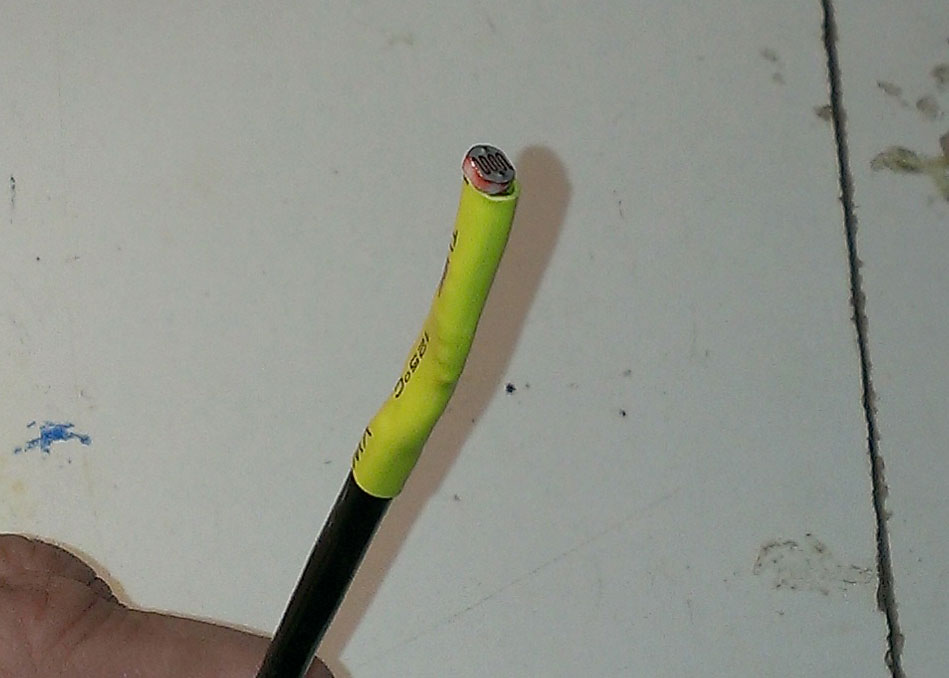
Photocell application and installation
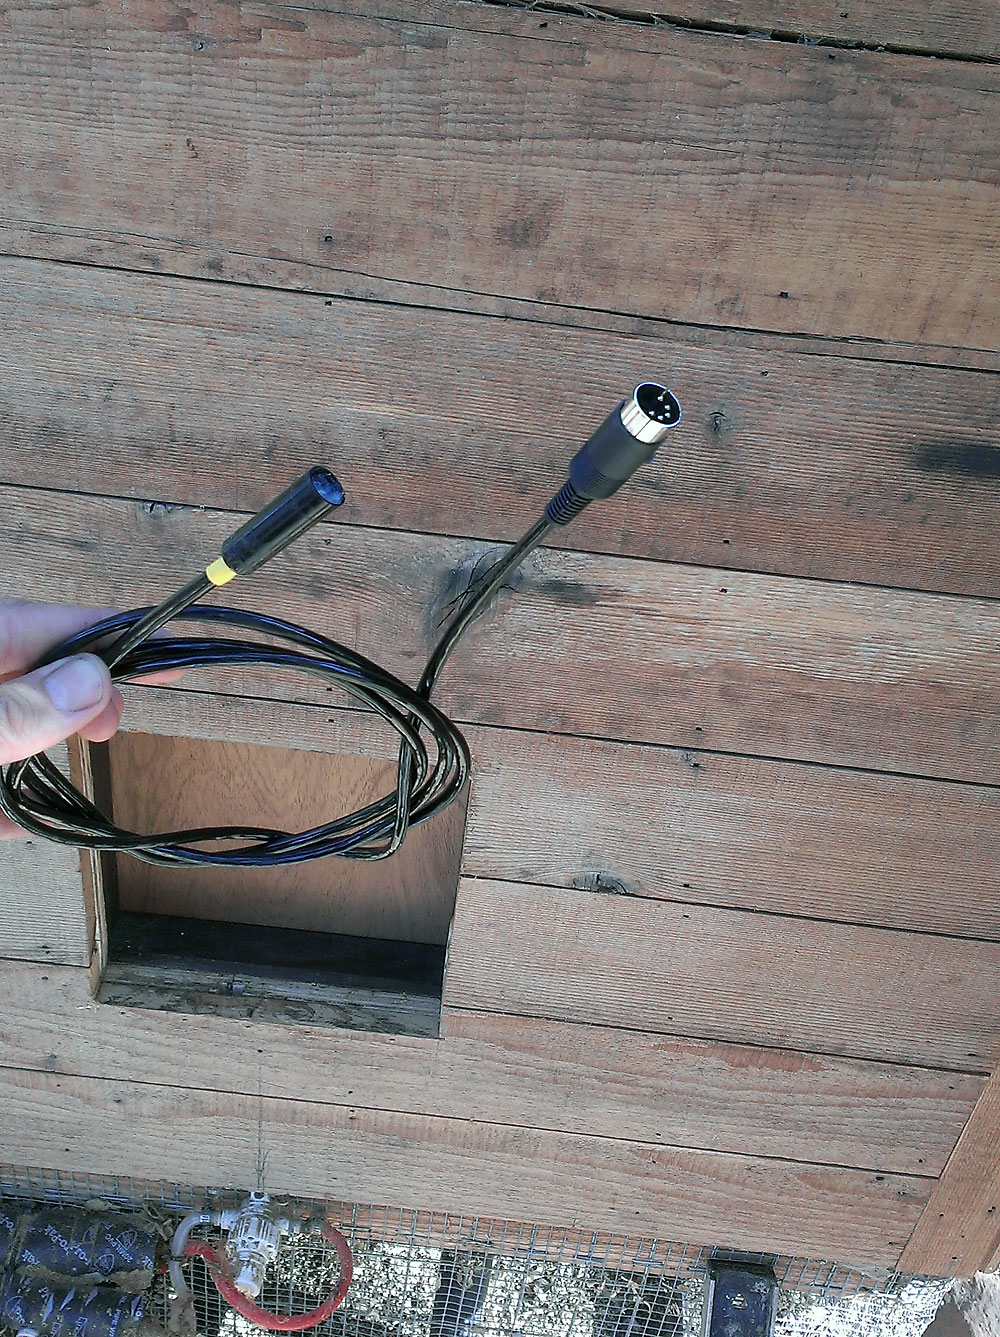
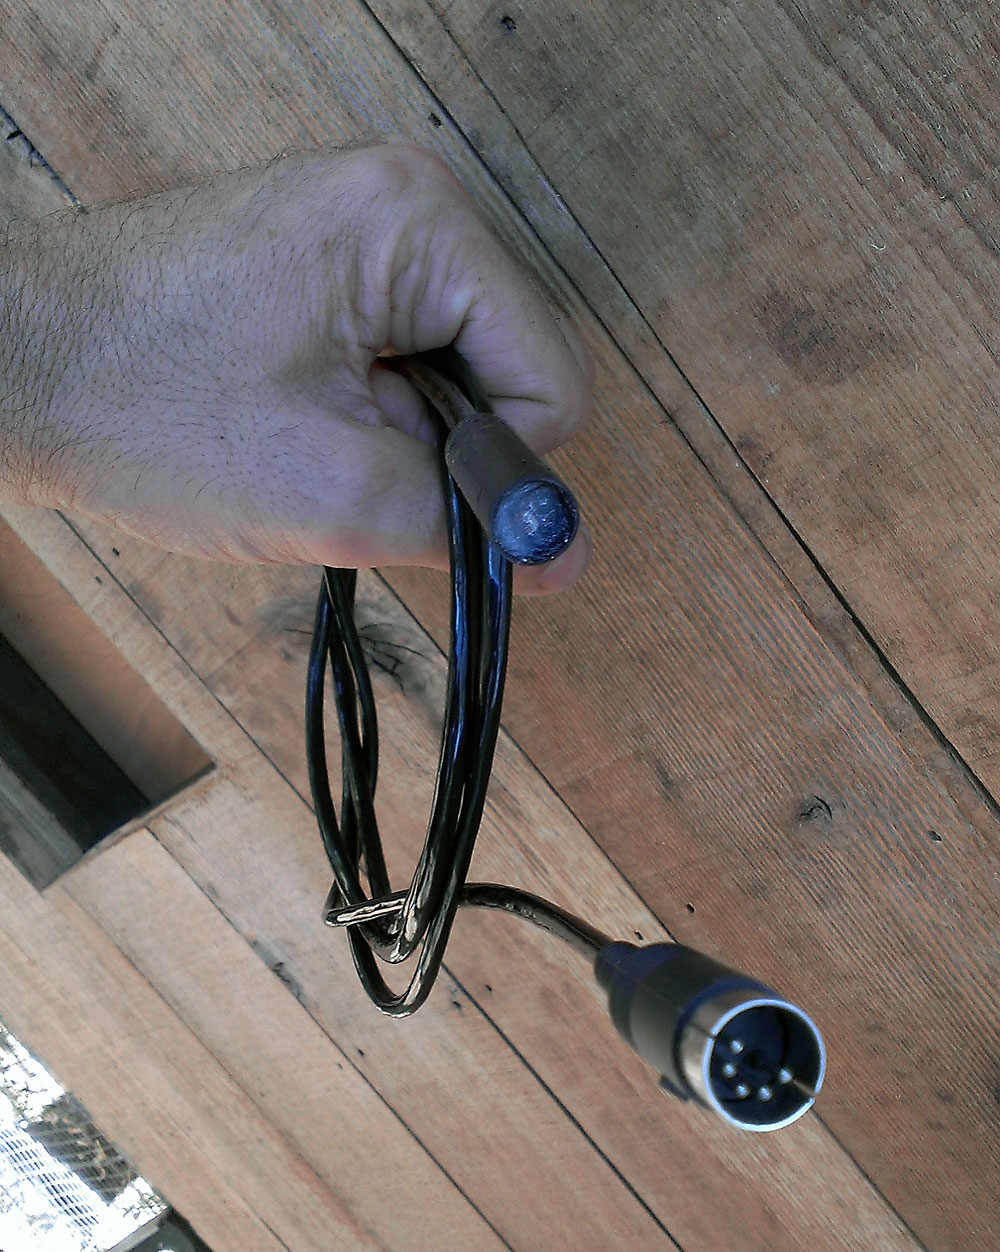
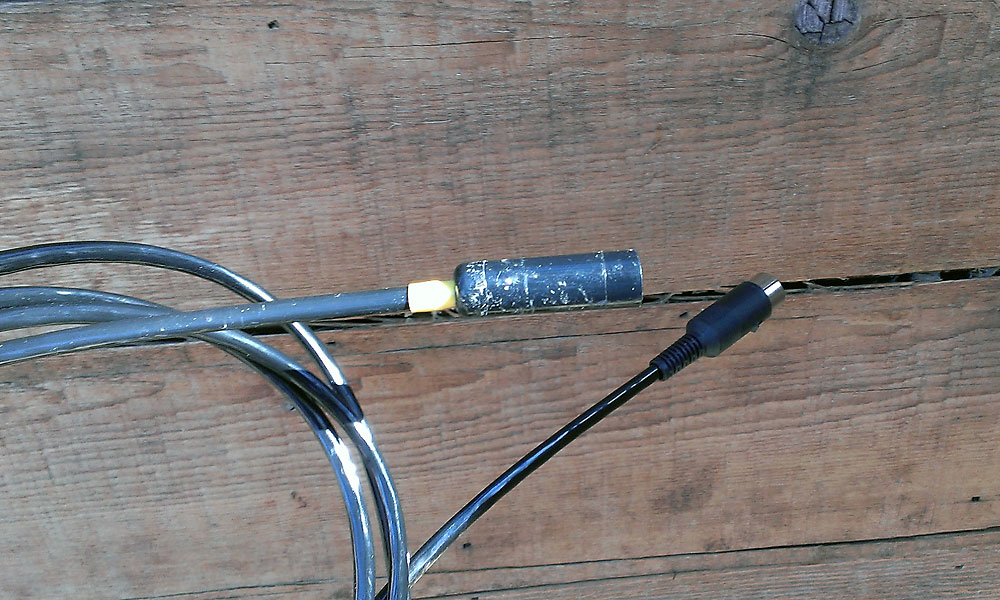
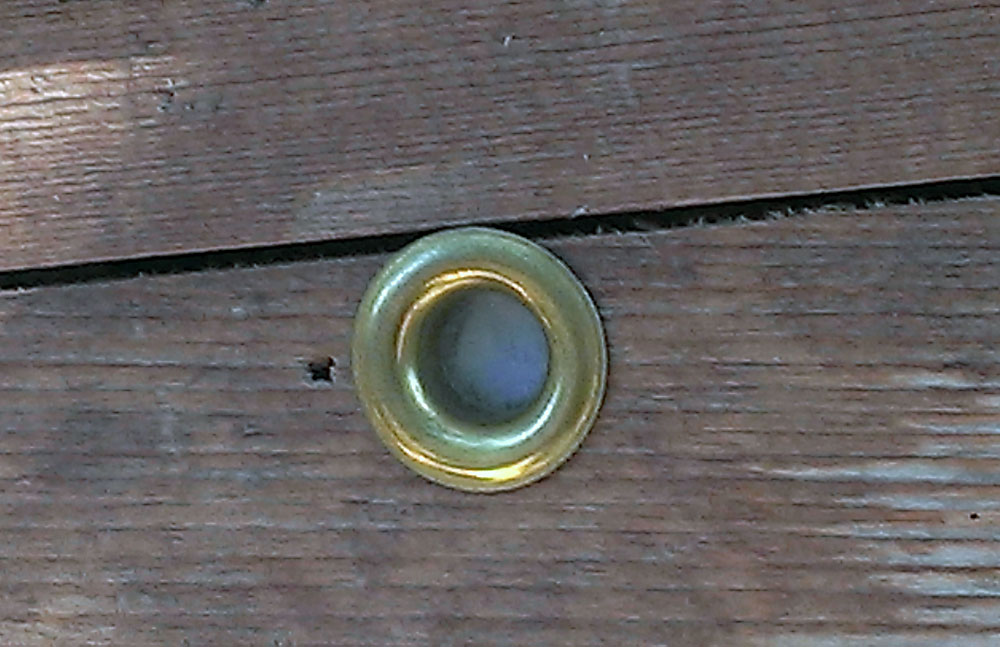
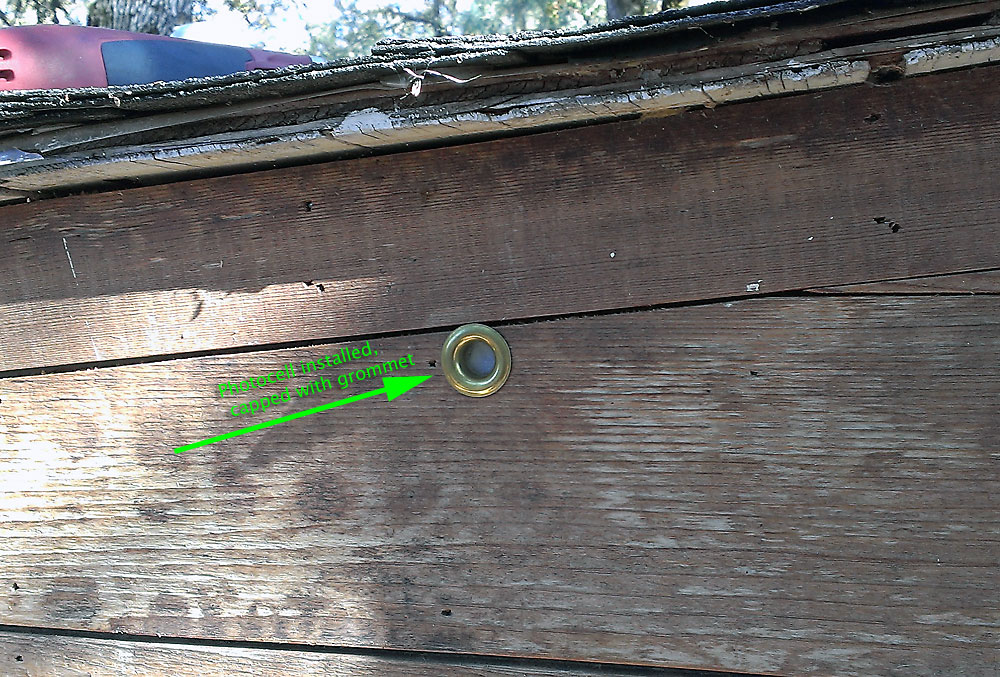
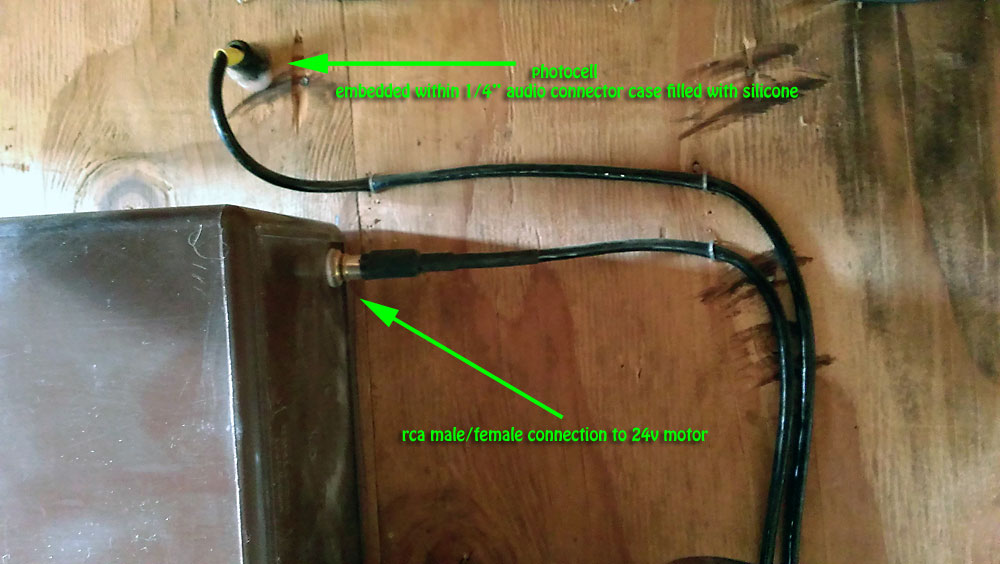
I first soldered the photocell to my cable, applied heat shrink tubing and encased the connection within a 1/4 inch plastic audio connector case. I filled the casing with silicone and capped the very tip with clear plexiglass to project the photocell from the elements. then I simply drilled a hole above the coop door monitor, and finished the outside with a brass grommet.
[Click thumbnails for detailed images]
-
- Photocell – Arduino Automatic Chicken Coop Door

-
- Arduino Chicken Coop Door-installed – Interior Close-up Connections
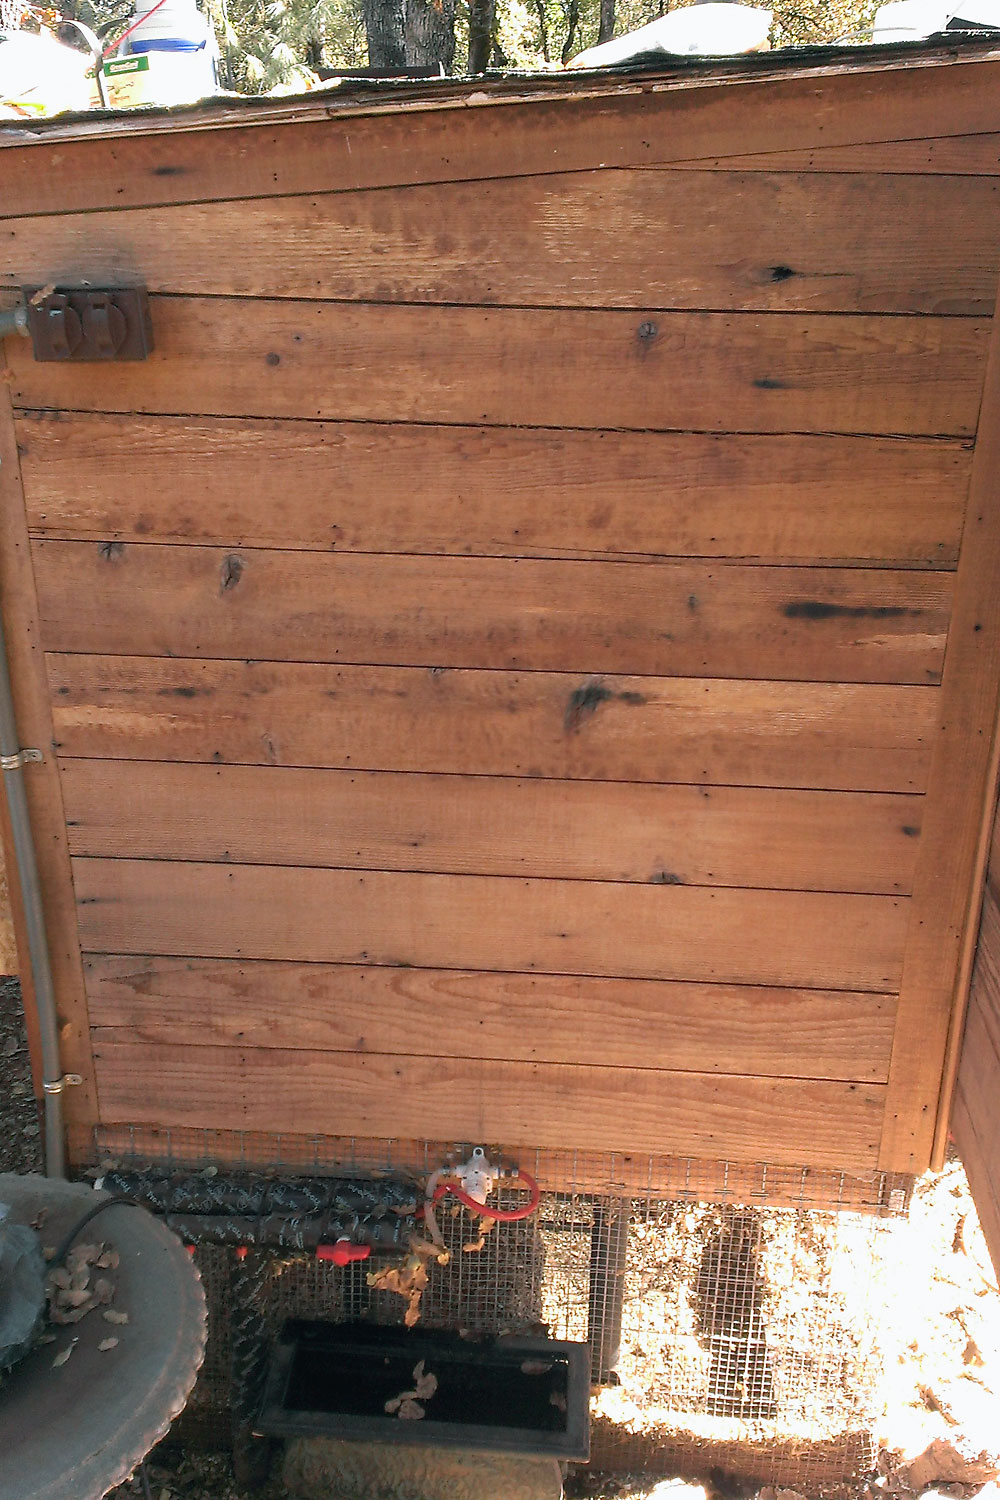
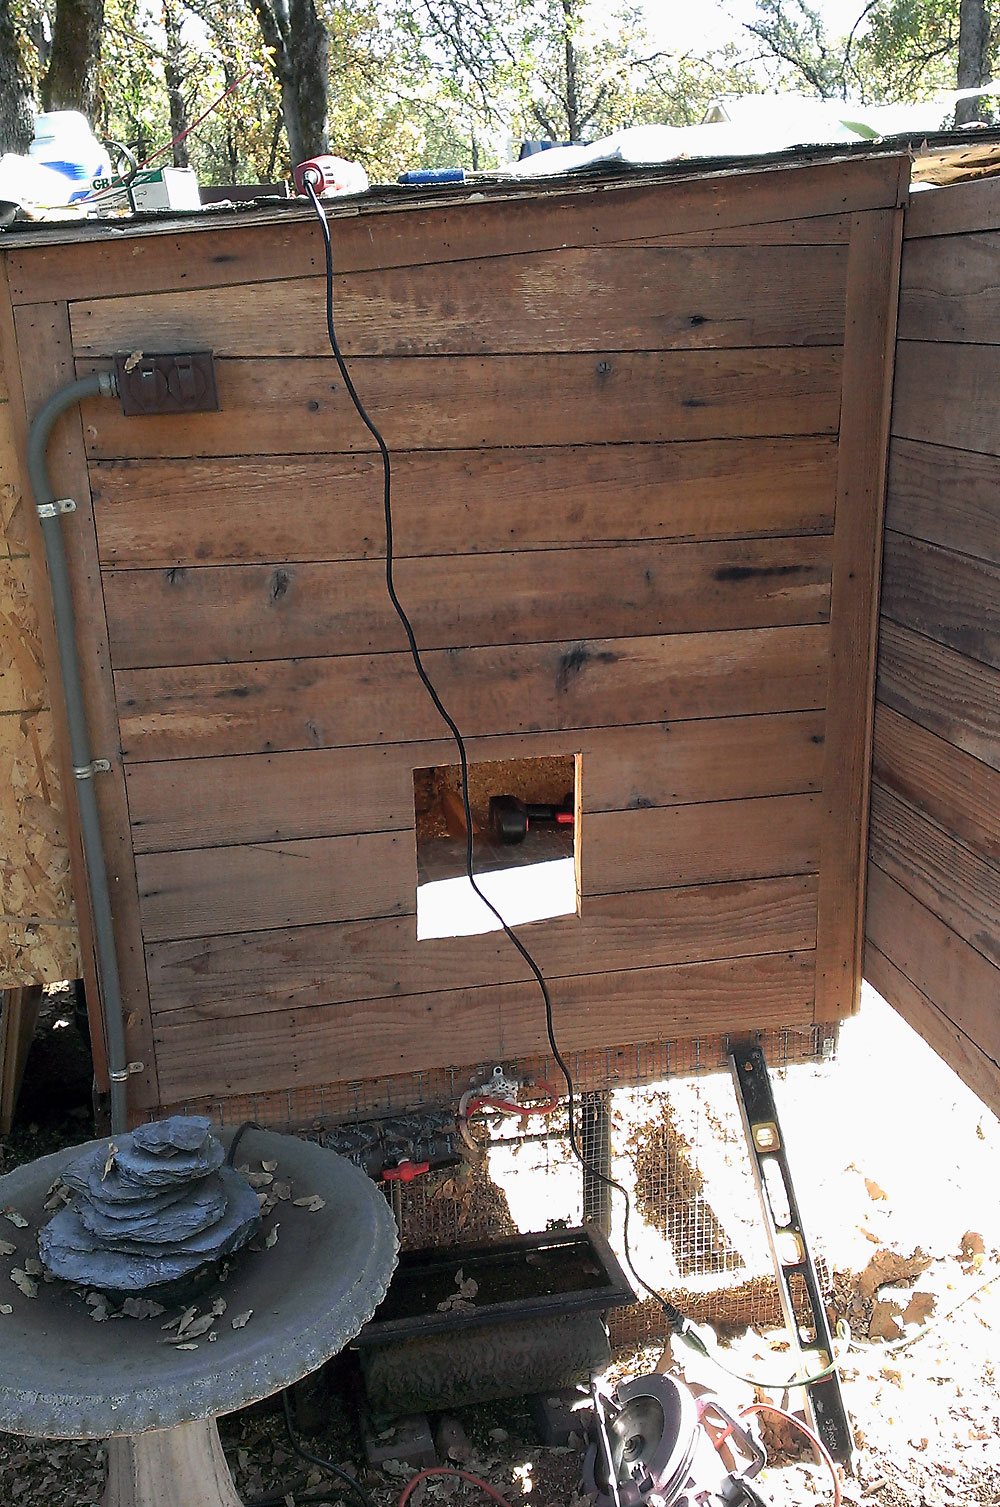
The Door
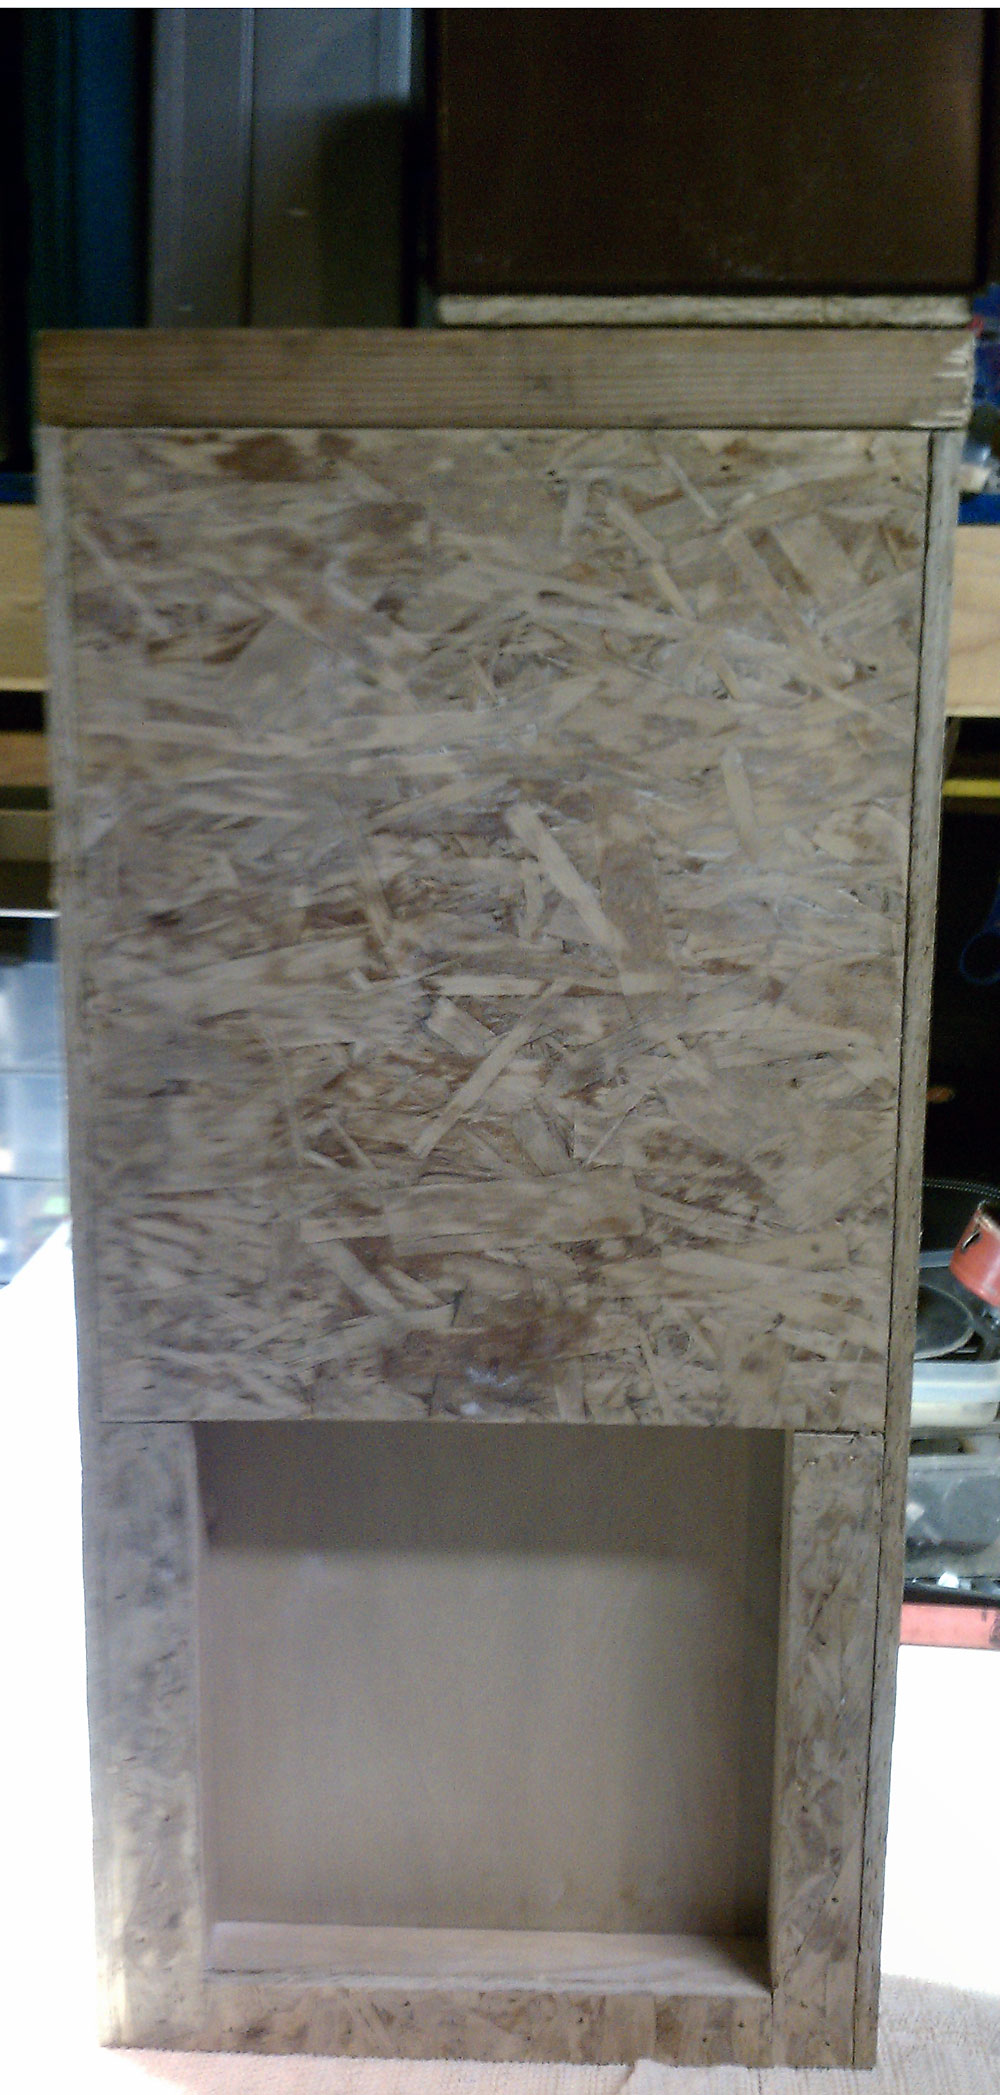 Auto chicken door – front view (from exterior of coop)
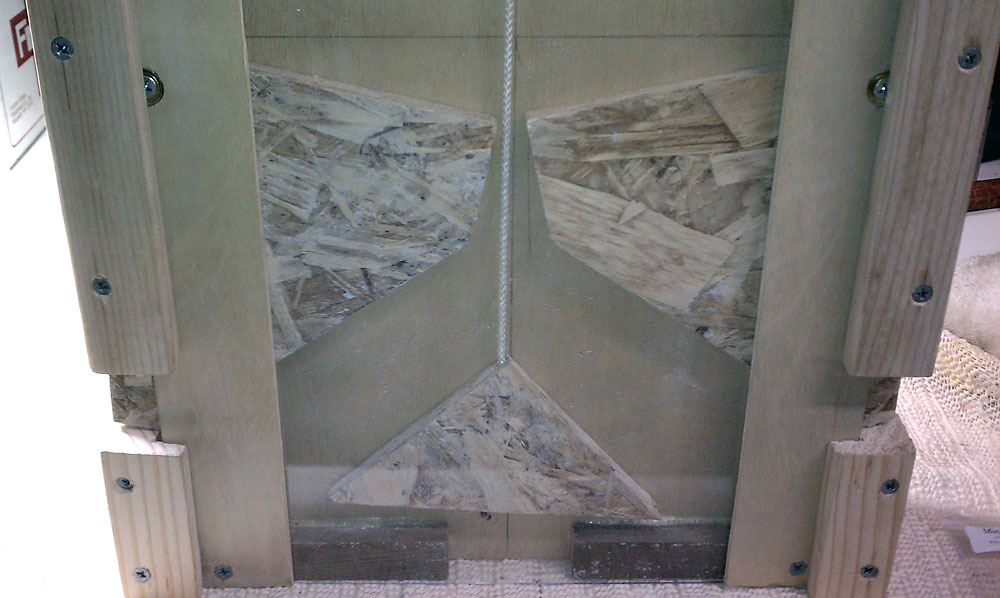
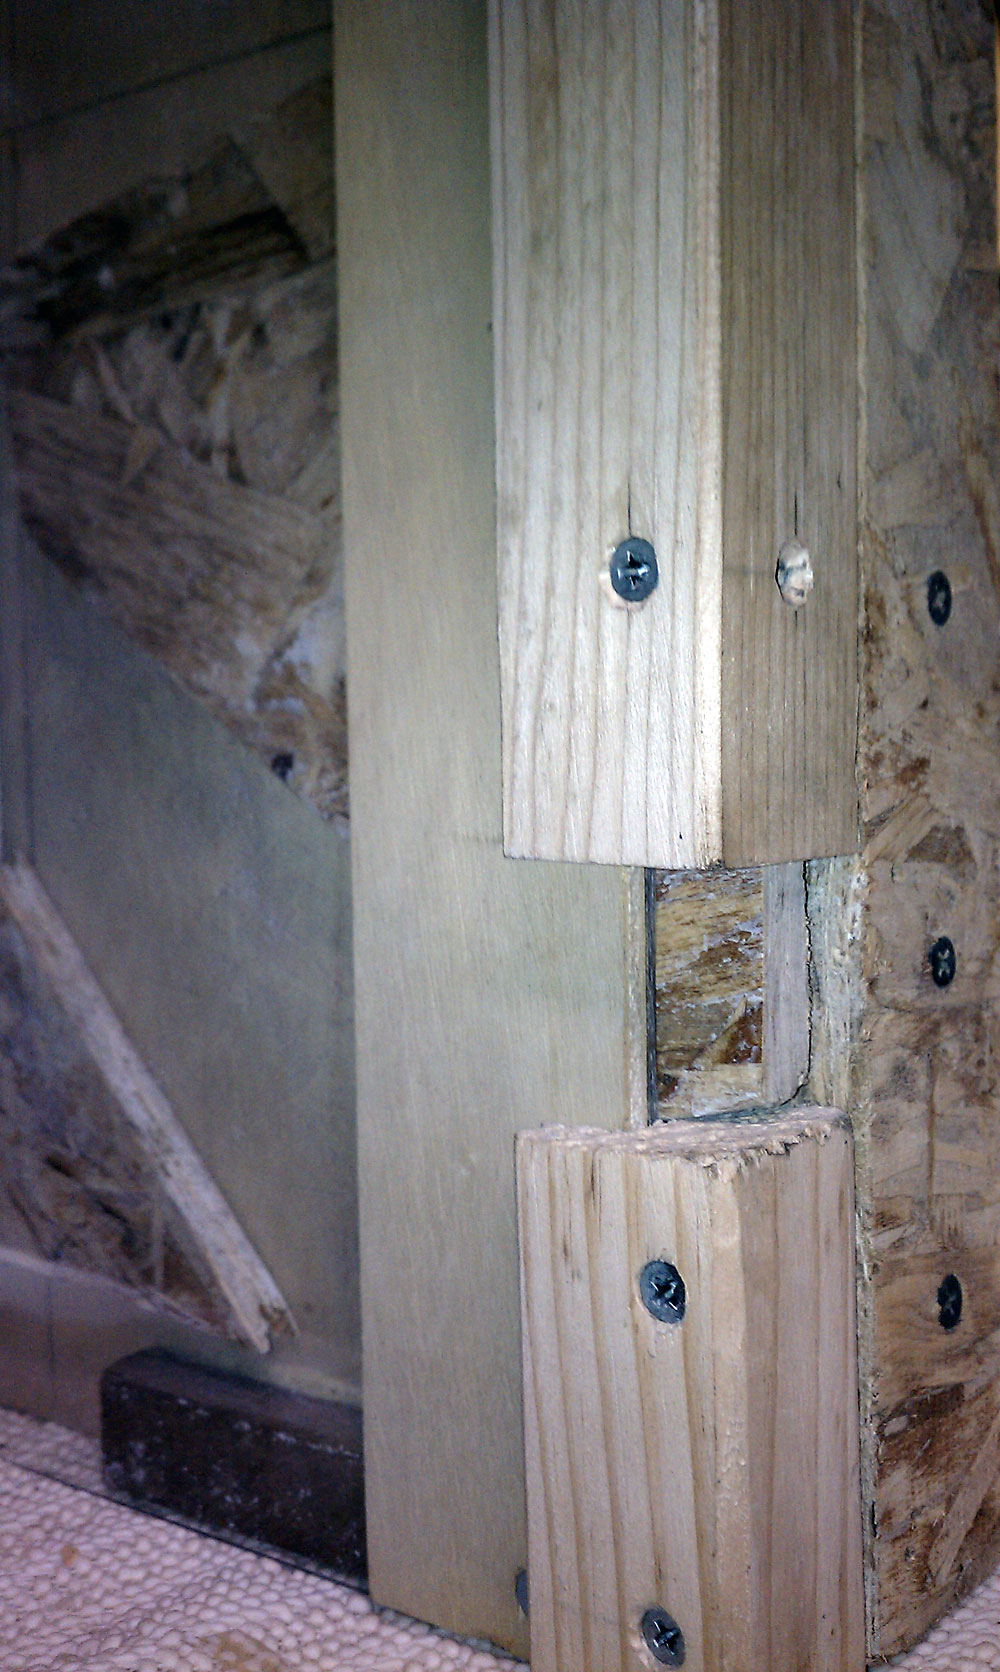
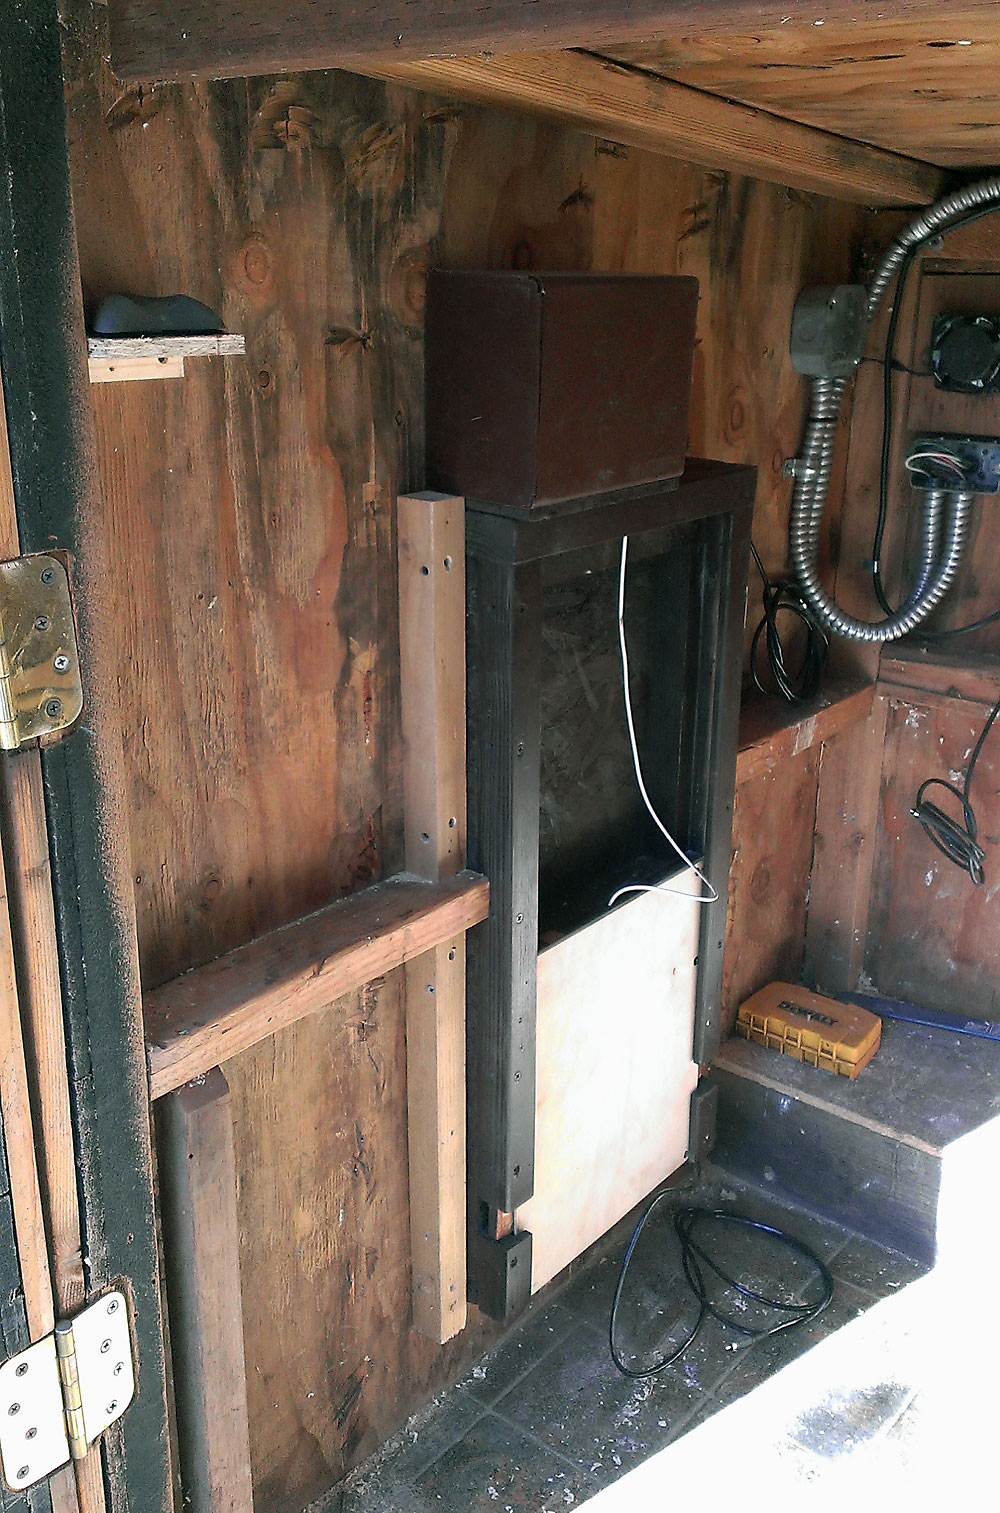
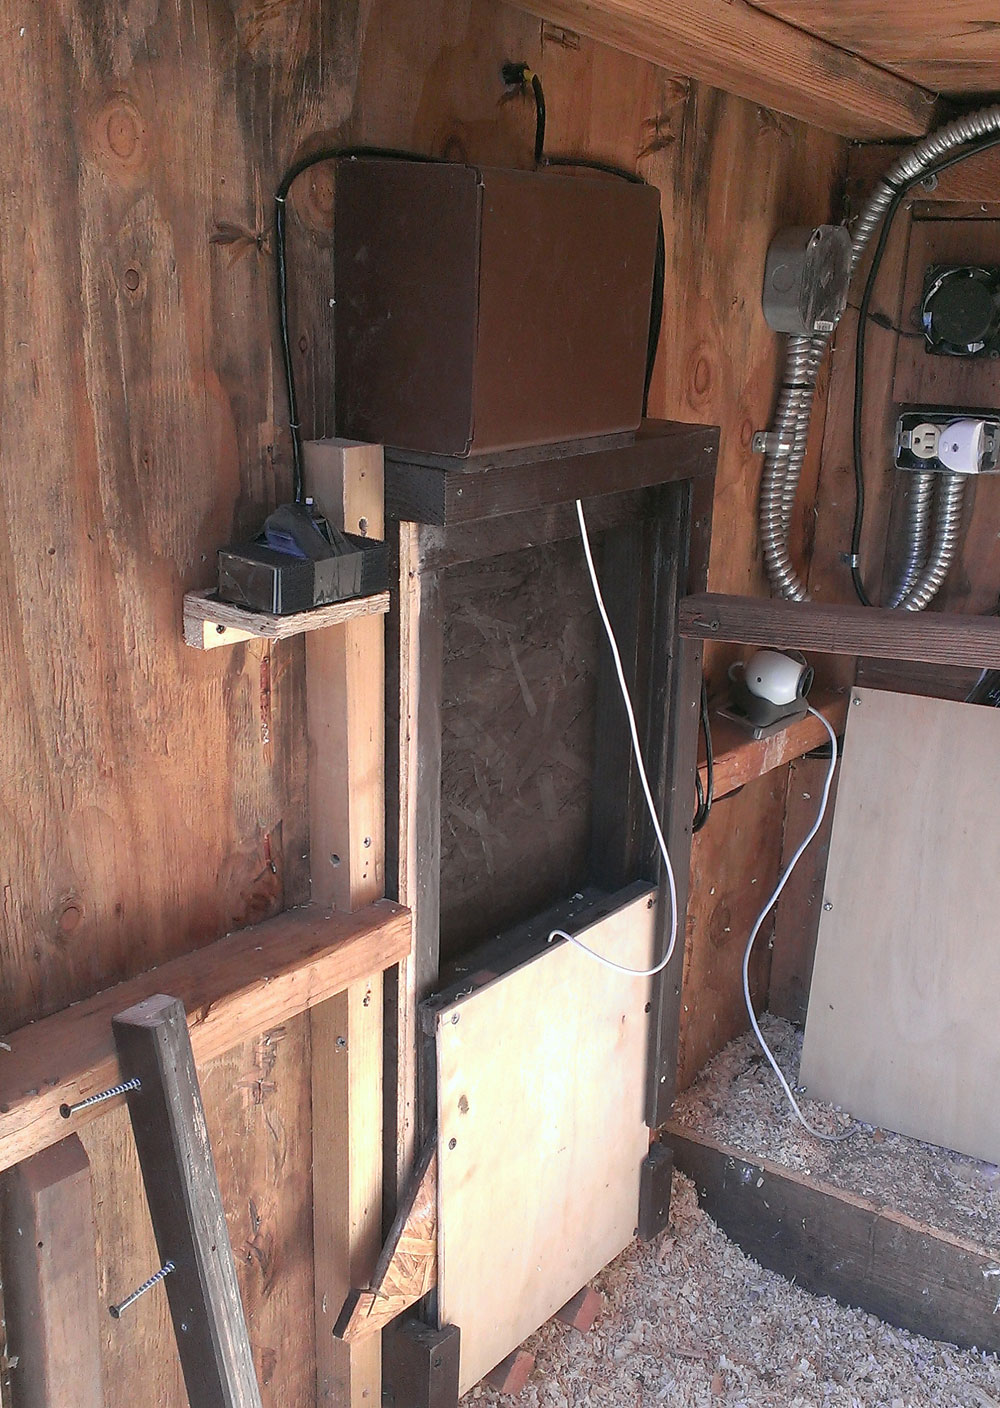
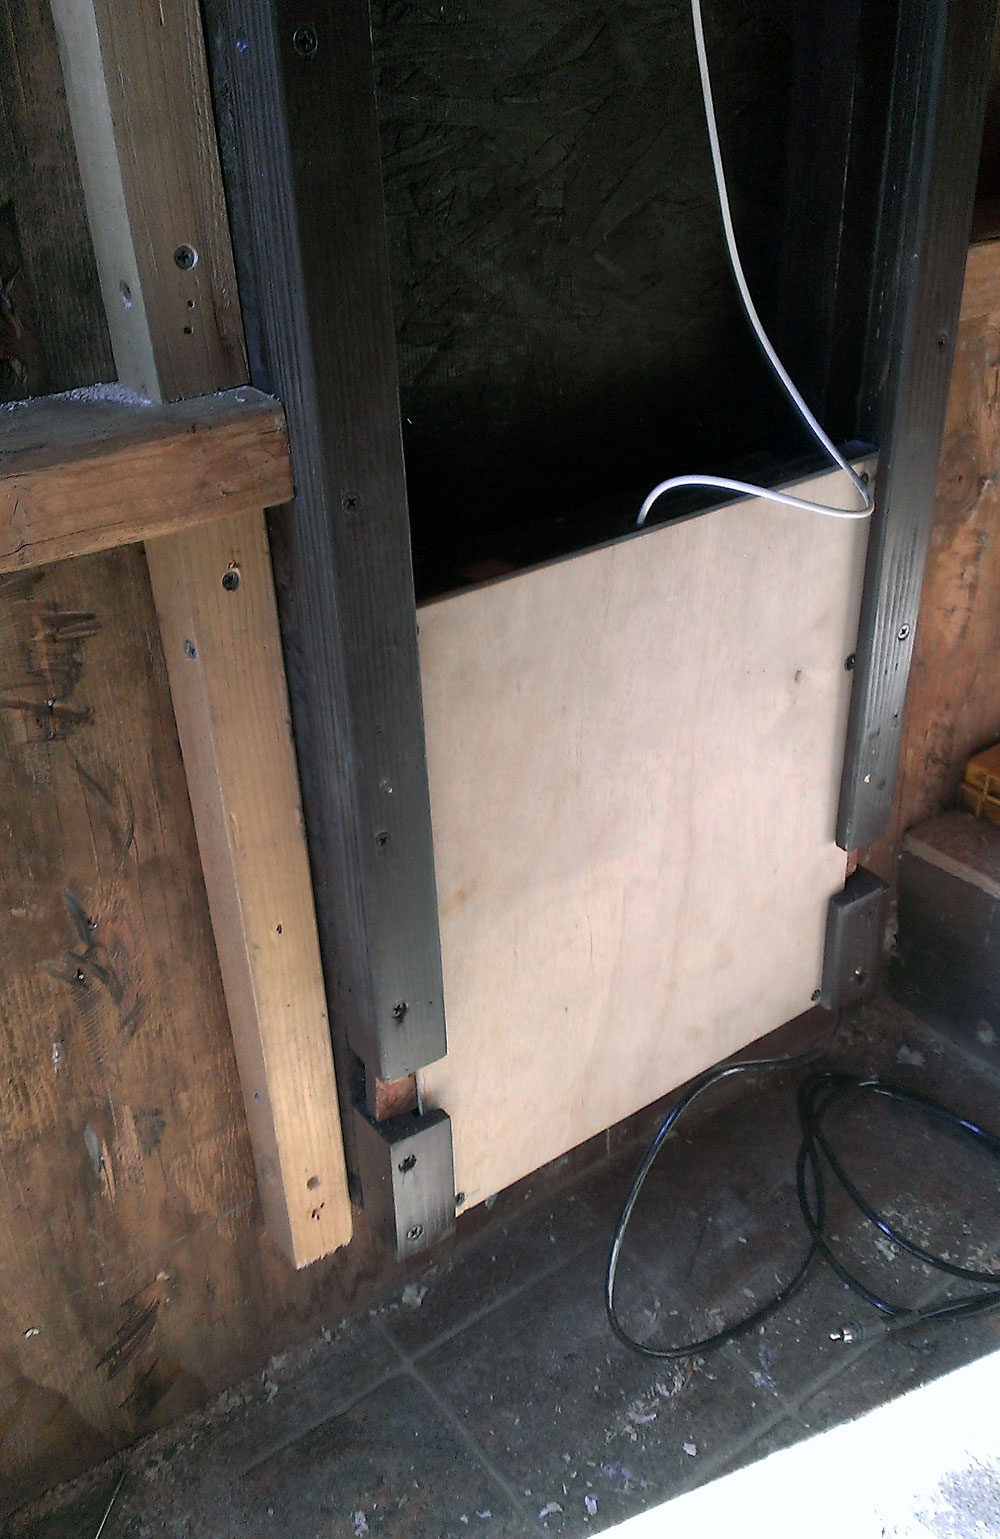
As you can see, the door construction is fairly straightforward. I began framing out the door with 2 x 2s, capped with 2x4s and screwed everything together with 1/2 inch galvanized deck screws. The door itself is a 1/8 inch birch, sandwiching in OSB plywood door locks ~and in the pictures (below)~ is the 1/8th inch acrylic. Note: I have since swapped out the acrylic with more 1/8 inch birch because I cracked the acrylic… being too rough with all the testing. =(
I cut 1/2 inch grooves into the backsides of the 2x2s so the door could slide easily. I gave myself enough room for 1/4″ of play. You can see in the pictures I’ve also rubbed a bar of soap over the edges all moving parts to ensure that they will move freely. If you’re taking on this project I’m assuming you have basic carpentry skills and can simply take a look at the pictures below to come up with similar ideas to build your own. ( which of course is my way of saying I didn’t do a great job documenting this exact process with plans or dimensions) =)
[Click thumbnails for detailed images]
-
- Auto chicken door
-
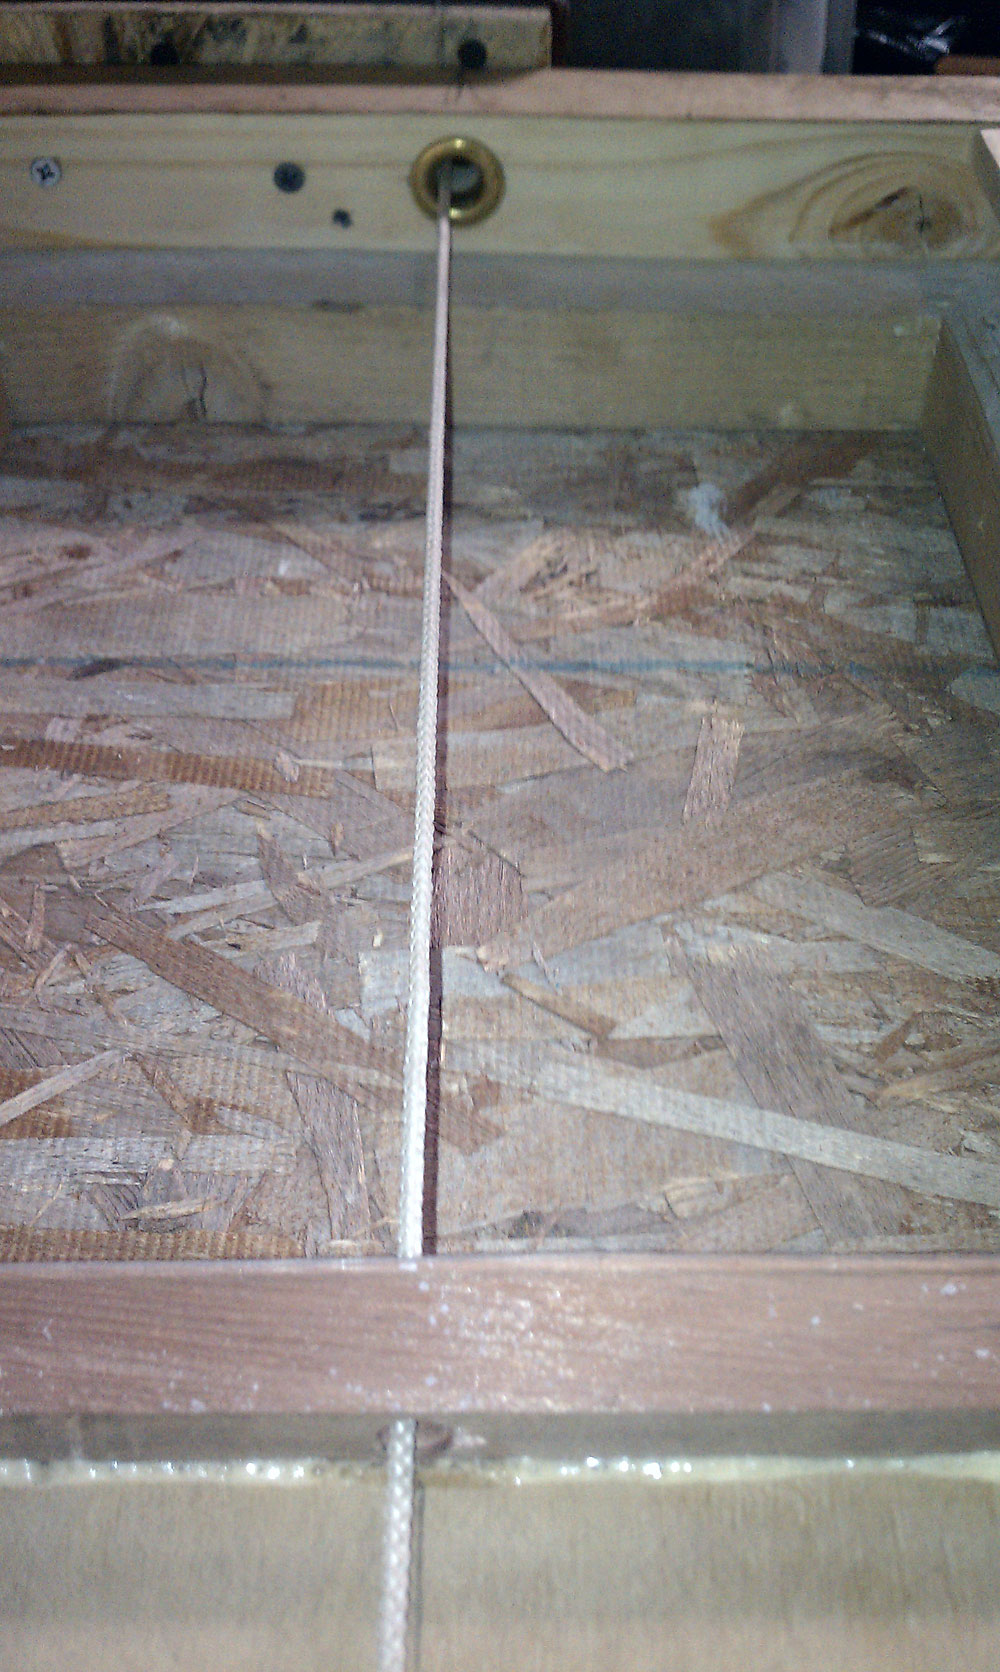
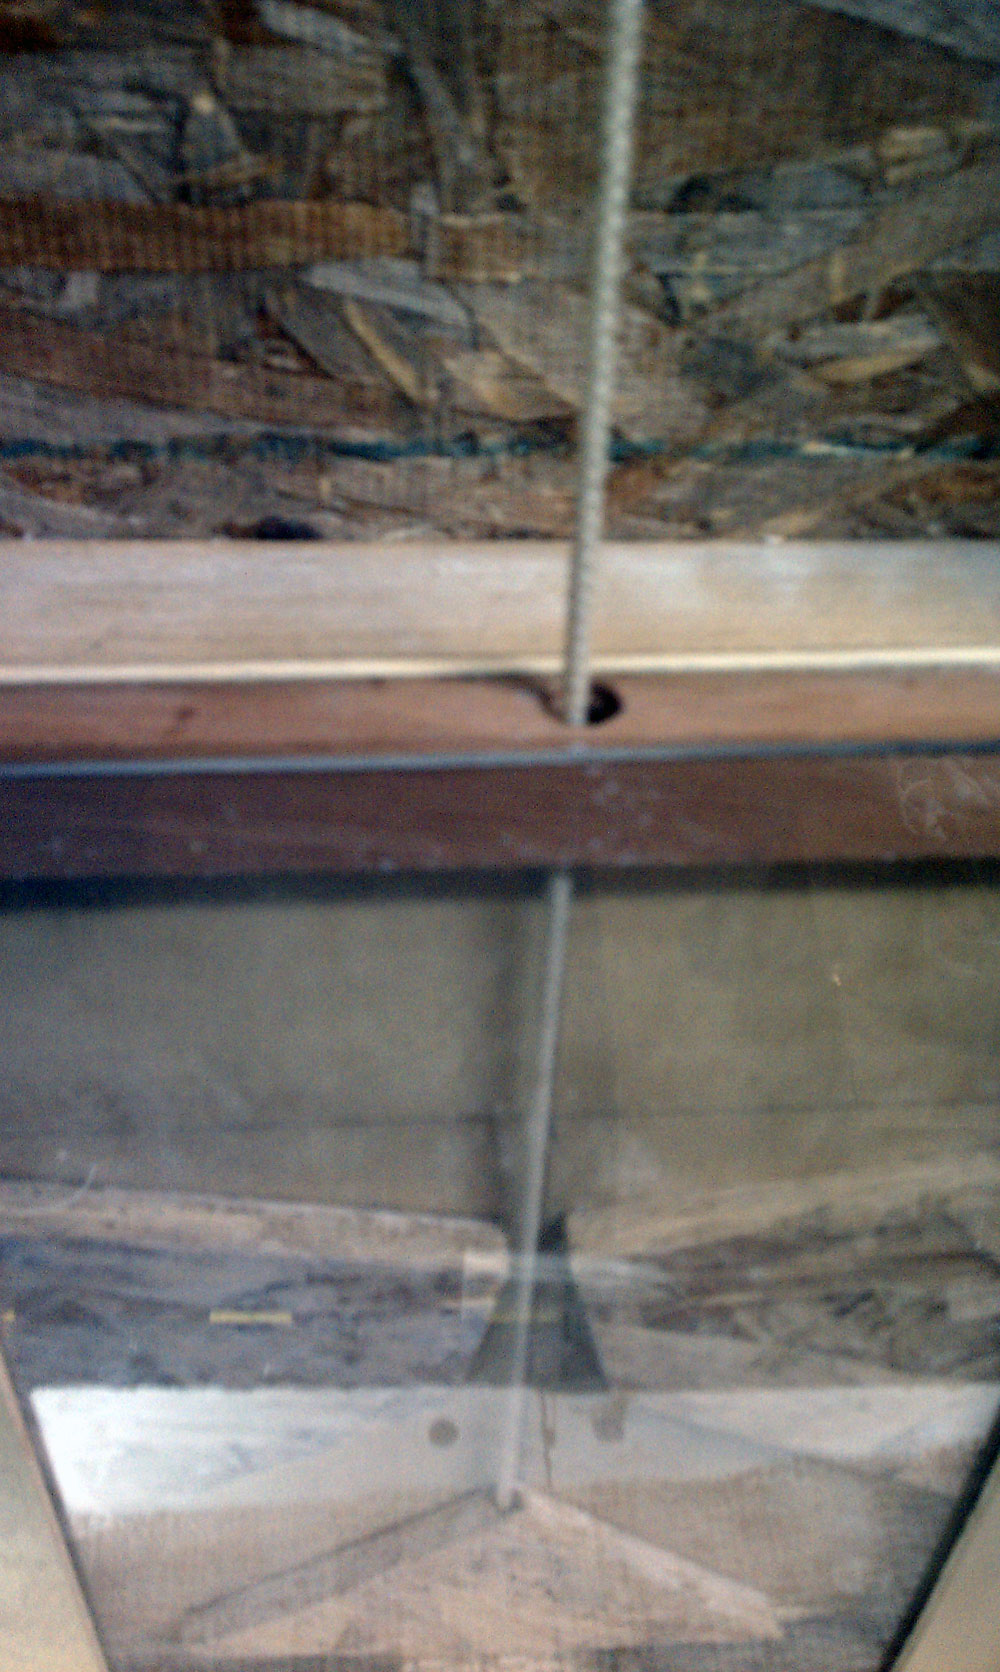
- Auto chicken door – interior view, looking up
-
- Auto chicken door – interior view, looking down
-
- Auto chicken door – interior view, lock detail
-
- Auto chicken door – front view
-
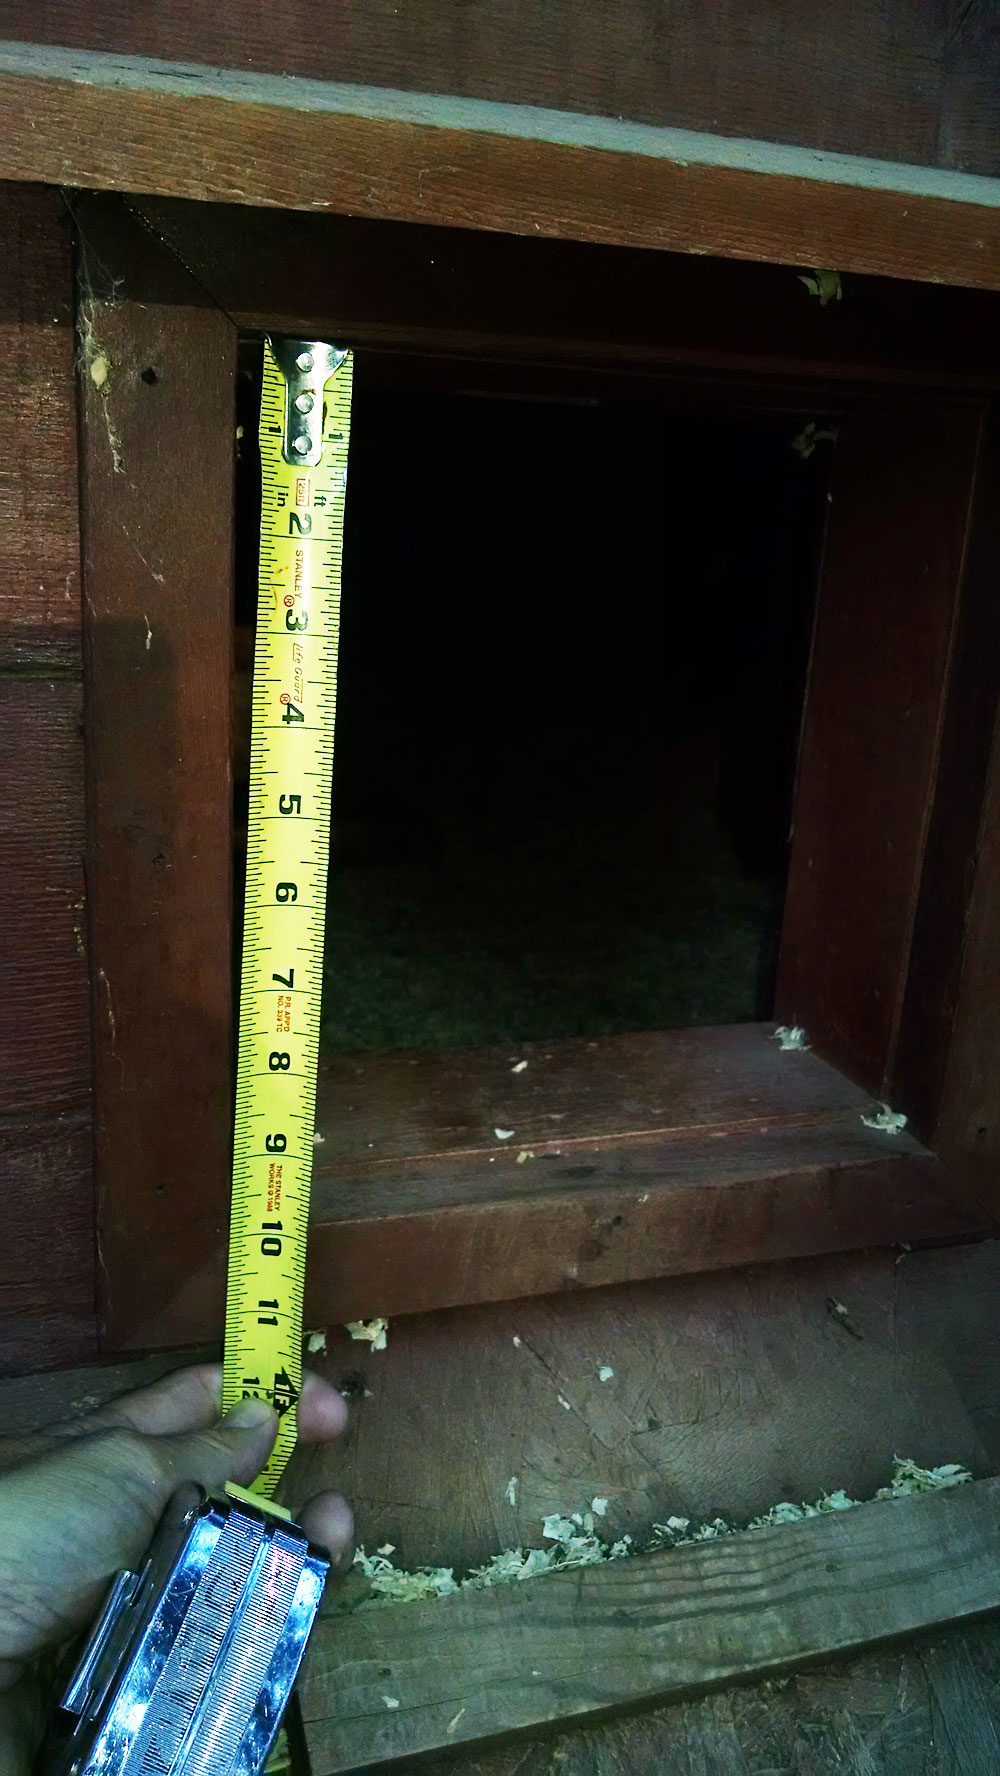
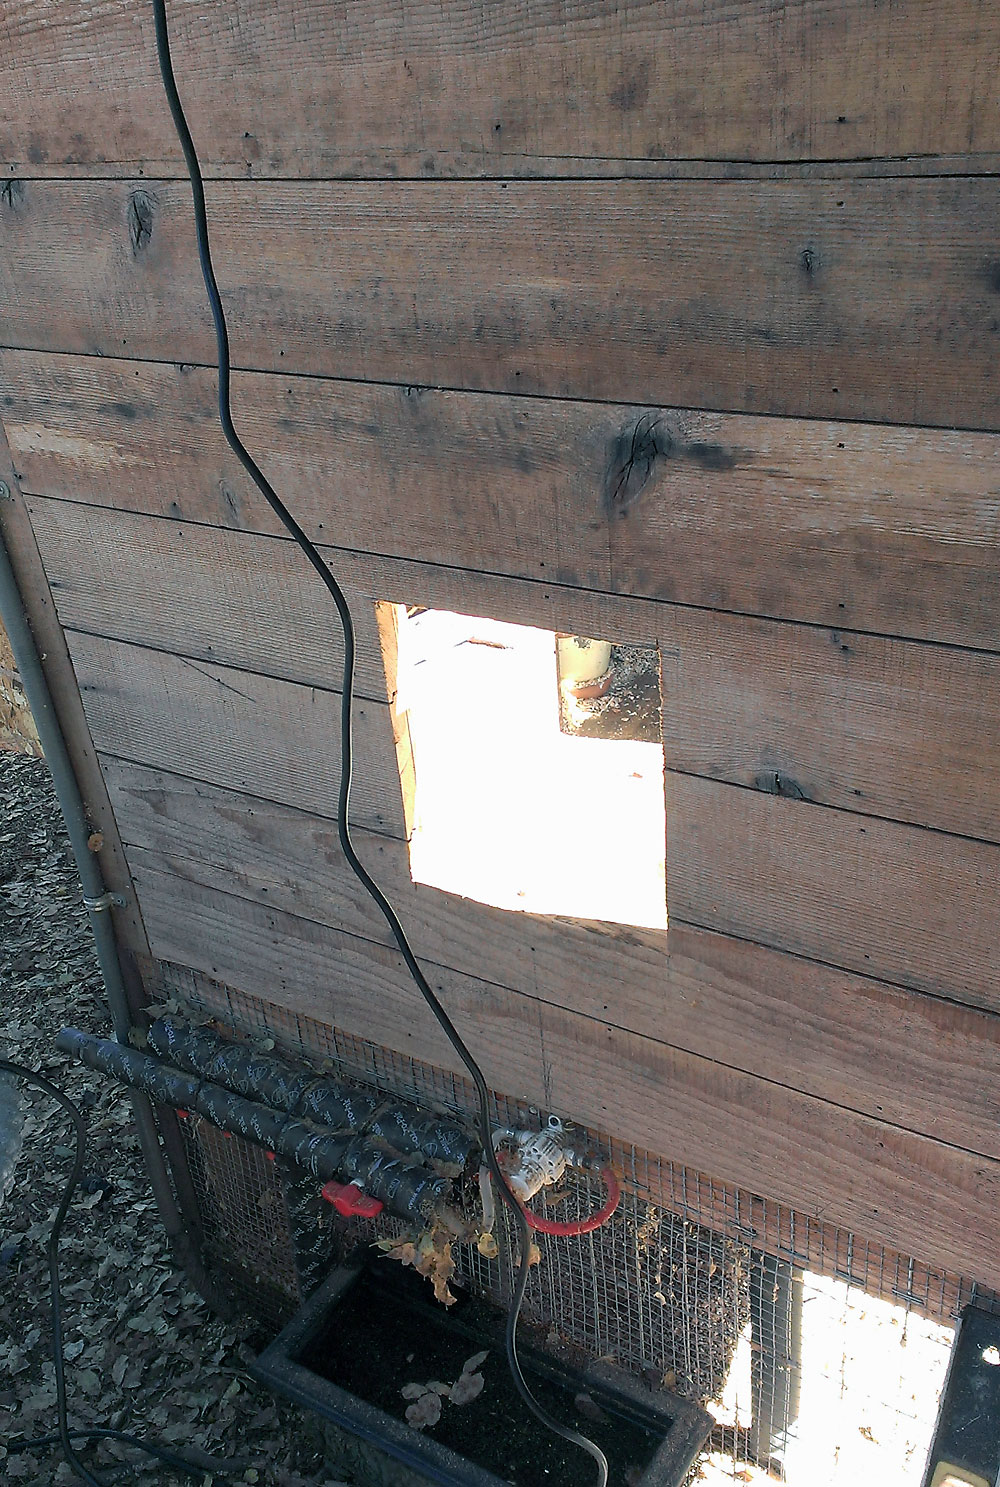
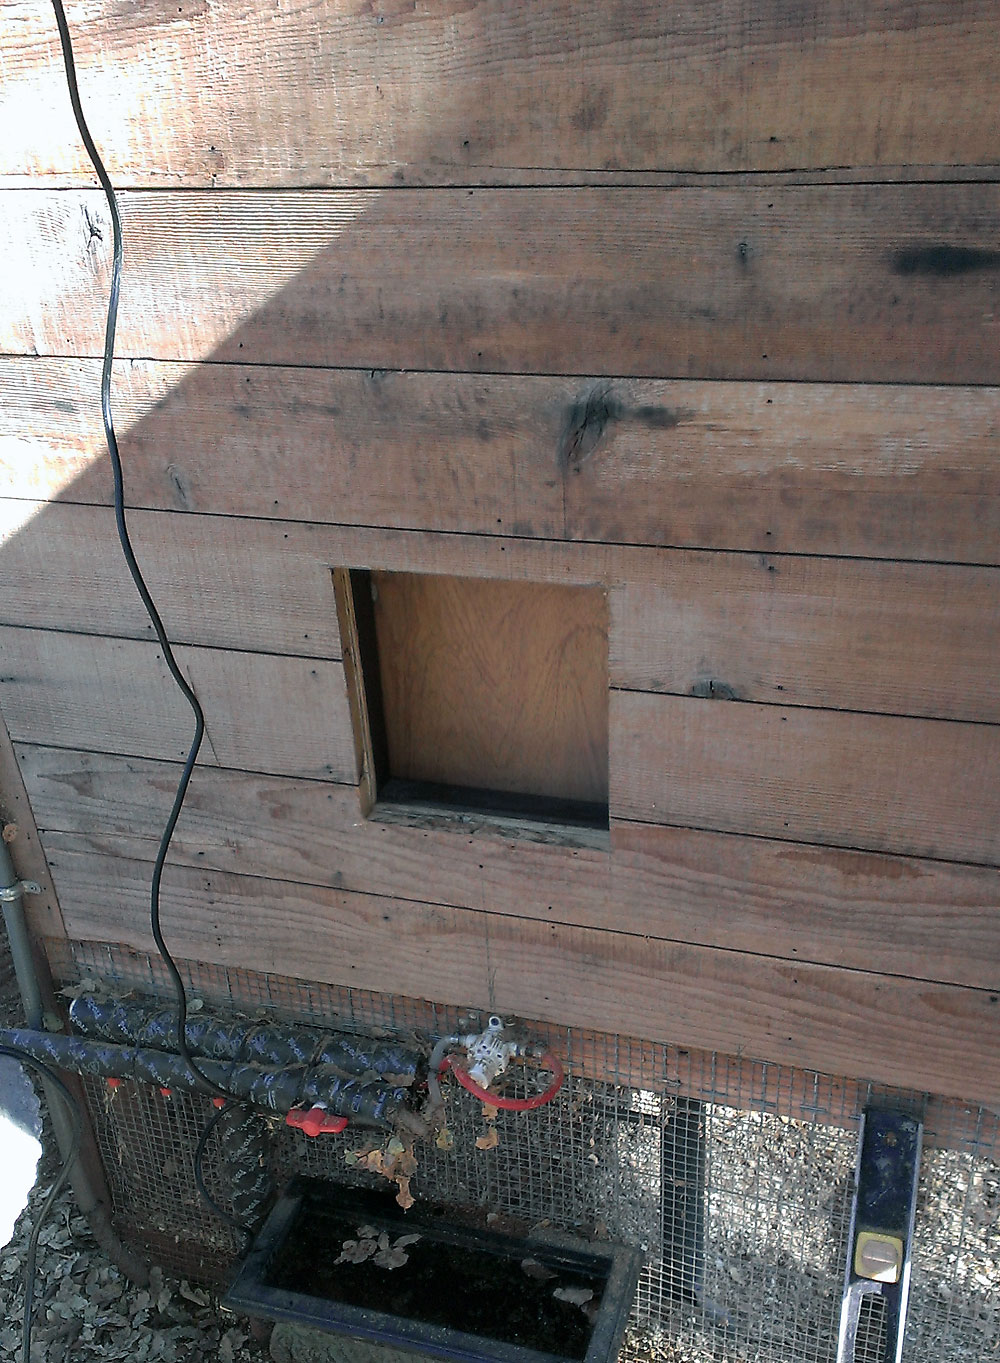
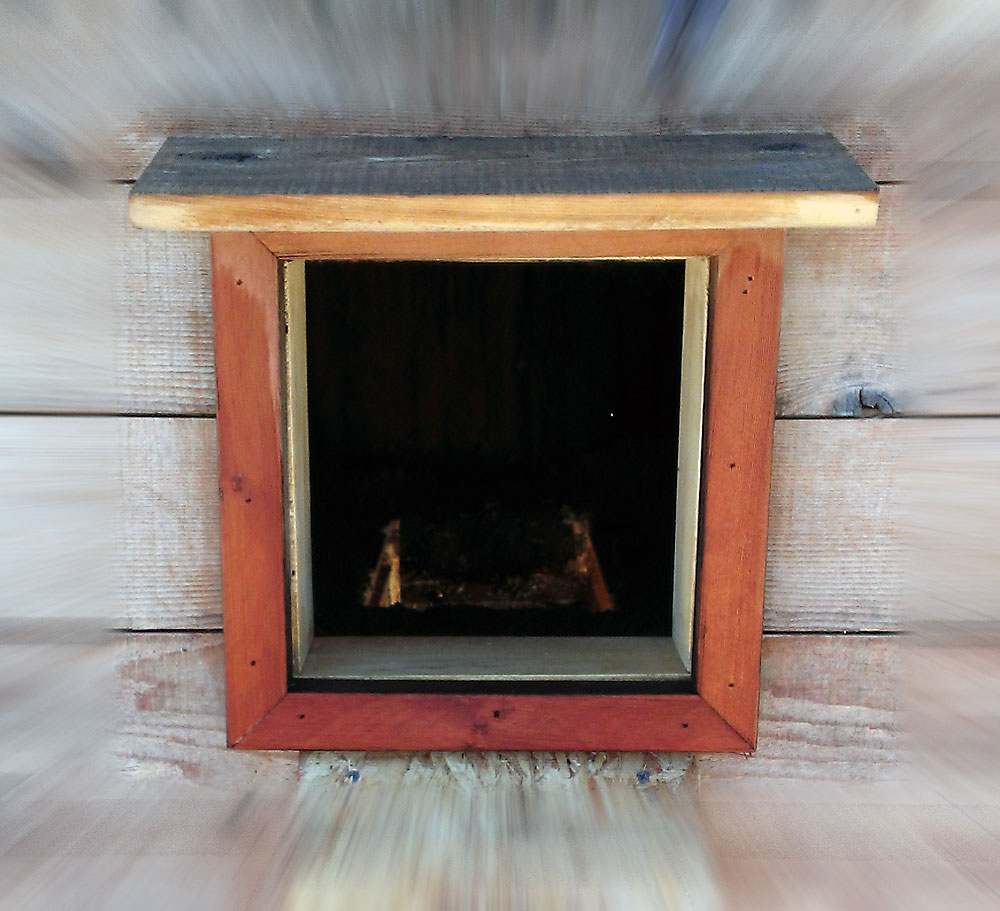
- Automatic Chicken Coop Door – exterior finished int dimensions: 10″ x 10″
-
- Automatic Chicken Coop Door – interior rough height: 31″

-
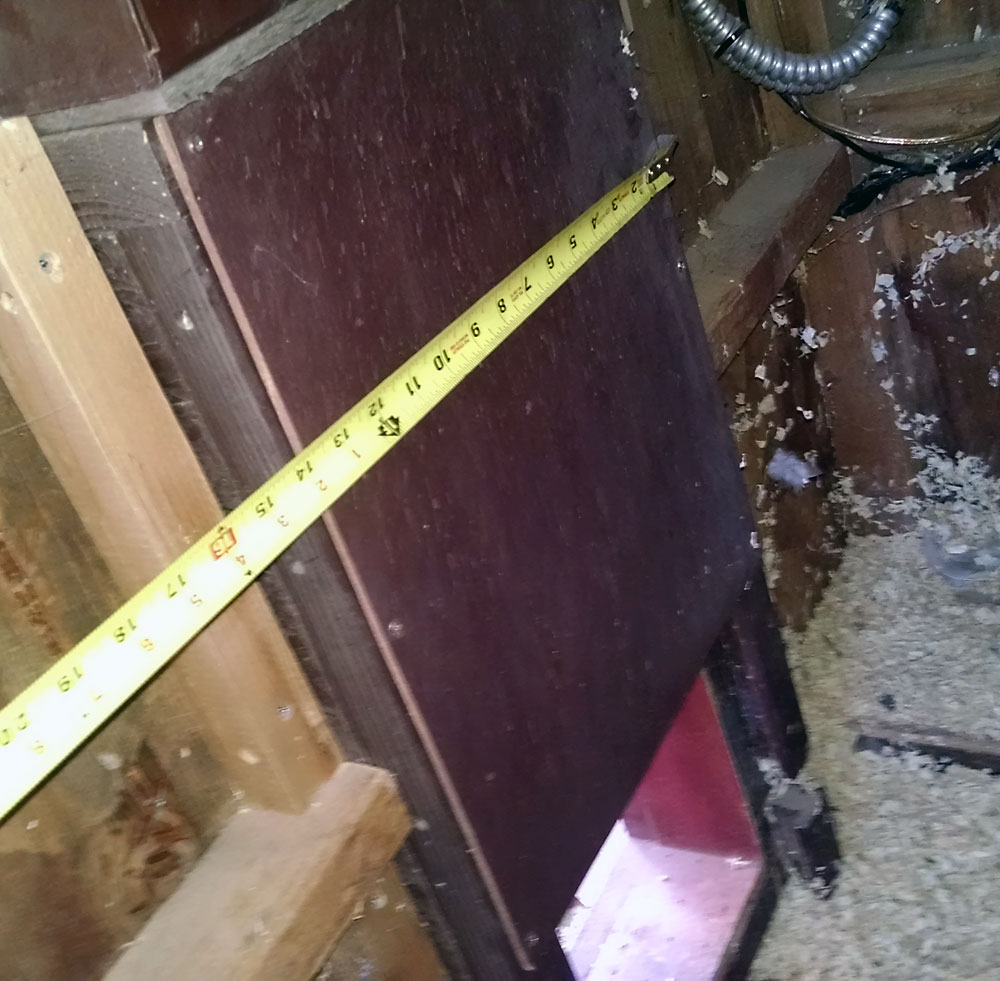
- Automatic Chicken Coop Door – interior rough width: 14″
Exterior Front Finished Entrance: 10″ X 10″ (made it a bit small, so chickens wouldn’t want to hang out in the doorway and prevent others from coming in or out)
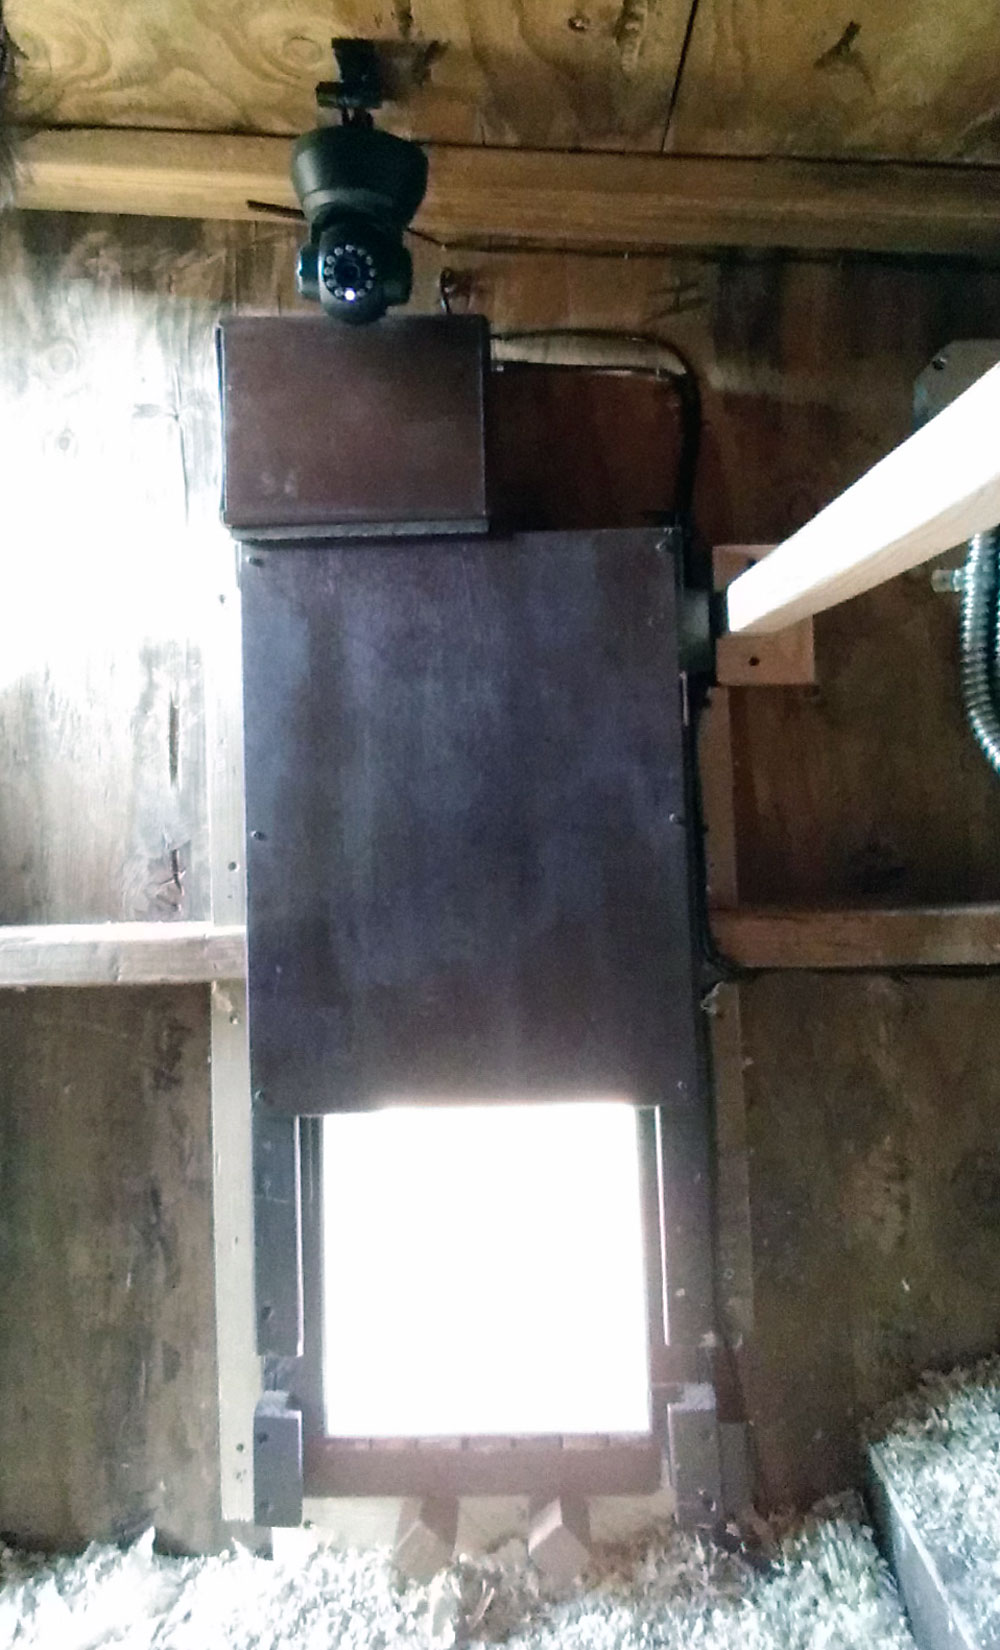
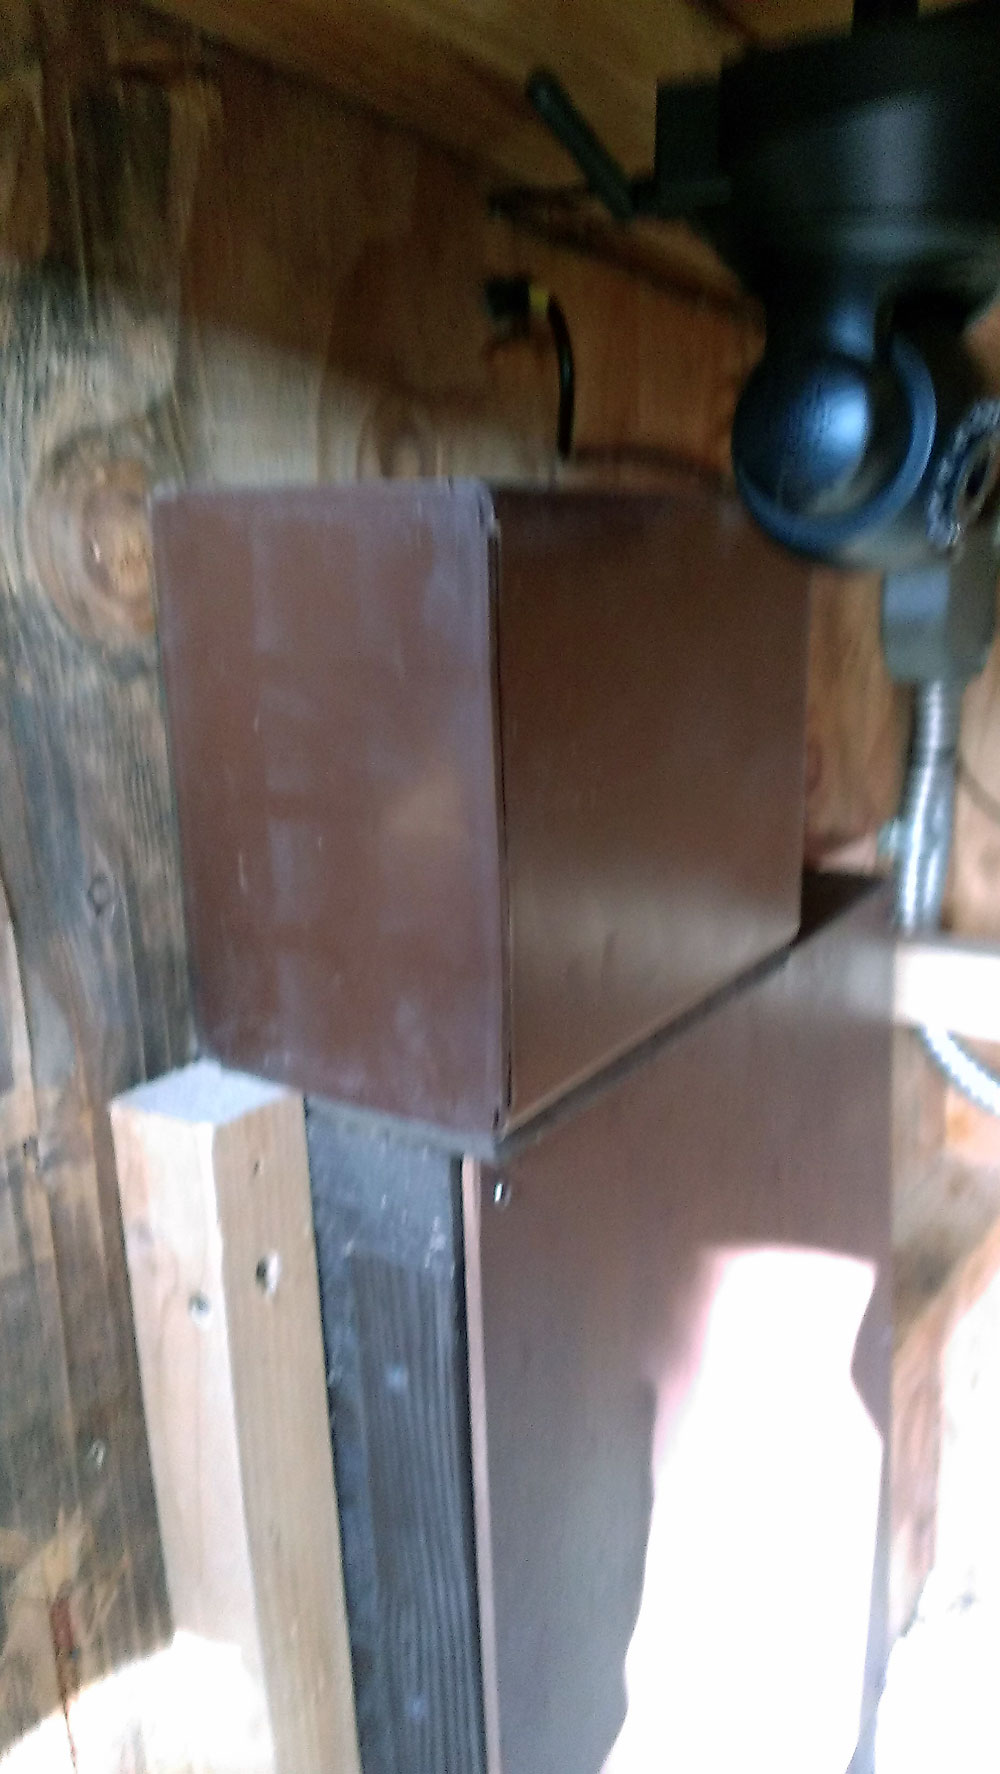
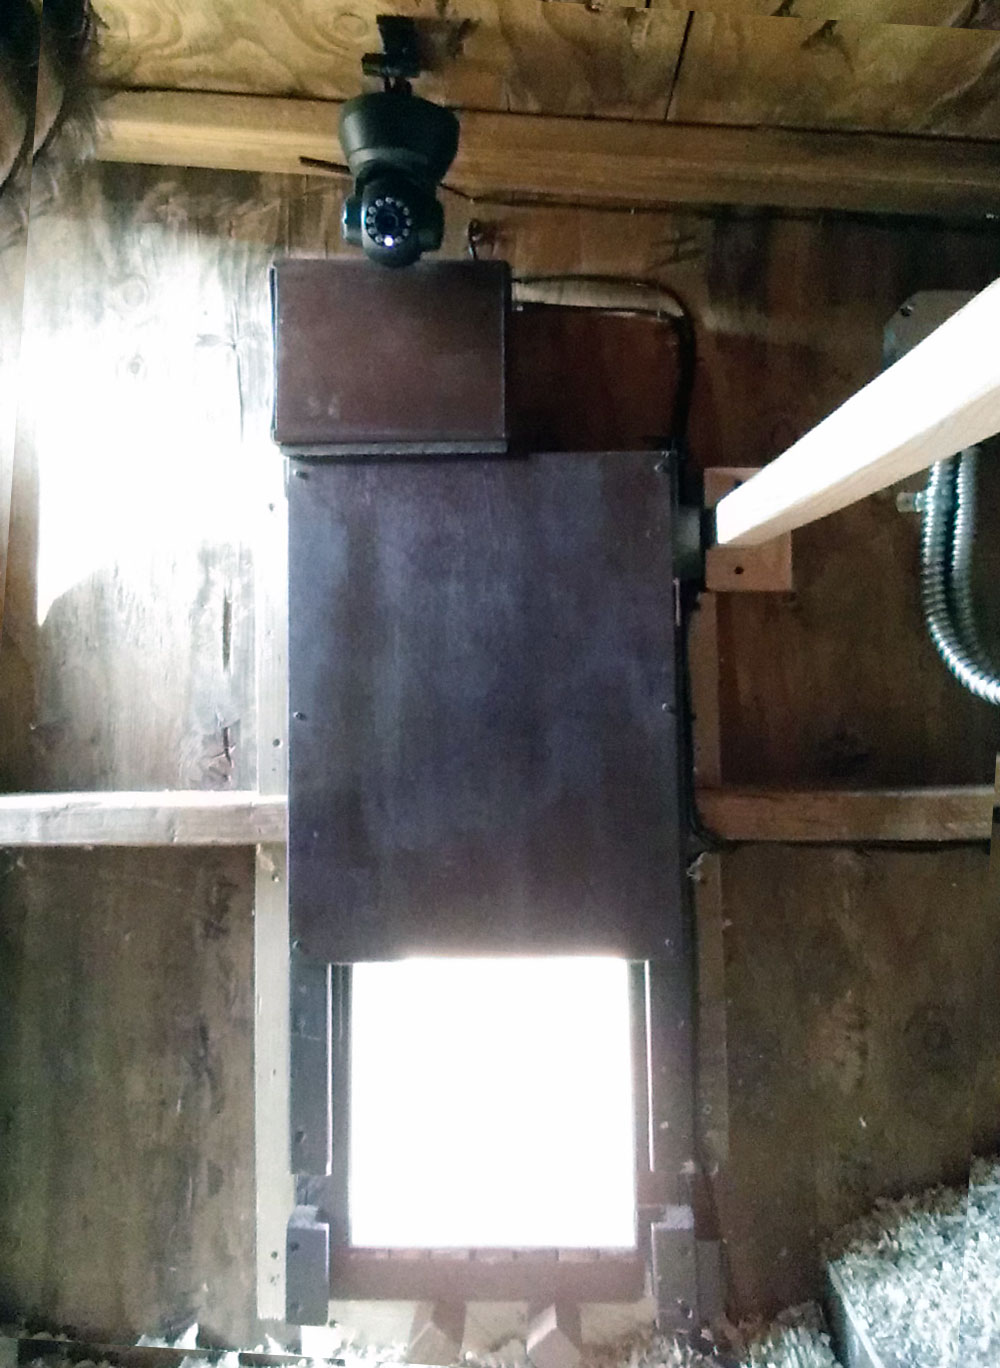
Interior Housing
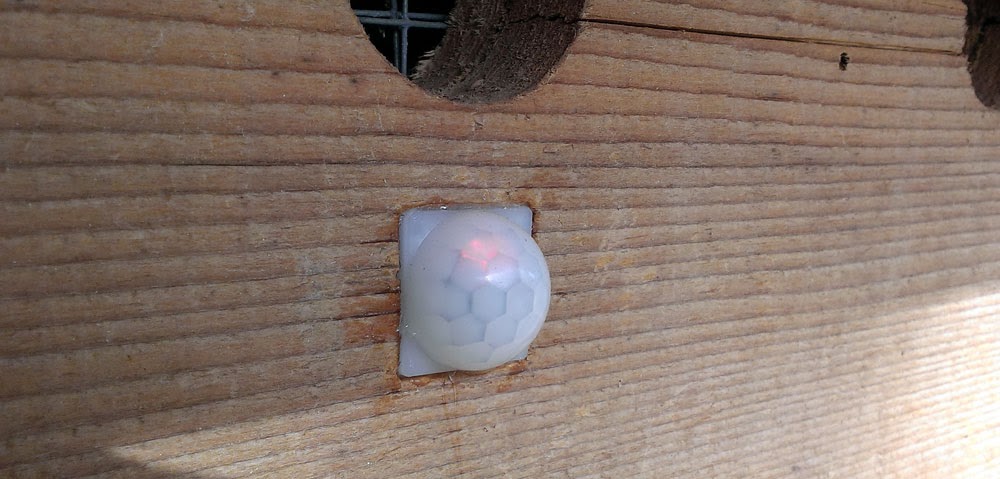
The Switches
At first I was going to use micro switches for this build, but after testing them I felt they would wear out over time, being mechanical-type switches. So instead I chose to use Reed Switches, which are essentially magnets that when you get close in proximity throw an electromagnetic field thereby becoming a switch with open or closed values. ( high/low | 0/1)
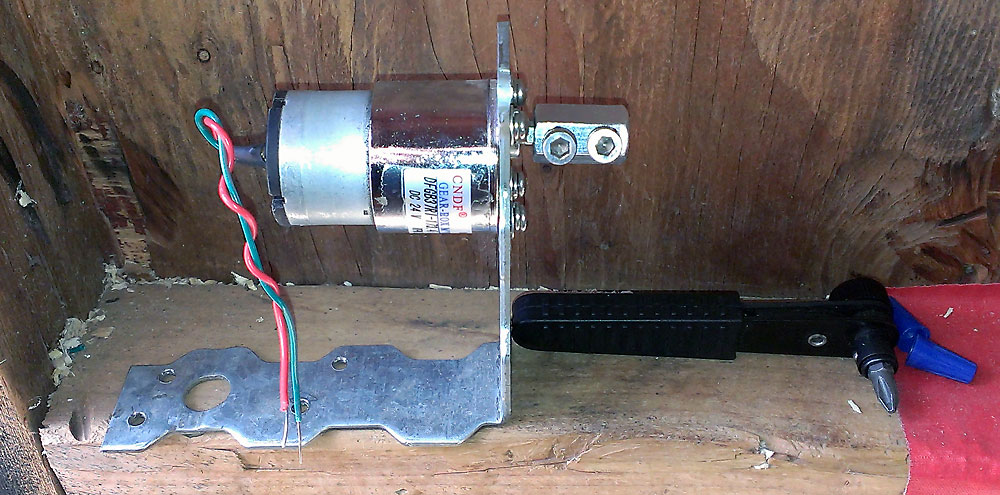
The Door Motor

I chose a 25 RPM model, but you can certainly buy a different speed (just not *too* fast) Here’s the motor I purchased (linked to saved search of similar motors at Amazon.com)
![]()
Here’s a saved search of a DC 24V 25 RPM 6mm Dia Shaft Magnetic Gearbox Electric Motor 37mm at Amazon![]() [Click thumbnails for detailed images]
[Click thumbnails for detailed images]

The Installation
[Click thumbnails for detailed images]


-
- Arduino chicken coop door
-
- Arduino chicken coop door
-
- Arduino Chicken Door: installed – interior

-
- Arduino Chicken Door: installed – interior
-
- Arduino Chicken Door: installed – motor housing
-
- Arduino Chicken Door: installed

-
- Arduino Chicken Door: installed

-
- Arduino Chicken Door: installed – sans cover
-
- Arduino Chicken Coop Door -installed interior
-
- Arduino Chicken Door: installed – interior

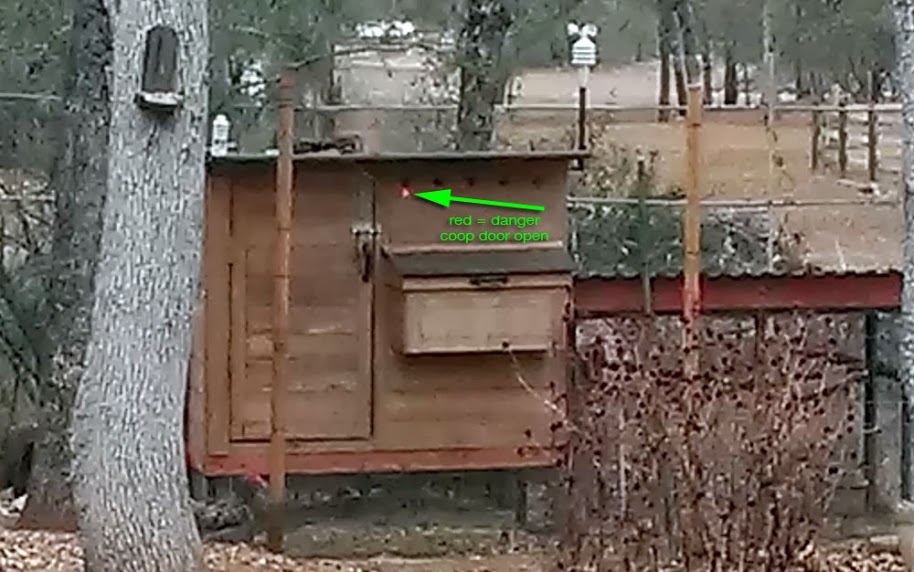
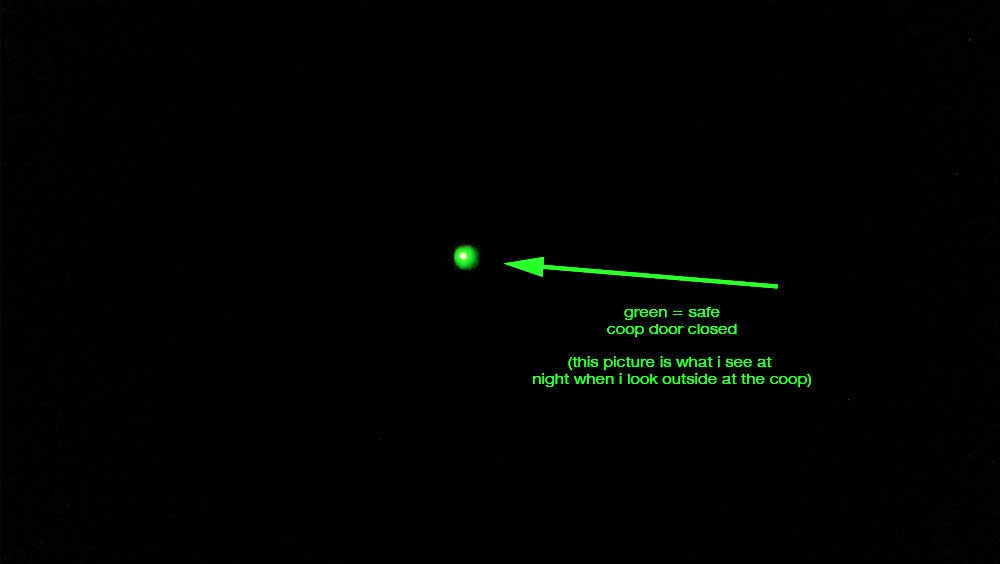
Coop Door Status LEDs
I created a visual aid for checking the status of the door from the house. (red for open, green for closed) It works like a charm. It’s triggered by the status of the top and bottom switch of the door.
-
- Chicken Coop Door Status LED Lights
-
- Chicken Coop Door Status LED Lights
-
- Chicken Coop Door Status LED Lights
-
- Chicken Coop Door Status LED Lights

Parts Used
(my affiliate links)
Arduino MEGA 2560 Board R3 – by Arduino
(The Arduino Micro Controller to control the entire coop, including the door)
NEOMART L298N Stepper Motor Driver Controller Board Module – by Tontec
(The board that controls the motor)
DFGB37RG-136i Cylinder Shape DC 24V Speed 20 RPM Geared Motor – by Amico
The motor it self (make sure to pick a motor that isn’t too fast.I chose the 20rpm model)
White Inbuilt Type Alarm Contacts Door Window Reed Switch – by Amico
(The Reed Switches (magnetic) which signals when to start/top the motor)
20pcs Photo Light Sensitive Resistor Photoresistor Optoresistor 5mm GM5539 5539 – by sunkee-E
(The Photocell that continually reads light levels.In this project, it’s instructed to read ever 10mins)
10k Ohm Resistors – 1/4 Watt – 5% – 10K (25 Pieces) – by E-Projects
(10k resistors for the photocell and the reed switches – refer to wiring diagram)
BB830 Solderless Plug-in BreadBoard, 830 tie-points, 4 power rails – by BusBoard Prototype Systems
(To connect all devices and wiring.Tip: apply hot glue to wired connections on breadboard once set)
Polycom SoundPoint IP Universal AC Power Supply 24V DC – by Polycom Inc.
(power supply for 24v motor)
Wall Adapter Power Supply – 9V DC 650mA – by NKC Electronics
(power supply for arduino)
Acrylic Sheet, Transparent Clear, 0.08″ Thickness, 12″ Width, 24″ Length – by Small Parts
(To cover door’s internal workings…prevents dust, shavings, feathers, etc.)
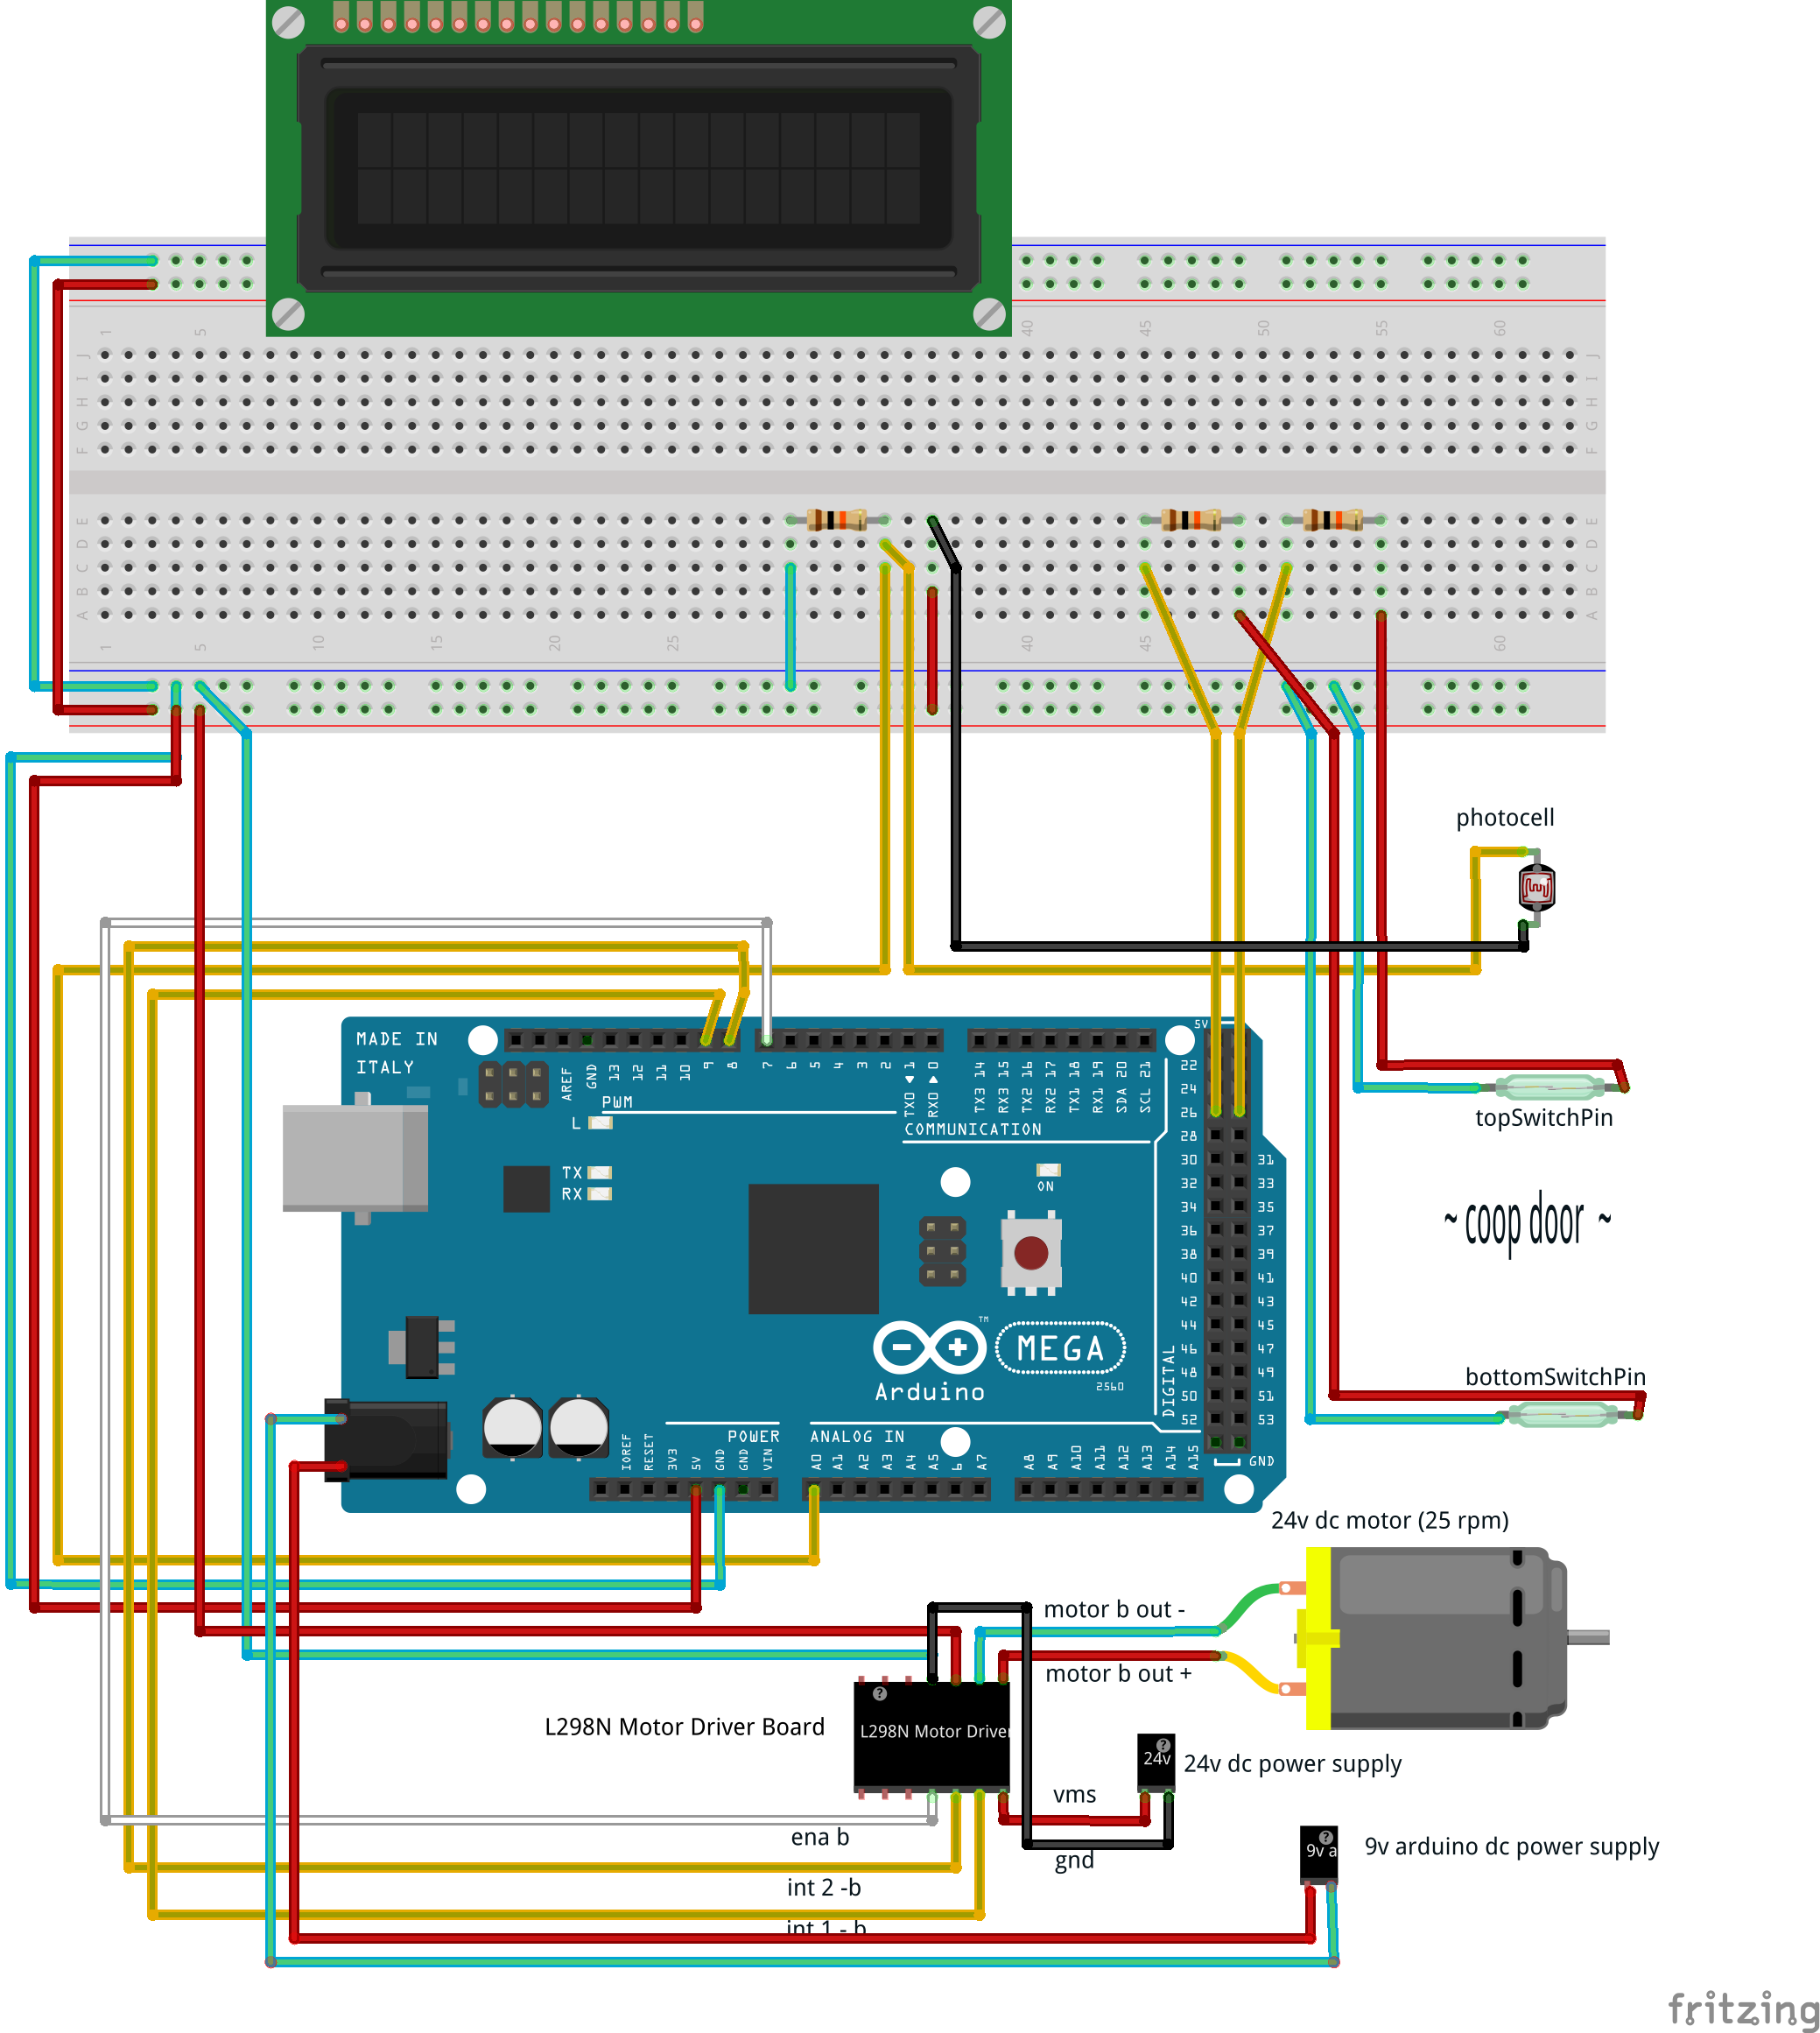
The Wiring Diagram for the Automatic Chicken Coop Door
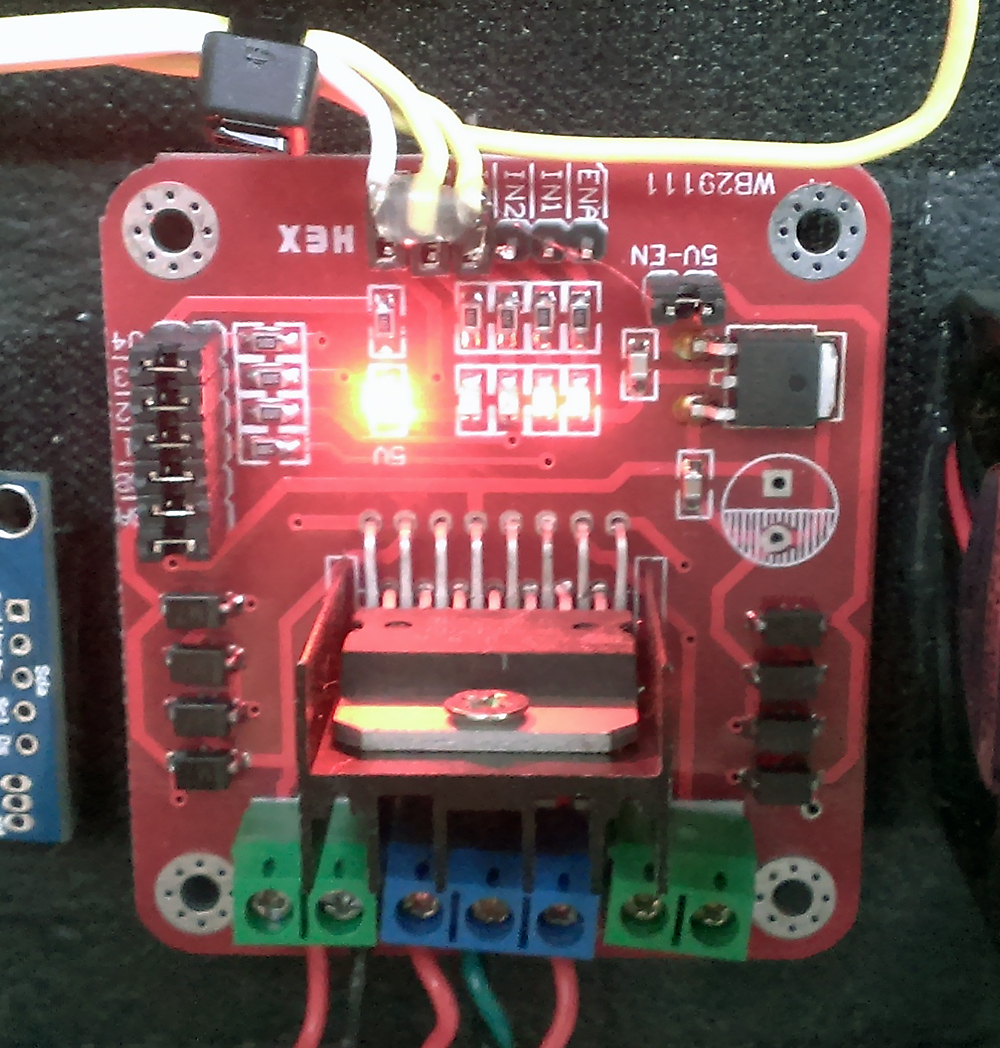
Close-up of the motor controller
More than a few people have asked for close-up photos of the motor controller (the Fritzing library didn’t have an image of the L298N Stepper Motor Controller)
Here’s the L298N Stepper Motor Controller itself:
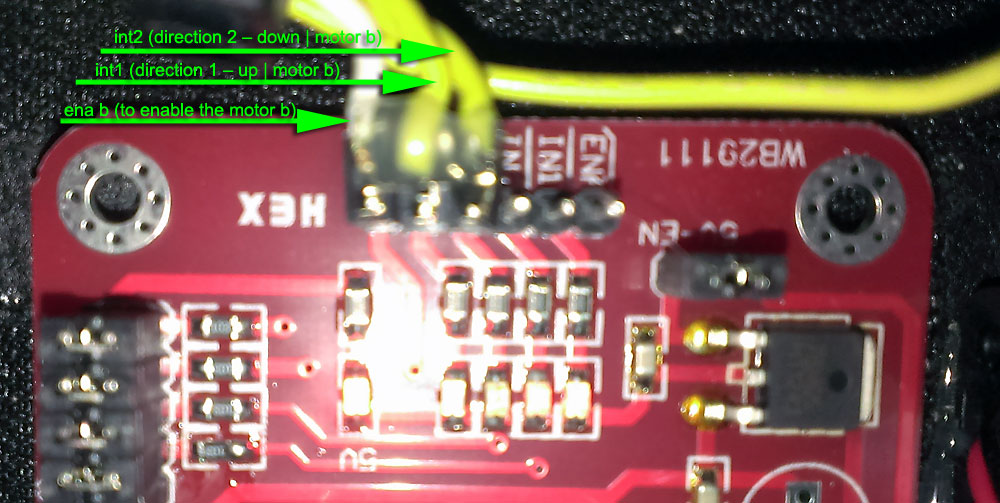
Here’s the top half of the connections (labelled)
Here’s the bottom half (labelled)

Note: the Stepper Motor Controller Board is indeed the l298n (the one in the pic might look different b/c I broke (fried) a couple of them while testing – but it’s definitely the same model… sometimes suppliers send the same product but with different layouts)
Notes on the wiring to make the board/motor work: (I used only 1 motor – Motor B)
- 5v (from arduino)
- gnd (from arduino)
- enab (to enable the motor b)
- int1 (direction 1 – up)
- int2 (direction2 – down)
- 24 v in to l298n board (vms *or* vcc in some controllers)
- 24v gnd in to l298n board (gnd)
- motor b out + (24 volts to motor)
- motor b out – (gnd)
Here’s a closeup of the Automatic Chicken Coop Door Fritzing diagram
The Arduino Code for the Automatic Chicken Coop Door
[callout font_size=”13px” style=”limegreen”]

Please note:
I’m hoping that if you use or modify my code or ideas, you will share *your* coop project with me and the world (pictures, whatever) I’m big on sharing.
Also, since I’m a firm believer in sharing, if you have questions or comments, please ask them through comments in this blog, (below) instead of trying to email or call me directly… you’ll find you’ll be waiting a verrrrrry long time for an answer. =)
Cheers,
//D
[/callout]
Insider info
To hopefully save you some time, I’ll let you in on the trick that FINALLY got this door to work with the light levels, debouncing the switches and *the chickens*. (as you’ll see in the code)
Check the light levels every 10 minutes to avoid the readings bouncing back and forth between dark/twilight/light during those dawn/dusk minutes. Then, when “dark” is reached (for me i chose >= 0 && <= 3 based on when my chickens actually went & stayed in the coop) enable motor dir down > debounce the switches > stop. Then do the opposite for morning. I’m sure there are different, maybe more efficient methods, but this code has been running flawlessly for a while now and I’m feeling confident enough to go out at night without worrying about predators. Although I still somehow find a reason to check the ChickenCam from time to time. (currently waiting for my new servo motors and night vision web cam to arrive in the mail)[callout font_size=”13px” style=”limegreen”]
Code updated 02/06/15
[/callout]
Click here for the clean .ino file (zipped up)
/*
* Copyright 2015, David Naves (https://daveworks.net, https://davenaves.com)
*
* This program is free software; you can redistribute it and/or
* modify it under the terms of the GNU General Public License
* as published by the Free Software Foundation; either version 3
* of the License, or (at your option) any later version.
*
* This program is distributed in the hope that it will be useful,
* but WITHOUT ANY WARRANTY; without even the implied warranty of
* MERCHANTABILITY or FITNESS FOR A PARTICULAR PURPOSE. See the
* GNU General Public License for more details.
*
* You should have received a copy of the GNU General Public License
* along with this program; if not,  write to the Free Software
* Foundation, Inc., 51 Franklin Street, Fifth Floor, Boston, MA
* 02110-1301, USA.

*/

 /*
* I'm hoping that if you use/modify this code, you will share your
* coop project with me and the world (pictures, whatever)
* I'm big on sharing.
* Cheers,
* //D
*/


// libraries


#include                          // load the onewire library for thermometer
#include                    // load the liquid crystal library


// print debug messages or not to serial
const boolean SerialDisplay = true;


// pins assignments

// temperature chip i/o
const int photocellPin = A0;                 // photocell connected to analog 0
const int enableCoopDoorMotorB = 7;          // enable motor b - pin 7
const int directionCloseCoopDoorMotorB = 8;  // direction close motor b - pin 8
const int directionOpenCoopDoorMotorB = 9;   // direction open motor b - pin 9
const int bottomSwitchPin = 26;              // bottom switch is connected to pin 26
const int topSwitchPin = 27;                 // top switch is connected to pin 27
const int coopDoorOpenLed = 40;              // led set to digital pin 40
const int coopDoorClosedLed = 41;            // led set to digital pin 41


// variables


// photocell
int photocellReading;                            // analog reading of the photocel
int photocellReadingLevel;                       // photocel reading levels (dark, twilight, light)

// reed switches top and bottom of coop door

// top switch

int topSwitchPinVal;                   // top switch var for reading the pin status
int topSwitchPinVal2;                  // top switch var for reading the pin delay/debounce status
int topSwitchState;                    // top switch var for to hold the switch state

// bottom switch

int bottomSwitchPinVal;                // bottom switch var for reading the pin status
int bottomSwitchPinVal2;               // bottom switch var for reading the pin delay/debounce status
int bottomSwitchState;                 // bottom switch var for to hold the switch state


// photocell reading delay
unsigned long lastPhotocellReadingTime = 0;
unsigned long photocellReadingDelay = 600000;   // 10 minutes

// debounce delay
unsigned long lastDebounceTime = 0;
unsigned long debounceDelay = 100;


// ************************************** the setup **************************************

void setup(void) {

  Serial.begin(9600); // initialize serial port hardware


  // welcome message
  if (SerialDisplay) {
    Serial.println(" Processes running:");
    Serial.println(" Timer doReadPhotoCell every 10 minutes - light levels: open or close door");
  }


  // coop door

  // coop door motor
  pinMode (enableCoopDoorMotorB, OUTPUT);           // enable motor pin = output
  pinMode (directionCloseCoopDoorMotorB, OUTPUT);   // motor close direction pin = output
  pinMode (directionOpenCoopDoorMotorB, OUTPUT);    // motor open direction pin = output

  // coop door leds
  pinMode (coopDoorOpenLed, OUTPUT);                // enable coopDoorOpenLed = output
  pinMode (coopDoorClosedLed, OUTPUT);              // enable coopDoorClosedLed = output
  digitalWrite(coopDoorClosedLed, LOW);

  // coop door switches
  // bottom switch
  pinMode(bottomSwitchPin, INPUT);                  // set bottom switch pin as input
  digitalWrite(bottomSwitchPin, HIGH);              // activate bottom switch resistor

  // top switch
  pinMode(topSwitchPin, INPUT);                     // set top switch pin as input
  digitalWrite(topSwitchPin, HIGH);                 // activate top switch resistor


}

// ************************************** functions **************************************


// operate the coop door

// photocel to read levels of exterior light

void doReadPhotoCell() { // function to be called repeatedly - per coopPhotoCellTimer set in setup

  photocellReading = analogRead(photocellPin);

  if ((unsigned long)(millis() - lastPhotocellReadingTime) >= photocellReadingDelay) {
    lastPhotocellReadingTime = millis();

    //  set photocel threshholds
    if (photocellReading >= 0 && photocellReading <= 3) { photocellReadingLevel = '1'; if (SerialDisplay) { Serial.println(" Photocel Reading Level:"); Serial.println(" - Dark"); } } else if (photocellReading >= 4 && photocellReading <= 120) { photocellReadingLevel = '2'; if (SerialDisplay) { Serial.println(" Photocel Reading Level:"); Serial.println(" - Twilight"); } } else if (photocellReading >= 125 ) {
      photocellReadingLevel = '3';
      if (SerialDisplay) {
        Serial.println(" Photocel Reading Level:");
        Serial.println(" - Light");
      }
    }
    if (SerialDisplay) {
      Serial.println(" Photocel Analog Reading = ");
      Serial.println(photocellReading);
    }
  }
}

//debounce bottom reed switch

void debounceBottomReedSwitch() {

  //debounce bottom reed switch
  bottomSwitchPinVal = digitalRead(bottomSwitchPin);       // read input value and store it in val

  if ((unsigned long)(millis() - lastDebounceTime) > debounceDelay) {    // delay 10ms for consistent readings

    bottomSwitchPinVal2 = digitalRead(bottomSwitchPin);    // read input value again to check or bounce

    if (bottomSwitchPinVal == bottomSwitchPinVal2) {       // make sure we have 2 consistant readings
      if (bottomSwitchPinVal != bottomSwitchState) {       // the switch state has changed!
        bottomSwitchState = bottomSwitchPinVal;
      }
      if (SerialDisplay) {
        Serial.print (" Bottom Switch Value: ");           // display "Bottom Switch Value:"
        Serial.println(digitalRead(bottomSwitchPin));      // display current value of bottom switch;
      }
    }
  }
}


// debounce top reed switch
void debounceTopReedSwitch() {

  topSwitchPinVal = digitalRead(topSwitchPin);             // read input value and store it in val

  if ((unsigned long)(millis() - lastDebounceTime) > debounceDelay) {     // delay 10ms for consistent readings

    topSwitchPinVal2 = digitalRead(topSwitchPin);          // read input value again to check or bounce

    if (topSwitchPinVal == topSwitchPinVal2) {             // make sure we have 2 consistant readings
      if (topSwitchPinVal != topSwitchState) {             // the button state has changed!
        topSwitchState = topSwitchPinVal;
      }
      if (SerialDisplay) {
        Serial.print (" Top Switch Value: ");              // display "Bottom Switch Value:"
        Serial.println(digitalRead(topSwitchPin));         // display current value of bottom switch;
      }
    }
  }
}


// stop the coop door motor
void stopCoopDoorMotorB() {
  digitalWrite (directionCloseCoopDoorMotorB, LOW);      // turn off motor close direction
  digitalWrite (directionOpenCoopDoorMotorB, LOW);       // turn on motor open direction
  analogWrite (enableCoopDoorMotorB, 0);                 // enable motor, 0 speed
}


// close the coop door motor (motor dir close = clockwise)
void closeCoopDoorMotorB() {
  digitalWrite (directionCloseCoopDoorMotorB, HIGH);     // turn on motor close direction
  digitalWrite (directionOpenCoopDoorMotorB, LOW);       // turn off motor open direction
  analogWrite (enableCoopDoorMotorB, 255);               // enable motor, full speed
  if (bottomSwitchPinVal == 0) {                         // if bottom reed switch circuit is closed
    stopCoopDoorMotorB();
    if (SerialDisplay) {
      Serial.println(" Coop Door Closed - no danger");
    }
  }
}


// open the coop door (motor dir open = counter-clockwise)
void openCoopDoorMotorB() {
  digitalWrite(directionCloseCoopDoorMotorB, LOW);       // turn off motor close direction
  digitalWrite(directionOpenCoopDoorMotorB, HIGH);       // turn on motor open direction
  analogWrite(enableCoopDoorMotorB, 255);                // enable motor, full speed
  if (topSwitchPinVal == 0) {                            // if top reed switch circuit is closed
    stopCoopDoorMotorB();
    if (SerialDisplay) {
      Serial.println(" Coop Door open - danger!");
    }
  }
}


// do the coop door
void doCoopDoor() {
  if (photocellReadingLevel  == '1') {              // if it's dark
    if (photocellReadingLevel != '2') {             // if it's not twilight
      if (photocellReadingLevel != '3') {           // if it's not light
        debounceTopReedSwitch();                    // read and debounce the switches
        debounceBottomReedSwitch();
        closeCoopDoorMotorB();                      // close the door
      }
    }
  }
  if (photocellReadingLevel  == '3') {              // if it's light
    if (photocellReadingLevel != '2') {             // if it's not twilight
      if (photocellReadingLevel != '1') {           // if it's not dark
        debounceTopReedSwitch();                    // read and debounce the switches
        debounceBottomReedSwitch();
        openCoopDoorMotorB();                       // Open the door
      }
    }
  }
}


// ************************************** the loop **************************************

void loop() {

  doReadPhotoCell();
  doCoopDoor();

}
Click here for the clean .ino file (zipped up)
Lessons Learned
What I’ve learned about the door, Arduino, light and construction:
- Best to check the light levels every 10 minutes to avoid the readings bouncing back and forth between dark/twilight/light during those dawn/dusk minutes
- Test your door with your chickens to see if any of them like to hang outside after hours
- Testing the actual light values outside is very important (many variables involved: light from neighbor’s house, clouds, internal/external coop lights etc.)
- Debouncing of your switches within your Arduino code is important (door will jump around and fail as electronic readings vary greatly by the millisecond)
- Reach out for help on the Arduino Forums before pulling out your hair. (be nice, do your homework and ask very specific questions)
- I changed from micro-switches to reed switches (magnets) because I didn’t want the mechanics of the micro-switches to fail over time AND because chickens are very messy, kicking up shavings and sawdust, which might get caught in the mechanic, thereby preventing electrical contact.
What I’ve learned about the chickens:
- Keeping on a light within the coop can keep chickens outside longer (I think b/c the ambient light shines outside) And that’s important when it comes to automating this door, so they won’t get accidentally locked out.
- They can jump and fly (high and far)
- They love to roost in safety at night, but want nothing more than to get OUT as soon as it’s light out
Hi Dave, Love your work and I actually built the Coop door using your design and code a few years back here in the UK. However I now have an issue with it that I can’t sort and I have lost my wiring diagrams. I have LEDs and LCD display and I am pretty sure I got the wiring design from your site but I cannot find the drawing with LCD detail included anywhere on the website? Am I going mad? I would really appreciate if you could point me to it as I have a few weekends away planned and want my girls to be safe. Thanks in advance.
Dan (Cambridge, UK)
Hi Dan,
I know it’s a late reply, but I don’t think I ever had a pic of the LCD… just notated it within the code:
/ lcd
LiquidCrystal lcd(38, 37, 36, 32, 33, 34, 35); // lcd pin assignments
int backLight = 13; // pin 13 controls backlight
/*
LCD Pin > arduino Pin
lcd pin 1 VSS > gnd arduino pin
lcd pin 2 VDD > +5v arduino pin
lcd pin 3 VO(contrast) > 330 ohm resistor to gnd arduino pin
lcd pin 4 RS arduino pin 38
lcd pin 5 R/W arduino pin 37
lcd pin 6 Enable arduino pin 36
lcd pin 7 –
lcd pin 8 –
lcd pin 9 –
lcd pin 10 –
lcd pin 11 (Data 4) > arduino pin 32
lcd pin 12 (Data 5) > arduino pin 33
lcd pin 13 (Data 6) > arduino pin 34
lcd pin 14 (Data 7) > arduino pin 35
lcd pin 15 Backlight + > arduino pin 13 (built-in resistor)
lcd pin 16 Backlight > arduino gnd pin
*/
On this page:
https://davenaves.com/blog/interests-projects/chickens/arduino-chicken-coop-controller/
Cheers!
Hi Dave,
I am experiencing an issue with your Code. This is my first ‘real’ Arduino Project, for some practicing i did a few small Beginner Project’s so i know a little bit.
I downloaded your Ino File, my problem is when I try to load your Code onto my Arduino it always says ‘no matching function for call to ‘SimpleTimer::setInterval(long int, void (&)())’ and I don’t know what the problem is since this is a pretty complicated Code to me.
Can you help me out ?
Best regards from Germany
Hi Tim,
In short, SimpleTimer is a library that must be loaded so the code can reference it. You’ve probably already figured that out, but it’s best to start with smaller projects and read read read… I did. took me a long time. =)
Hi Dave! I’m building your chicken door and have some questions. I am mostly confused about the wire from the photo cell and how it connects to the arduino and power supply. I got a computer interface cable to solder the photo cell to, but did you just cut the end off (that you soldered to)? Also, what does the other end of that cable connect to? I see that you have it going through the box in to the motor area but in the picture it’s just the loose wires so I’m confused how the 24v power supply ties in? Thanks so much! Such a cool project!
Hi Clair,
As I mention in the article, I soldered the photocell to my cable, (applied heat shrink tubing and encased the connection within a 1/4 inch plastic audio connector case) I filled the casing with silicone and capped the very tip with clear plexiglass to project the photocell from the elements. then I simply drilled a hole above the coop door monitor, and finished the outside with a brass grommet.
(https://davenaves.com/blog/interests-projects/chickens/chicken-coop/arduino-chicken-door/#iLightbox%5Bgallery-1%5D/3)
The other end was soldered to the midi connectors that plugged to the side of the project box, which housed the Arduino and entire wiring harness. Make sense?
The 24v was specifically for the door motor, plugged into the motor controller. (see extreme close-ups on https://davenaves.com/blog/interests-projects/chickens/chicken-coop/arduino-chicken-door/) The 12v supply was for the Arduino. (it’s a black barrel plug at the bottom of the Arduino) There are no loose wires (https://davenaves.com/blog/interests-projects/chickens/arduino-chicken-coop-controller/) Or maybe you’re looking at another photo I’m not remembering?
Cheers!
Hey Dave:
Nice website and great design. I modified your hardware and software design to build a very similar door. I added a IR remote control receiver so I could use the control to open & close the door when building the door. With the help of a friend who is an electrical engineer, I used moved the debounce function from the software to the hardware by inserting a capacitor into the circuit. The photocell I used was a bit different and It took a bit of tweaking with the light values, but all seems to be working like a charm.
Thanks for a great design.
Tony B
Thank you, Sir!
Hey Tony B. would you mind to share your design? That may help the community here. thanks in advance.
Hey Dave:
Thanks for a great HW & SW design! I copied and modified both for my new chicken coop. With the help of a friend who is an Electrical Engineer, I changed the debounce switch from software to hardware by adding a capacitor. It simplified the code a bit. I also added an IR remote receiver and code to open and close the door with a remote control. This helped immensely when I was testing the door hardware and debugging the code.
Thanks again for sharing,
Tony B
What kind of connectors are you using on the enclosure to connect to the sensors outside the arduino/breadboards area?
Embarrassed to say: velcro. =)
Next version will be properly mounted via posts/circuit board. I was so new to this and was racing, that I didn’t know that threaded posts existed.
Cheers!
Hi Dave,
thank you for the guide, it worked for me really nicely, including light levels.
I made only 2 modifications:
1) I am running on 12 V so I could use L298N as power supply for Arduino
2) I wanted to have manual control when needed so I added 2 momentary push buttons which will bypass the photocell reading and leave door open/closed for 10 minutes. I just added this to void loop:
void loop() {
delay(500);
doReadPhotoCell();
doCoopDoor();
if (digitalRead(openButtonPin) == 0) {
lastPhotocellReadingTime = millis(); //artificially setting last photocell reading time so the door will remain opened for 10 minutes (as long as photocell reading time threshold is set)
photocellReadingLevel = ‘3’; //same as above but with light reading level so the door will remain opened
}
if (digitalRead(closeButtonPin) == 0) {
lastPhotocellReadingTime = millis(); //artificially setting last photocell reading time to ensure door will be closed for 10 minutes (as long as photocell reading time threshold is set)
photocellReadingLevel = ‘1’; //same as above but with light reading level so the door will remain closed
}
}
Hello David,
thank you very much for your documentation. It was very helpful for me and inspired me to make a new chicken coop with automatic door.
The code worked flawlessly. I will probably add some “manual override” with button to leave door open for next 10 minutes. Our chickens usually stay out after sunset during summer and such feature is needed for me. However the build will start in 2-3 months from now, because it is still winter. I just wanted to have everything prepared.
Awesome… thanks for writing in. (love the extra 10 minute idea)
Cheers!
Its a really nice website. Thanks for giving full information about Automatic Doors.
Thanks for the kind words! =)
Thank you for this nice project
like it and building it
http://84.106.2.21:8888/forum/index.php?action=view&id=255
Awesome…thanks for writing in!
Cheers,
//D
Have a bit of a safety isseu with your code
maybe good to inform other people
if a switch is not seen or something is preventing the bottom switch from being seen
the motor will not stop
there is no time limmit on the motor
so things can go wrong
http://84.106.2.21:8888/forum/index.php?action=view&id=255
I really appreciate this, Lubert.
This has actually been a problem in the past. When I have some time, I’ll update the code (and give you full credit) =)
Cheers,
//D
Thanks for sharing your design!
re bottom switch.
I’m planning a build following your outline to replace my commercial door opener (deceased for the 2nd or 3rd time in five years). One thing my current door opener has is a reed switch on a spring that measures the tension on the door string. When the weight of the door is removed, i.e. it’s landed at the bottom or onto some chicken dirt it, it triggers the reed switch which stops the door closing. This will prevent the motor continuously unwinding the pulley and eventually everything getting tangled if the bottom door reed isn’t activated. Looking at the structure of my current model this seems to be a feature for both the top and bottom of the door span.
Here’s a dropbox link showing a picture of my current opener:
You can see the two string tension sensors at the bottom and to the middle-right. The lower sensor works on a bead tied to the string. When it reaches the plastic hinge it pulls up activating the lower reed switch. Stopping the door winding up too far. The other works on string tension for when the door is lowered.
Best wishes, George
Awesome. Thanks for the addition and great idea!
//D
Does somebody got the chance to work the code to have a timeout on the motor ?
Thank you very much !
Hi Dave.
Nice project for your door !!!
I share with you my door project automatic connect (IOT) chicken coop. Make with nodemcu (esp8266) and heavy duty car seat motor, in Quebec Canada its really cold winter.
the Android app(Remote Control) is make with appinventor..
https://qsl.net/ve2cuz/chickencoop
arduino available code as well as the schematic.
Real… absolutely awesome! Love the OK Google interaction!
Thanks for sharing.
//D
Not sure why you’d be having issues. The link is:
https://davenaves.com/blog/interests-projects/chickens/chicken-coop/arduino-chicken-door/
Cheers!
Dave,
I am sorry to bother you. I am new to Arduino and seem out of my depths. When I use your code it gets in a loop. When I comment out doCoopDoor(); the loop stops. But I cannot figure out how the light sensor is causing this loop. My LCD is just streaming all the comment feed nonstop.
Thanks for your help.
Hi David,
It’s really hard to see what you’re looking at. If I were you, I’d post my code and exact question out on the Arduino forums (https://forum.arduino.cc/: the experts out there can be very helpful if you do your homework and ask very specific questions with as much code and context as possible)
It’s what I did when I really needed help. =)
Cheers!
Hey Dave,
Corey here from Eastern Idaho. I’m gearing up to build an automated coop door system similar to the one you’ve created for an insulated walk in coop that I’m currently in the process of building.
First off I want to say thanks for sharing all of the information you’ve presented; it has clearly helped a number of people. It is nice to see that 3 years in (judging by the date on your posted code) your system is still functioning and you’re still keeping the blog posting active.
I have a number of questions for you regarding how well your system mechanical components have held up over time?
1.) Any issues with wood swelling/chicken debris causing jamming of the door?
2.) How has the motor that you selected held up over time? If you were to build another project like this, would you select a bigger motor set?
3) Does the arduino system automatically recover from temporary power outages? (Is there any need for manual reset?)
From the photos, it looks like you opted to not solder your leads, and instead used hot glue to mechanically fasten them.
4) Any issues with corrosion at the wire/board interfaces causing electrical issues? (Would be highly dependent on climate)
I thought the solutions you came up with for preventing hens from sitting in the doorway were interesting. You mentioned that you kept the door
Opening short so they would be less inclined to linger there. Have you found that to be effective? (From online research I find some individuals suggesting making the door wide enough to fit two chickens, in case one chooses to park in the doorway).
5) Any issues with this since you installed your starry nightlights? (This solution is uniquely awesome).
6) What did you construct your spool pulley from? Any issues with it working loose from the motor shaft since it has been put into service?
I’ll plan on sharing my coop build on instructables once it’s finished (structure is 85% finished). Thanks again for the great build tutorial!
-Corey
Howdy,
Thanks for the kind words…
Answers in order:
1) No swelling… I sealed the door with stain and clear coat. Debris: Yes, it’s important to check it once in a while. (great question)
2) Motor has lasted no problem. (it just doesn’t work that much)
3) Yeah, definitely resets on it’s own. (added bonus) =)
4) No corrosion… BUT, early on, I added hot glue to the bread board on the connections to keep in place and on the other connections, I added electrical anti-oxidant.
5) Nope… they’re still working just fine. (yeah, I love them too) =)
6) I’ve rebuilt it a couple of times, but the last one is actually a wire spool. I use a tough small rope and drilled through the spool with a knot.
Thanks for the kind words and questions.
Looking forward to seeing your coop!
Great write-up and exactly what I am looking for. Do you think it would be possible to run 6 motors in series from one controller? I have six coops, side by side. with a distance of 2 meters (2 yards-ish) between the doors. I would love to use one Arduino to run all six doors. I doubt I could use the visual check red and green lights, but otherwise, it would sure save some funds from setting up six individual units. What do you think?
Shouldn’t be a prob.. I think you have enough ports on your Arduino.
Hallo David
Auf dem Gebiet bin ich Neuling. Finde deine Hühner Tür klasse.
Fritzing-Diagramm habe ich schon aufgebaut, komme mit dem Anschluß vom LCD und RCT nicht zurande.
Da ich mein Schwerkranken Vater helfen will.
Kann mir nicht mal jemand der kompletten Verdrahtungsplan
von Arduino Chicken Coop Controller zusenden.
Bitte! (klaus.heinicke@t-online.de)
Maßschneiderei Ramona Heinicke
Hallo…
Tut mir leid, von deinem Vater zu hören. = (
Sobald ich Zeit habe, das gesamte Fritzing-Diagramm zu erstellen, werde ich es posten.
Das dauert nur eine Menge Zeit (und ich bin ziemlich beschäftigt)
Prost und viel Glück, Ihr Vater.
=)
// D
Dave- You are running a great site here! Thanks for the inspiration and sharing of info. I plan to get my info over to you once I get some more basic things done. One question I have, as I’m fairly new to breadboards, do you have any issues with the leads falling out of the breadboard? I saw a site that said over time wires can come loose on a breadboard and that it was best to solder them onto perf boards as a final product. I plan to implement breadboards in a fashion similar to the method you have in your pictures. Let me know your thoughts.
Thanks again!
Cheers.
Great question…
Yes, they fall out, which is why I used hot glue to keep them in (you can see this if you zoom into the pics) =)
Yeah, on my next coop I’m going to permanently solder the entire thing on perf board.
Cheers!
Hi Dave,
thanks for sharing this great project!
I successfully got this project run on an arduino uno and i’m going to adapt the code regarding manual open/close via buttons as well as a second time based operating mode by including a realtime clock.
Nevertheless, i’m wondering why are the following section is necessary:
if (photocellReadingLevel == ‘1’) { // if it’s dark
if (photocellReadingLevel != ‘2’) { // if it’s not twilight
if (photocellReadingLevel != ‘3’) { // if it’s not light
Since photocellReadingLevel (also changed that to a enum DARK, TWILIGHT, LIGHT in my code) can just hold one value at a time it should be sufficient to only have this:
if (photocellReadingLevel == ‘1’) { // if it’s dark
or am i wrong?
Thanks!
Chris
Great question…
In short, during twilight, the readings bounce around all over the place (the sun obviously doesn’t recognize miliseconds with it’s light output) =) So doing this weeds out the inconsistent readings and prevents the motor from jumping up and down)
Make sense?
Can i ask . I am beginer and I make door with solar power with your code. but I would like to have another switch to make shure if anything is blocking door to close… because if it does it will continue to wind up cord and open door full up, and it will not stop so i will have problem. so can you help me to add switch like the other switches , reed , so if door goes up to much it will stop door and let say turn red led . Please can you help me to add that in code .
Thanx . sory about writing i am from CROATIA . thanx for your work. I am a beginer and have made door and everything with your lesson.. but i have used your code in diferent site , the one with Simpletimer.
Howdy,
Great idea! But I’m just too busy right now to write any code. (this is why I wrote in the led light code… to give me a visual cue if something was wrong)
Good luck!
Thanks for the wealth of information here Dave, and your efforts to reply to everyone’s questions. I am hoping you can help a new programmer tweak this project a bit.
I am planning to use a 12v linear actuator (with automatic shutoffs so no need for limit switches) to raise and lower the door.
My questions:
1. How could I add manual up/down buttons that override the system temporarily? (Someone asked this earlier in the comment section, but sadly the information was not shared.
2. Do I need to run an LCD display, or can I delete that portion of the code?
Thanks for offering such a welcoming environment to a newbie chicken lover!
Howdy!
Thanks for the kind words…
I’m sorry, I just don’t have the time right now to figure that out (but I love the idea) I’ll try to think about this when I have time (life is just getting int the way right now) =)
And no… you don’t need the LCD.
Cheers!
I love this project. I built a chicken coop on an old pop up camper frame that we plan to move around the pasture periodically. Since we don’t have electricity in the pasture I have rigged up a solar panel to run the door motor. The door works great except for one thing. I set the bottom switch to turn off the motor when the door hits the bottom board, but it shuts off before the locks fall in place. If I move the switch lower, the motor will never shut off and moving it higher doesn’t solve the problem either. I see your door works great and the motor continues to run after the door hits the bottom. What am I doing wrong or how do I set the bottom switch where the locks will fall into place?
Hi Bill,
Funny you should ask… I had the same problem (and the video showed test code)
My fix: install the magnetic reed switch in the bottom of the weight (the thing attached to the cord) that lets the locks engage/disengage. (that way the motor will continue to run until after the locks have engaged)
Also, make sure to put soap on those locks (make them smooth so they won’t stick as they’re being pulled up or you will fry your motor)
Cheers!
Thanks for the suggestion, but I don’t understand where you put the switch. I finally found a place in the code I could put a 3 second delay which is working great. If I knew how, I would post a picture of my chicken coop out in the pasture powered by a 25 watt solar panel. So far it is working great thanks to you and your great instructions.
I hoping to upload my Fritzing diagram and code….
Hi, I am prototyping your door with a basic Uno and an L239D as my motor controller. I have your code (edited to reduce the 10 mins to just a couple and edited for my board’s pins), I see the Photo resistor values change in the serial monitor and the motor runs, but i’m having trouble with the switches and getting the motor to run the opposite direction, and I don’t actually have switches, I have leads that I can ‘set’ or ‘remove’ to act like a switch. But i’m not sure which position the switches should start in and are the switches normally closed or normally open? I figure one should be activated and the other not when the program starts, but which one? does it matter? And why did u choose the motor controller you did, am I wrong to use the L239D? Thanks in advance. Ben
Hi Ben,
Thanks for the questions…
I honestly don’t have the experience with “leads.” I just used the magnetic reed switched because I knew they world work. (and I’m VERY glad I did… mainly for the reason that the chickens scratch up a TON of shavings within the coop and I know for a fact that if I used anything like a standard mechanical switch, a tiny piece of shaving would block the connection, the door wouldn’t close and my chickens would become dinner for a predator) Obviously up to you, but I highly recommend the reed switches.
To answer your main question, no, it doesn’t matter what position to set them. They just need to be instantiated. Then once your loop begins looping, it’s output the correct position based on the arguments set forth within. Great question!
I chose the motor because of its strength and the very low rpms. (I didn’t want to create a chicken guillotine) =)
Cheers!
Hey Ben, I’m working on the coop and only have access to the Uno. I was wondering how and what you altered with the wiring and the code to make it work. Thanks in Advance
Hi Dave, Love this project.I built this about a year ago and love it.My question : is there a way to use a stepper motor instead of a dc motor? Any thoughts would be helpful.
Hi JD,
Thanks for the kind words. Absolutely, but I’d make certain that the stepper motor was hefty enough to lift the door. Were you looking for additional operational control over the door?
Cheers!
David,
So first good job at the automation of the coop. I do have a question i see above you used the polycom to power the 298. Did you cut the barrel off the end to wire?
Howdy!
Nope… soldered in a female end to receive. =)
Cheers!
Dave,
Great work!
I am an Arduino-nerd as well, and am doing a coop door for a friend. My question is around the door locks. I see on the web several companies offering automatic coop doors without a lock. They offer a door that is aluminum, and slides past the opening a few inches, with no lock. Now that your system has been in operation for a few years (congrats!), do you feel the lock is necessary?
Thanks!
Thanks for the comments… and great question. I can say unequivocally, no… there is no need for locks if the door slides down past the opening. I live where there are tons of critters and haven’t lost a chicken yet. Cheers!
Hey Dave,
Looks like you are connecting things with a 5 pin cable.
What are you connecting the 5 pin cable to for the photocell
Hi Chad,
If you look at the Fritzing Diagram, you’ll see exactly which 2 pins I connected: (note resistor)
http://davenaves.com/blog/wp-content/uploads/Arduino-Automatic-Chicken-Coop-Door-Fritzing-Project1-1024×997.png
Cheers!
Hi Dave. Could you tell me how you made the door status light indicator? I’m unsure of how to connect the LEDs, and what to house them in.
Hi Alex,
Thanks for the question.
Yeah, it took me a while to figure out how to house them. But I finally came up with using the plastic cover for Pir Motion IR Sensor: http://amzn.to/2E32uHE |Popped off the plastic top (looks kinda cool, no?) carefully chiseled out a section of the front of the coop, simply wired up the led =/- filled the ir sensor cover with silicone and smooshed it in there. =)
The code is within the sketch posted on the page (function is interwoved within existing functions… but not too hard to find it) :
const int coopDoorOpenLed = 40; // led set to digital pin 40
const int coopDoorClosedLed = 41; // led set to digital pin 41
If you went to the Mega2560 because of RAM, you can probably go back to Uno or 328P chip with some minor code changes.
Print lines like;
Serial.println(” Timer doReadPhotoCell every 10 minutes – light levels: open or close door”);
EAT RAM by loading the data in flash to RAM at startup. If you use the F() macro they don’t.
Serial.println( F( ” Timer doReadPhotoCell every 10 minutes – light levels: open or close door” ));
Also everywhere you use an int where a byte (0 to 255, pin numbers and states fit) would do you can save 1 byte.
The less easy thing would be to put all the constants into PROGMEM and save all that RAM.
Suppose you could run the coop on a Nano or your own standalone 328P? You have my email now and my forum name, and I know you’re not a student shamming out on homework and I can see that you’ve learned the most important lesson (don’t Block!) so I’d be happy to help if you want to shrink your controller requirement.
Very cool of you, Neal.
Cheers!
Thanks for the question, CC.
I just installed them on the sides of the door/track about a half inch up from top and botto,. Look here at about 5:58 https://www.youtube.com/watch?list=PLvuTs5dlaWiPWWAdZDWDy1CeFmhZAY40S&time_continue=358&v=1qq0KlYfJbo&feature=emb_logo
You’ll see the little white outline of the front side of one of the reed switches.
Cheers!
Hello david I have cut a bit in the code so I only have the function of the hatch to fit an Arduino uno.
I have free range chicken so I want a “delye” so the hatch does not open before 2h after sunrise.
To reduce the risk of fox food.
But I’m not so good at programming. do you think you can help me out?
Here’s what the code looks like in the link
https://pastebin.com/Su9tJHuM
// Niklas
Hi Niklas,
So I’m so busy right now and don’t have the time to write anything, but based on my code you may want to try testing out different threshold readings based on the exact light readings in your area. (some code pasted below) In other words, Open the door when the light level is high (mid morning) but not dark, nor twilight. Make sense? However, if you want it actually timed at two hours, then the code will need to be re-written into a time-based format or giant delays. Make sense? You can also ask the question out on the Arduino forums: https://forum.arduino.cc/
Cheers!
// set photocel threshholds
if (photocellReading >= 0 && photocellReading <= 445) { photocellReadingLevel = '1'; if(SerialDisplay){ Serial.print(" Photocel Reading Level:"); Serial.println(" - Dark"); } } else if (photocellReading >= 450 && photocellReading <= 595){ photocellReadingLevel = '2'; if(SerialDisplay){ Serial.print(" Photocel Reading Level:"); Serial.println(" - Twilight");
I live in Sweden is my problem is that it gets bright around 5:00 in the morning so it was not possible to adjust the photocel. I have put there a couple of hours on the power source so I turn off the arduiono on the early morning
Hi Niklas,
You can DEFINITELY control that photocel’s output. Like me, you just have to take some readings during the day and find wheat those reading are (via serial monitor) Look at my readings: (I had to literally stand there and wait to see what was light, twilight and dark)
Cheers!
// operate the coop door
// photocel to read levels of exterior light
void doReadPhotoCell() { // function to be called repeatedly – per coopPhotoCellTimer set in setup
photocellReading = analogRead(photocellPin);
if ((unsigned long)(millis() – lastPhotocellReadingTime) >= photocellReadingDelay) {
lastPhotocellReadingTime = millis();
// set photocel threshholds
if (photocellReading >= 0 && photocellReading <= 3) { photocellReadingLevel = '1'; if (SerialDisplay) { Serial.println(" Photocel Reading Level:"); Serial.println(" - Dark"); } } else if (photocellReading >= 4 && photocellReading <= 120) { photocellReadingLevel = '2'; if (SerialDisplay) { Serial.println(" Photocel Reading Level:"); Serial.println(" - Twilight"); } } else if (photocellReading >= 125 ) {
photocellReadingLevel = ‘3’;
if (SerialDisplay) {
Serial.println(” Photocel Reading Level:”);
Serial.println(” – Light”);
}
}
if (SerialDisplay) {
Serial.println(” Photocel Analog Reading = “);
Serial.println(photocellReading);
}
}
}
I do write code and will help. It’s how I used to pay the bills.
Making the sketch posted here fit on a 328 board (Uno, Nano, Mini) is not a big deal.
The IDE since Dave wrote that has a simple way to keep all that printed text out of RAM, just for starts.
The whole coop automation should fit on a 328 board with an SD data logger to boot!
You can find me on the Arduino.cc forum as GoForSmoke (it’s about burning hairline traces off reject PCBs, they smoke, and about wiring parts wrong, they smoke too :o( It’s not about burning weeds of any kind.)
Hi again,
Yeah, again, this door doesn’t open based on time, but light readings… so you’ll need to sit there and experiment with the light readings and then use < > and = to open and close the door.
Cheers!
Hi Daves!
I have been very busy building my coop and, even if a figured out most of my issues, I still have a problem with the door. Everything is perfect while closing but when it opens, the motor pull the door all the way up, then stop but the motor is letting go down the door slowly. Then the board detects that the door is not completly open and start to open it again.. and so on. If it happens that a lady is holding the door a little bit, then the openning process doesn’t start over again.
I feel like the door is too heavy so I remove half of the weight already. But the problem is still present.
One last thing, do you think that my struggling with the door in testing might have broken the gears and/or the motor? It forces few times when the switches didn’t work. I also switch the PMW controller with a spare one and it didn’t help.
I love it by the way! And eveybody thinks that I’m a genius.. well, I tell them that I just copy paste mostly!
Thanks for your help!
Hi Carole-Anne,
Thanks for the question. So not being there, it’s kinda hard to know exactly why it’s falling down. Are you certain the door isn’t slipping? I’m kinda doubting you broke any gears… that would take a great deal of force. Does it seem like the motor is struggling to lift the door? How heavy would you guess the door is?
Your problem might be that the motor is too easy to backrun. The door goes down because the gears in the motor don’t have enough friction to hold it up, like they do on David N.’s.
One way to fix this might be to buy a motor that turns more slowly. More slowly means more gears, which means the door won’t be able to go down by itself.
Glad you’re getting some genius love! =)
So it sounds like that you have a mechanical problem and not a software prob. (maybe your door is way too heavy?) I had to lighten mine up quite a bit if memory serves.
Hi Dave do you actually have plans for the building of the door. I am currently building my coop and would love to incorporate now rather then have to rebuild and tear out. Let me know thanks
Hi Chad,
Because I was racing, I did a crummy job documenting the door build. Just the images and text.
Sorry bro.
//D
hello Dave, very cool to find a such good project !
i will make it for a friend of me. But i can’t see the display wiring and the type of display.
Can you give me some information about it ? (especially wiring)
and another question; did you updated the code on the ino file according of your modifications in 2016 ?
Thanks a lot for your ingeniosity !!
Hey, thanks for the kind words…
The display (lcd) wiring is within the entire controller page:
http://davenaves.com/blog/interests-projects/chickens/chicken-coop/arduino-chicken-coop-controller/
Here’s all of the other elements as well:
http://davenaves.com/blog/interests-projects/chickens/arduino-chicken-coop/
Hope that helps,
//D
Hey Dave!
I am studying in Electrical Engineering and I love your project and i really appreciate you showing it to the world!
I am going to build this hopefully by this winter break. My parents are an elderly couple who enjoys
raising chickens. They are getting tired of opening and closing it each day and i have landed upon
your website. I was hoping if you could update your “parts list.” Some parts are no longer available i believe.
Hope to hear from you soon!
VH
Hi Dave,
I’ve built a coop door pretty similar to your and have used your code except for a few little tweaks, thank you very much.
One issue I haven’t figured out yet is that once the door closes, the motor stops but there isn’t enough slack in the string to allow the lock to engage. For my set up I need the motor to run another second or so to engage the lock.
I tried adding delay (1000); just before the stopCoopDoorMotorB(); and that works, but then a few seconds later the motor will run for a few seconds and keep repeating this. I think it’s because the delay function delays all of the functions on the arduino so the switch stops reading the 0.
Did you encounter this issue and if so do you have any suggestions?
Thanks again.
Jim
Hi Jim,
Funny you should ask… I ran into the same thing (and still haven’t dealt with it) BUT my idea is to actually embed a sensor into the end of one of the locks itself. (thereby letting the magnetic field engage once the lock is in place)
Honestly, I haven’t had the need to even use the locks at all since the door bottom closes a couple of inches below the frame of the door and is pretty tight. I haven’t had a single issue with raccoon fingers getting in there to lift it, so I’ll get to this mod when I have more time on my hands.
Thanks for writing in!
Cheers,
//D
Hi Dave, I just bumped into your very interesting youtube. I’m wanting to do the same Chicken Door. I noticed a couple of things I don’t quite understand: The LCD module type isn’t listed in the parts list, I am assuming its any inexpensive 2 line LCD,. and the wiring diagram doesn’t show the pinout connection for the LCD. I am assuming its serial, and serial 1 set of pins on the Mega (Mega has 4 serial I2C pins) I’m not sure which pins they are since I have a couple of UNO boards and the UNO has 1 I2C pin set. . Anyway Its not a show stopper as there are many tutorials on youtube that show how to use the LCD sample code that comes with the Arduino editor IDE.
BTW: I live down the hill from you in Loomis.
Thanks for sharing your good work
Hi Larry,
Thanks for the kind words, Loomis neighb!
Yeah, it’s just a cheap 2 line lcd. (like this one: http://amzn.to/2e36mtH)
And here are the pin assignments:
// lcd
LiquidCrystal lcd(38, 37, 36, 32, 33, 34, 35); // lcd pin assignments
int backLight = 13; // pin 13 controls backlight
/*
LCD Pin > arduino Pin
lcd pin 1 VSS > gnd arduino pin
lcd pin 2 VDD > +5v arduino pin
lcd pin 3 VO(contrast) > 330 ohm resistor to gnd arduino pin
lcd pin 4 RS arduino pin 38
lcd pin 5 R/W arduino pin 37
lcd pin 6 Enable arduino pin 36
lcd pin 7 –
lcd pin 8 –
lcd pin 9 –
lcd pin 10 –
lcd pin 11 (Data 4) > arduino pin 32
lcd pin 12 (Data 5) > arduino pin 33
lcd pin 13 (Data 6) > arduino pin 34
lcd pin 14 (Data 7) > arduino pin 35
lcd pin 15 Backlight + > arduino pin 13 (built-in resistor)
lcd pin 16 Backlight > arduino gnd pin
*/
And you can see how I coded it within the entire coop sketch:
http://davenaves.com/blog/interests-projects/chickens/arduino-chicken-coop-controller/
Hope it helps.
Cheers,
//D
Hi Jim,
Do you by chance have any plans for the door you build
Sorry, I didn’t do a great job documenting that. =( I decided to start documenting AFTER I started the project. What I have is on the main page (but I do have plenty of pics)
Cheers
Dave,
Tried to build and program exactly as you had and failed. I put that on me. This was my first ever attempt to use an Arduino, and first ever attempt to really use C++.
I had some of the same problems with the reed switches/photocell readings as others have commented. Went in a totally different direction, and used most of your code to control door opening and closing with a real time clock. Finally got some success! While I probably re-invented the wheel, I learned a lot along the way. So, it was time well spent.
I think I know why some people are having trouble with getting the motor to stop.
In “closeCoopDoorMotorB()” you have “if (bottomSwichPinVal == 0)”
and
“openCoopDoorMotorB()” you have “if (topSwitchPinVal == 0)”
I’m a noob. But, shouldn’t these values to a digital pin be “LOW” instead of “0”?
I changed the statement to “if (digitalRead(bottomSwitchPin) == LOW)” and if (digitalRead(topSwitchPin) == LOW) respectively. I know that this would negate how you debounced the reed switches, but I also totally dropped the debouncing of the reed switches, and things seem to be working. Besides, I figured that a false value would be negated the next loop cycle anyway.
I’ll post the altered code below (with lots of notes), for anyone who want to try this with a real time clock
// This code and associated libraries are running on an Arduino MEGA 2560 purchased from Amazon
// ARDUINO A000067 DEV BRD, ATMEGA2560, ARDUINO MEGA 2560 R3
// https://www.amazon.com/gp/product/B0046AMGW0/ref=oh_aui_search_detailpage?ie=UTF8&psc=1
//
// Most of this code and much of the component build is based on the following sources:
// http://davenaves.com/blog/interests-projects/chickens/chicken-coop/arduino-chicken-door/
// http://www.instructables.com/id/Automatic-Chicken-Coop-Door-2/
// Thanks Dave, you were the inspiration!
// However, I had to go to an real time clock (RTC) because I just couldn’t get the photocell readings right 🙁
// It may have been getting the photocell reading delay just right that threw me…
// I’m also too much of a noob to get Dave’s “debounce” to work. I’ll work on it. But, it doesn’t seem to be necessary???
// Used Dave’s wiring diagram w/o photocell for reed switches and step motor
// http://davenaves.com/blog/wp-content/uploads/Arduino-Automatic-Chicken-Coop-Door-Fritzing-Project1-1024×997.png
//
// DS3231 RTC codes are thanks to library and examples by Moja Sodaq //https://github.com/SodaqMoja/Sodaq_DS3231
// There is a ton of libraries out there. Some are easier to get the time from. But, found this one to be the most “useable”.
// Date and time functions using RX8025 RTC connected via I2C and Wire lib
// Used a Donop DS3231 AT24C32 IIC module precision Real time clock memory module Arduino from Amazon
// https://www.amazon.com/gp/product/B00HCB7VYS/ref=oh_aui_detailpage_o00_s00?ie=UTF8&psc=1
// wiring: http://cdn.instructables.com/FGZ/INFJ/HIXCJMB0/FGZINFJHIXCJMB0.MEDIUM.jpg
// Note: on the MEGA 2560 SDA is pin 20 and SCL is 21
//
// I also used a RioRand® LCD Module for Arduino 20 x 4, White on Blue from Amazon
// I need four lines for all of the feedback I want. I don’t like the serial monitor that comes with the Arduino software.
// https://www.amazon.com/gp/product/B00GZ6GK7A/ref=oh_aui_detailpage_o05_s00?ie=UTF8&psc=1
// wiring: http://www.learningaboutelectronics.com/images/Arduino-HD44780-circuit-schematic.png
#include //Included with Arduino
#include “Sodaq_DS3231.h” //https://github.com/SodaqMoja/Sodaq_DS3231
char weekDay[][4] = {“Sun”, “Mon”, “Tue”, “Wed”, “Thu”, “Fri”, “Sat” };
#include
// Init the LCD
LiquidCrystal lcd(12,11,5,4,3,2);
// variables
// temperature chip i/o
//const int photocellPin = A0; // photocell connected to analog 0
const int enableCoopDoorMotorB = 7; // enable motor b – pin 7
const int directionCloseCoopDoorMotorB = 8; // direction close motor b – pin 8
const int directionOpenCoopDoorMotorB = 9; // direction open motor b – pin 9
const int bottomSwitchPin = 26; // bottom switch is connected to pin 26
const int topSwitchPin = 27; // top switch is connected to pin 27
const int coopDoorOpenLed = 40; // led set to digital pin 40
const int coopDoorClosedLed = 41; // led set to digital pin 41
// Time Settings
int integerTime; // will need to take RTC reading and converted to an integer
int whatTime; // what time of day is it? too early (1), too late (2), just right, egg time (3)
int openTime = 600; // time to open door – 24 hour clock format, do not use “:”
int closeTime = 2200; // time to close door – 24 hour clock format, do not use “:”
//***************************The Set Up – Runs Once********************************
void setup (void)
{
Serial.begin(9600);
Wire.begin();
rtc.begin();
lcd.begin(20,4); // set LCD columns and rows
// coop door
// coop door motor
pinMode (enableCoopDoorMotorB, OUTPUT); // enable motor pin = output
pinMode (directionCloseCoopDoorMotorB, OUTPUT); // motor close direction pin = output
pinMode (directionOpenCoopDoorMotorB, OUTPUT); // motor open direction pin = output
// coop door leds
pinMode (coopDoorOpenLed, OUTPUT); // enable coopDoorOpenLed = output
pinMode (coopDoorClosedLed, OUTPUT); // enable coopDoorClosedLed = output
digitalWrite(coopDoorClosedLed, LOW);
digitalWrite(coopDoorOpenLed, LOW);
// coop door switches
// bottom switch
pinMode(bottomSwitchPin, INPUT); // set bottom switch pin as input
digitalWrite(bottomSwitchPin, HIGH); // activate bottom switch resistor
// top switch
pinMode(topSwitchPin, INPUT); // set top switch pin as input
digitalWrite(topSwitchPin, HIGH); // activate top switch resistor
}
uint32_t old_ts; // ??? from Sodaq RTC “Now” sample. Purpose to be investigated…
//***********************************************Functions***************************************************
void doClock() { // All DS3231 RTC functions. This replaces photocell readings.
//DS3231 RTC information
DateTime now = rtc.now(); //get the current date-time
uint32_t ts = now.getEpoch();
if (old_ts == 0 || old_ts != ts) {
old_ts = ts;
}
rtc.convertTemperature(); //convert current temperature into registers
//Date time and temp to LCD Display
lcd.clear();
lcd.setCursor(0, 0);
lcd.print(“Date: “);
lcd.print(weekDay[now.dayOfWeek()]);
lcd.print(“, “);
lcd.print(now.month(), DEC);
lcd.print(“/”);
lcd.print(now.date(), DEC);
lcd.print(“/”);
lcd.print(now.year(), DEC);
lcd.setCursor(0, 1);
lcd.print(“Time: “);
lcd.print(now.hour(), DEC);
lcd.print(“:”);
lcd.print(now.minute(), DEC);
lcd.print(“:”);
lcd.print(now.second(), DEC);
lcd.setCursor(0, 2);
lcd.print(“RTC Temp: “);
lcd.print(rtc.getTemperature());
lcd.print(” C”);
// convert RTC time to integer because you can’t compare a string!
integerTime = ((now.hour()*100) + now.minute());
// determine “whatTime” – modification of Dave’s “doReadPhotoCell()”. Modified to be simple. No need for 10 minute delay.
// what time of day is it? too early (1), too late(2), just right (3, egg time)
if (integerTime = closeTime){
whatTime = 2; // to late to be open
}
else if ((integerTime >= openTime) && (integerTime < closeTime)){
whatTime = 3; // it's time to open
}
}
// stop the coop door motor
void stopCoopDoorMotorB() {
digitalWrite (directionCloseCoopDoorMotorB, LOW); // turn off motor close direction
digitalWrite (directionOpenCoopDoorMotorB, LOW); // turn on motor open direction
analogWrite (enableCoopDoorMotorB, 0); // enable motor, 0 speed
}
// close the coop door motor – Changed Dave's reed switch readings from 1/0 to HIGH/LOW
void closeCoopDoorMotorB() {
if (digitalRead(bottomSwitchPin) == LOW) { // if bottom reed switch circuit is open
digitalWrite (directionCloseCoopDoorMotorB, HIGH); // turn on motor close direction
digitalWrite (directionOpenCoopDoorMotorB, LOW); // turn off motor open direction
analogWrite (enableCoopDoorMotorB, 255); // enable motor, full speed
lcd.setCursor(0, 3); // lcd message
lcd.print(" Door Closing ");
}
if (digitalRead(bottomSwitchPin) == HIGH) { // if bottom reed switch circuit is closed
stopCoopDoorMotorB(); // stop the motor
lcd.setCursor(0, 3); // lcd message
lcd.print(" Door Closed ");
digitalWrite(coopDoorClosedLed, HIGH); // turn on door closed led
digitalWrite(coopDoorOpenLed, LOW); // turn off door open led
}
}
// open the coop door – Changed Dave's reed switch readings from "1/0" to "HIGH/LOW"
void openCoopDoorMotorB() {
if (digitalRead(topSwitchPin) == LOW) { // if top reed switch is open
digitalWrite(directionCloseCoopDoorMotorB, LOW); // turn off motor close direction
digitalWrite(directionOpenCoopDoorMotorB, HIGH); // turn on motor open direction
analogWrite(enableCoopDoorMotorB, 255); // enable motor, full speed
lcd.setCursor(0, 3); // lcd message
lcd.print(" Door Opening ");
}
if (digitalRead(topSwitchPin) == HIGH) { // if top reed switch circuit is closed
stopCoopDoorMotorB(); // stop the motor
lcd.setCursor(0, 3); // lcd message
lcd.print(" Door Open ");
digitalWrite(coopDoorClosedLed, LOW); // turn off door open led
digitalWrite(coopDoorOpenLed, HIGH); // turn on door open led
}
}
// do the coop door "whatTime" replaces Dave's photocell readings, also changed (simplified for me) some of the logic
void doCoopDoor() {
if ((whatTime == 1) || (whatTime == 2)) { // if it's "too early" or "too late"
// debounceTopReedSwitch(); // read and debounce the switches
// debounceBottomReedSwitch(); //not ready for this, disabled.
closeCoopDoorMotorB(); // close the door
}
if (whatTime == 3) { // if it's "egg time"
// debounceTopReedSwitch(); // read and debounce the switches
// debounceBottomReedSwitch(); //not ready for this, disabled.
openCoopDoorMotorB(); // Open the door
}
}
//******************************************The loop*****************************************
void loop() {
doClock();
doCoopDoor();
}
Code did not paste correctly. For some reason lots of information randomly deleted?
Hi Don,
Might be a plugin issue. Please try this direct link to the zipped up .ino:
http://davenaves.com/blog/wp-content/uploads/Dave_Naves_Chicken_Coop_Controller.zip
Cheers1
Posted code to instructables.com Seems to not have the same random delete issues.
It may be the “crayon” plugin that’s jacking up copy/paste. Here’s a direct link to the clean ino:
http://davenaves.com/blog/wp-content/uploads/Dave_Naves_Chicken_Coop_Controller.zip
Hope it helps,
//D
Thanks for all of the notes and additional code… love it.
For me, debouncing was essential. AND the light readings as I inserted them had to be done, b/c right around dusk and dawn, the light readings were all over the place, thereby giving me completely unreliable readings by the millisecond (and stuttering the door… even making it jump ahead and jamming) So I delayed the readings, made sure the readings were consistently either dark or light (and nowhere in between) and it hasn’t skipped a beat in years.
But if your stuff is working… awesome!
Cheers,
//D
Hi Dave, Loved your youtube videos and your website is pretty cool too. Thanks for taking the time to document all your endeavours and share them with us.
Just one thing in the code updated on your site 06/15 it appears that you havent added the following:
const int coopDoorOpenLed = 40; // led set to digital pin 40
const int coopDoorClosedLed = 41; // led set to digital pin 41
as when i tried to verify i got an error.
checking it the above code seems to have been ommitted? i’m assumming its just a copy paste error?
Cheers
Alex
Wow.. don’t know what happened there! Thanks very much for bringing that to my attention… really appreciate it.
Fixing now.
Cheers!
Dave, I built an arduino coop much like yours and wanted to share with you some photos and other info. Your post was extremely helpful and I wanted to thank you because without this site I would still be scratching my head. One thing I did was to add an override switch, which took me a while to figure out because I wasn’t declaring the switchStates within the correct scope, then I had to put that function inside the readPhotoCell function otherwise it would only look once every 10 minutes which isn’t very useful at all!
Howdy, Quillster!
Thanks for the kind words…
Ya, know, I’ve been wanting to do the same thing with the override. (no time) I was actually wanting to do a complete override (lights, door, heat, cooling… everything)
Do you feel like sharing your function? Would love to check it out.
And can you post some pics and share? (on a social network or picassa… something)
Cheers, Mate!
Check your email, I sent you some photos and the .ino. Feel free to post it on here.
-Quillster
Hello David,
Thank you for posting this article, it is exactly what I needed. I am planning to start building the electronics for my coop door today. The mechanicals are just about done.
I also want to add override buttons to manually open/close the coop door. I was thinking it would open the door and then wait for light levels to fall to “night time” levels before closing. Unfortunately I am not a coder so this will be tough for me to figure out. Please post that code if you are able to.
I will post pics as soon as I can.
Thanks,
JH
Hi JH,
Thanks for the kind words… Ya know “Quillster” ( a commenter on this page) has already created something like what you’re talking about. You might want to ping him on this thread and see if he’d post his code.
And yeah, post some pics so we can all see what your coop looks like!
Cheers
Hello Quillster, i am searching for code to override door with a remote (it is same with burron).
Can you give us your code for this ?
Thanks for my chickens !
bigjim
Howdy,
I haven’t yet written code for a remote, but my friend Roger did:
http://arduino-coop.blogspot.com/p/remote.html
Hope that helps,
//D
They were just wired into the breadboard separately (digital pin 40 and 41) then they were triggered by the reed switch outputs:
https://davenaves.com/blog/interests-projects/chickens/chicken-coop/arduino-chicken-coop-controller/ (look at Arduino sketch within)
Cheers!
I tried the code and it said this
C:\Users\ ???? ?????\Documents\Arduino\chicken_coop_software\chicken_coop_software.ino:34:89: fatal error: OneWire.h: No such file or directory
#include // load the onewire library for thermometer
^
compilation terminated.
exit status 1
Error compiling.
Hi Evan,
If you read the error carefully, the code is trying to find the “OneWire.h” (library) Read this article carefully: http://playground.arduino.cc/Learning/OneWire
grab the library and install the library in the “libraries” folder.
https://www.arduino.cc/en/hacking/libraries
Hope that helps.
//D
thank you 🙂
My pleasure…
I have been trying to make my chicken coop door work for a very long while now but it still seems to mess up whenever I turn it on currently it only goes up interspersed by random spurts of going down if you have any insights on this problem please let me know ASAP (my science project is due very soon)
Thank you very much
Evan
Hi Evan,
Make sure to ~carefully~ look at the debounce section and implement this section as is:
// do the coop door
void doCoopDoor() {
if (photocellReadingLevel == ‘1’) { // if it’s dark
if (photocellReadingLevel != ‘2’) { // if it’s not twilight
if (photocellReadingLevel != ‘3’) { // if it’s not light
debounceTopReedSwitch(); // read and debounce the switches
debounceBottomReedSwitch();
closeCoopDoorMotorB(); // close the door
}
}
}
if (photocellReadingLevel == ‘3’) { // if it’s light
if (photocellReadingLevel != ‘2’) { // if it’s not twilight
if (photocellReadingLevel != ‘1’) { // if it’s not dark
debounceTopReedSwitch(); // read and debounce the switches
debounceBottomReedSwitch();
openCoopDoorMotorB(); // Open the door
}
}
}
}
Best of luck!
I have just done some troubleshooting and have narrowed down the problem to sporadic readings coming from the Photocell readings such as
hotocel Analog Reading =
264
Top Switch Value: 1
Bottom Switch Value: 0
Coop Door Closed – no danger
Photocel Analog Reading =
272
Top Switch Value: 1
Bottom Switch Value: 0
Coop Door Closed – no danger
Photocel Analog Reading =
282
Top Switch Value: 1
Bottom Switch Value: 0
Coop Door Closed – no danger
Photocel Analog Reading =
291
Top Switch Value: 1
Bottom Switch Value: 0
Coop Door Closed – no danger
Photocel Analog Reading =
294
Top Switch Value: 1
Bottom Switch Value: 0
Coop Door Closed – no danger
Photocel Reading Level:
– Twilight
Photocel Analog Reading =
301
Photocel Reading Level:
– Light
Photocel Analog Reading =
326
Top Switch Value: 1
Bottom Switch Value: 0
Top Switch Value: 1
Bottom Switch Value: 0
Photocel Reading Level:
– Light
Photocel Analog Reading =
609
Top Switch Value: 1
Bottom Switch Value: 0
Photocel Reading Level:
– Light
Photocel Analog Reading =
322
Top Switch Value: 1
Bottom Switch Value: 0
Photocel Reading Level:
– Light
Photocel Analog Reading =
420
Top Switch Value: 1
Bottom Switch Value: 0
Photocel Reading Level:
– Light
Photocel Analog Reading =
665
Top Switch Value: 1
Bottom Switch Value: 0
Photocel Reading Level:
– Light
Photocel Analog Reading =
387
Top Switch Value: 1
Bottom Switch Value: 0
Photocel Reading Level:
– Light
Photocel Analog Reading =
371
Top Switch Value: 1
Bottom Switch Value: 0
Photocel Reading Level:
– Light
Photocel Analog Reading =
661
Howdy,
Answered in the former comment… the code must be implemented exactly as I have it. (light levels must be checked every 10 mins, debounced correctly and then make certain to include:
// do the coop door
void doCoopDoor() {
if (photocellReadingLevel == ‘1’) { // if it’s dark
if (photocellReadingLevel != ‘2’) { // if it’s not twilight
if (photocellReadingLevel != ‘3’) { // if it’s not light
debounceTopReedSwitch(); // read and debounce the switches
debounceBottomReedSwitch();
closeCoopDoorMotorB(); // close the door
}
}
}
if (photocellReadingLevel == ‘3’) { // if it’s light
if (photocellReadingLevel != ‘2’) { // if it’s not twilight
if (photocellReadingLevel != ‘1’) { // if it’s not dark
debounceTopReedSwitch(); // read and debounce the switches
debounceBottomReedSwitch();
openCoopDoorMotorB(); // Open the door
}
}
}
}
Cheers!
I noticed there are a few bugs when I tried to use this code. In the debounce function you’re not updating the lastDebounceTime. Also, an issue that’s actually effected the door was when the switches stop the door. The way it’s written if it turns dark (say a cloud goes by) and the door starts driving down. Then the cloud moves past and the light reading is twilight. The bottom switch will not be read to stop the motor. I’m guessing forcing the photoresistor read to every 10 min solved that issue for you. Also, the motor is always being triggered on and off by having the stopCoopDoorMotorB function immediately after turning the motor on. I updated the code to:
// close the coop door motor (motor dir close = clockwise)
void closeCoopDoorMotorB() {
closing = true;
digitalWrite (directionCloseCoopDoorMotorB, HIGH); // turn on motor close direction
digitalWrite (directionOpenCoopDoorMotorB, LOW); // turn off motor open direction
analogWrite (enableCoopDoorMotorB, 255); // enable motor, full speed
// if (bottomSwitchPinVal == 0) { // if bottom reed switch circuit is closed
// stopCoopDoorMotorB();
// if (SerialDisplay) {
// Serial.println(” Coop Door Closed – no danger”);
// }
// }
}
// open the coop door (motor dir open = counter-clockwise)
void openCoopDoorMotorB() {
opening = true;
digitalWrite(directionCloseCoopDoorMotorB, LOW); // turn off motor close direction
digitalWrite(directionOpenCoopDoorMotorB, HIGH); // turn on motor open direction
analogWrite(enableCoopDoorMotorB, 255); // enable motor, full speed
// if (topSwitchPinVal == 0) { // if top reed switch circuit is closed
// stopCoopDoorMotorB();
// if (SerialDisplay) {
// Serial.println(” Coop Door open – danger!”);
// }
// }
}
// do the coop door
void doCoopDoor() {
if (closing){
debounceBottomReedSwitch();
if (bottomSwitchPinVal == 0){
stopCoopDoorMotorB();
closing = false;
}
}
if (opening){
debounceTopReedSwitch();
if (topSwitchPinVal == 0){
stopCoopDoorMotorB();
opening = false;
}
}
if (photocellReadingLevel == ‘1’) { // if it’s dark
if (photocellReadingLevel != ‘2’) { // if it’s not twilight
if (photocellReadingLevel != ‘3’) { // if it’s not light
debounceBottomReedSwitch(); // read and debounce the switches
if (bottomSwitchPinVal != 0) {
closeCoopDoorMotorB(); // close the door
}
}
}
}
if (photocellReadingLevel == ‘3’) { // if it’s light
if (photocellReadingLevel != ‘2’) { // if it’s not twilight
if (photocellReadingLevel != ‘1’) { // if it’s not dark
debounceTopReedSwitch(); // read and debounce the switches
if (topSwitchPinVal != 0) {
openCoopDoorMotorB(); // Open the door
}
}
}
}
}
Hi Jacob,
Thanks for the notes…
As far as updating the debounce, here’s what I use:
// debounce delay
unsigned long lastDebounceTime = 0;
unsigned long debounceDelay = 100;
if ((unsigned long)(millis() – lastDebounceTime) > debounceDelay) { // delay 100ms for consistent readings
Not sure why that’s not updating for you?
And hanks much for taking a peek and sending your notes Yep, completely correct with all of what I dealt with. (but it wasn’t really a cloud, but instead, the infinitely changing light levels around dusk/dawn. The sun, electronically speaking, doesn’t rise and set via mills. ;^ ) )
And yes, I solved it with both the 10 minute reading intervals, BUT also with the light levels if statements:
if (photocellReadingLevel == ‘1’) { // if it’s dark
if (photocellReadingLevel != ‘2’) { // if it’s not twilight
if (photocellReadingLevel != ‘3’) { // if it’s not light
debounceBottomReedSwitch(); // read and debounce the switches
It has worked like a charm for years now. (but drove me crazy during development) =)
However, I really dig how you solved with:
if (opening){
debounceTopReedSwitch();
if (topSwitchPinVal == 0){
stopCoopDoorMotorB();
opening = false;
}
Very creative…
Thanks again, brother.
//D
Hi Dave,
I’m glad to found your project. Now I am preparing for build-up the door but before I try to understand the code you wrote. It is very well documented and a good way to learn from it the programming of Arduino.
My question is connecting to a prev. comment of Jacob. To tell the truth I also remarked that variables LastDebounceTime, LastTempChecktime, LastTwilightTime are not updated later in the code. They are initiated by value 0 as a starting value, but later, after the first check of temperature, photocell or reedswitch, their values should be updated. Otherwise they remain value 0 and do not function the delaying/debouncing.
You wrote to Jacob that they are updated, but (as i know) in the IF statement the values are only compared but not updated.
Could you explain more detailed how they are updated during run of code, please?
Thanks for your answer!
Sure… and I hope I understand your question correctly,. In short I didn’t see a need to have any values updated later in the code? The debounce has worked perfectly for me ever since publishing.
The the value is instantiated by 0, there is also a delay of 1/10th of a second (long debounceDelay = 100;) for consistent reads (it took me a while to figure out that sunset light values are most definitely not consistent and the door motor would definitely jump all over the place during twilight)
Then the comparison is constantly checked by this if statement (with the aforementioned delay)
if ((millis() – lastDebounceTime) > debounceDelay)
Then I think the comments should definitely explain the rest of the process:
The whole bottom reed debounce switch process
void debounceBottomReedSwitch() {
//debounce bottom reed switch
bottomSwitchPinVal = digitalRead(bottomSwitchPin); // read input value and store it in val
// delay(10);
if ((millis() – lastDebounceTime) > debounceDelay) { // delay 10ms for consistent readings
bottomSwitchPinVal2 = digitalRead(bottomSwitchPin); // read input value again to check or bounce
if (bottomSwitchPinVal == bottomSwitchPinVal2) { // make sure we have 2 consistent readings
if (bottomSwitchPinVal != bottomSwitchState) { // the switch state has changed!
bottomSwitchState = bottomSwitchPinVal;
}
if(SerialDisplay){
Serial.print (” Bottom Switch Value: “); // display “Bottom Switch Value:”
Serial.println(digitalRead(bottomSwitchPin)); // display current value of bottom switch;
}
}
}
}
Does that help?
//D
Can you tell me what you used for a status indicator light to monitor door closed status from your house?
Hi Eric,
Sure… I chose two simple LEDs. 1 red 1 green (red = danger, green = safe)
On Amazon: http://goo.gl/dMLDIA
Cheers!
Hi again Dave.
Me and my friend we just finished the first project at his place.I started to build for my coop now.Will upload fotos soon.
But i have a question.
The automation without to be present at the place leaves you an unsecure filling.
So i was thinking if there is a way to login via internet at the arduino and see if the door is close or the door is open.
Controlling the all setup if working properly without need to go at coop and control if the thing works good.
A second line of control at any time of the day.
Hope you understand my thought.
Thanks alot.
Pol
Yeah, the ability to monitor and execute functions via remote was going to me my next more… just have no time. =) BUT, look below in the comments and you’ll see that Will Vincent has published a link to GitHub with exactly that stuff (Thanks again, Will)
I’m going to check it out… you should, too. =)
Cheers!
Hi Daves.
I have built the project and i have a few questions.
I would like to know if i can add a lamp which will switch on when the photocell is at twilight status.
And this lamp will be switch off when the photocell is not at the twilight status.
And i also have a issue with the bottom switch.As the switch get the order to close, the motor still turns for 3-4 seconds more or doesn’t stops at all.I have test more than 3 switches and have the same problem.
The top switch works perfect.
Thanks alot and i hope you understand my questions.
Pol
Hi Pol,
Thanks for the question.
The light… yes, in fact that’s exactly what I’ve done already. (look for “relayInteriorLight” in the code on this page:
http://davenaves.com/blog/interests-projects/chickens/arduino-chicken-coop-controller/
I’m not sure why your motor won’t stop:
The function to stop is essentially:
if (bottomSwitchPinVal == 0) { // if bottom reed switch circuit is closed
stopCoopDoorMotorB();
// stop the coop door motor
void stopCoopDoorMotorB() {
digitalWrite (directionCloseCoopDoorMotorB, LOW); // turn off motor close direction
digitalWrite (directionOpenCoopDoorMotorB, LOW); // turn on motor open direction
analogWrite (enableCoopDoorMotorB, 0); // enable motor, 0 speed
}
The function to trigger the motor to stop:
// close the coop door motor (motor dir close = clockwise)
void closeCoopDoorMotorB() {
digitalWrite (directionCloseCoopDoorMotorB, HIGH); // turn on motor close direction
digitalWrite (directionOpenCoopDoorMotorB, LOW); // turn off motor open direction
analogWrite (enableCoopDoorMotorB, 255); // enable motor, full speed
if (bottomSwitchPinVal == 0) { // if bottom reed switch circuit is closed
stopCoopDoorMotorB();
if (SerialDisplay) {
Serial.println(” Coop Door Closed – no danger”);
}
}
}
Kinda hard to diagnose without seeing it live. Are you checking the serial monitor as you test? (believe me, I checked a ton while I was checking)
Hope that helps a little.
Cheers,
//D
Thank you for this tutorial. I used it as a guideline for my chicken coop door. When I first started researching doors, I was surprised at how much people pay for the chicken coop door motor most tutorials show. It is almost $100. That is about all I have tied up into all my electronics. I knew I could build it cheaper. Using this page as my main reference, I have it wired up, but not installed yet. I used a 12v motor and 12v gel cell battery. I have the battery hooked up to a solar panel to keep it topped off. I write code for a living, so I ended up rewriting most of the code for fun and so that I understood it better. This site saved me a lot of time. Here is my code:
const int photocellPin = A0;
const long photocellDelay = 600000;
unsigned long lastPhotocellReadingTime = 0;
int lightLevel = 0;
const int motorUpPin = 13;
const int motorDownPin = 12;
const int motorEnablePin = 11;
const int topReedSwitchPin = 9;
const int bottomReedSwitchPin = 8;
void setup() {
Serial.begin(9600);
pinMode(motorUpPin, OUTPUT);
pinMode(motorDownPin, OUTPUT);
pinMode(motorEnablePin, OUTPUT);
pinMode(topReedSwitchPin, INPUT);
pinMode(bottomReedSwitchPin, INPUT);
}
void loop() {
readPhotocell();
switch(lightLevel) {
case 0:
closeDoor();
break;
case 1:
openDoor();
break;
}
}
void readPhotocell() {
if ((long)(millis() – lastPhotocellReadingTime) >= photocellDelay) {
lastPhotocellReadingTime = millis();
int reading = analogRead(photocellPin);
if (reading >= 100) {
lightLevel = 1;
} else {
lightLevel = 0;
}
}
}
void openDoor() {
if (doorIsClosed()) {
while (doorIsClosed()) {
enableMotor(motorUpPin, motorDownPin);
}
disableMotor();
}
}
void closeDoor() {
if (doorIsOpen()) {
while (doorIsOpen()) {
enableMotor(motorDownPin, motorUpPin);
}
disableMotor();
}
}
boolean doorIsClosed() {
int reading1 = digitalRead(topReedSwitchPin);
delay(100);
int reading2 = digitalRead(topReedSwitchPin);
return (reading1 == reading2) && reading1 == 0;
}
boolean doorIsOpen() {
int reading1 = digitalRead(bottomReedSwitchPin);
delay(100);
int reading2 = digitalRead(bottomReedSwitchPin);
return (reading1 == reading2) && reading1 == 0;
}
void enableMotor(int highPin, int lowPin) {
digitalWrite(highPin, HIGH);
digitalWrite(lowPin, LOW);
analogWrite(motorEnablePin, 255);
}
void disableMotor() {
digitalWrite(motorUpPin, LOW);
digitalWrite(motorDownPin, LOW);
analogWrite(motorEnablePin, 0);
}
Awesome job!
Love your code… very efficient. If you have any pics of your coop, please post them somewhere… would love to see them.
Thanks for the share!
Cheers,
//D
Would love to learn more about how you hooked up the 12v gel cell battery to a solar panel!
@David this is a great site. Thanks so much for taking the time to do all this for other makers.
Hi jay,
Thanks for the kind words. In short, I didn’t =) I was lucky/smart enough (at least when I was a little younger, anyway) to run 3/4″ conduit years earlier. (knowing I’d probably want water and power there someday) So I just ran a 20A circuit down to the coop.
Cheers!
Hi Josh, I see your code look good but get an error when I try to compile it…
my compiler doesn’t like this code, see error below:
void readPhotocell() {
if ((long)(millis() – lastPhotocellReadingTime) >= photocellDelay) {
lastPhotocellReadingTime = millis();
int reading = analogRead(photocellPin);
if (reading >= 100) {
lightLevel = 1;
} else {
lightLevel = 0;
}
}
}
This report would have more information with
“Show verbose output during compilation”
enabled in File > Preferences.
Arduino: 1.0.6 (Mac OS X), Board: “Arduino Uno”
sketch_feb19a:37: error: stray ‘\’ in program
sketch_feb19a.ino: In function ‘void readPhotocell()’:
sketch_feb19a:37: error: expected primary-expression before ‘long’
sketch_feb19a:37: error: expected `)’ before ‘long’
sketch_feb19a:90: error: expected `)’ at end of input
sketch_feb19a:90: error: expected statement at end of input
sketch_feb19a:90: error: expected `}’ at end of input
Thanks for helping, Ben.
Yeah, Josh… if you look at what Ben posted, it *appears* the the first error found (typically the main culprit of any code problem) shows:
sketch_feb19a:37: error: stray ‘\’ in program
(you have an extra \ floating around in there somewhere.
=)
Cheers and thanks again for helping here among all of us Chicken Nerds. =)
When searching for a door that would work for our girls your site came up. I have to say, this looked like the easiest to follow and very well thought out. We are still designing to coop itself though, and I was wondering if you had some rough dimensions of the door. Or did I miss that somewhere? I ask mainly because we are insulating (way too cold in the winter) and wanted to know how this will fit with the plans we have going so far or if we need to make modifications. Thanks!
Hi Kelly,
Sorry for the late reply…. I missed it in the comments. No you didn’t miss it, I neglected to insert it. (like an elephant in a microscope, I sometimes miss the obvious things) =)
I snapped some photos for you and posted them: (along with some rough dimensions)
http://davenaves.com/blog/interests-projects/chickens/chicken-coop/arduino-chicken-door/#rough_dimensions
Also, if you have an issue with cold, I also built a heater as well: (interior coop and exterior for protecting water pipes)
http://davenaves.com/blog/interests-projects/chickens/chicken-coop/automatic-chicken-coop-heater/
The code is embedded within the overall coop sketch, if you want to snag it out of there: (scroll down to the code section)
http://davenaves.com/blog/interests-projects/chickens/arduino-chicken-coop-controller/
Hope it helps,
//D
Dave,
Bueno job. Making this for a co-worker as a gift. He loves the idea!
I made some modifications to the program, motor choice, and I’m using simple open/close switches. I’m learning how to “arduino” but I think it may be useful to look into Interupts so the arduino will “sleep” while it is not looking for light. I’ll post back with my code and hopefully some images when we’re done!
Thanks again.
Ralph
Thanks for the comments, Ralph… yes, would love to see your code.
Yeah, as far as interrupts, you could certainly just increase the number of millis between checks (or add in the rtc to trigger events) i just put in every 15 minutes between checks, because i wanted to make sure when dusk and dawn hit, that the door would open close as quickly as possible to keep out the critters from munching down on mcnuggets. =) (and I like to work Arduinos HARD) ;^ )
Looking forward to see what you come up with… and thanks again for sharing!
//D
Dave, this is awesome, and thanks for sharing!
I want to give your setup a try but a couple of the parts are no longer available on amazon. Any chance you can update your parts list and/or affiliate links? I just want to make sure I order everything I need and have a list to check against to ensure I have everything based on your latest build. If there is a complete parts list seperate from the product links, that will work too.
I also plan to modify the door to accommodate Turkeys and Ducks (Indian Runners, which are tall). I plan to use aluminum for this to keep the door lightweight.
Thanks again!
-Danny
Hi Danny,
Thanks for the heads-up with the parts. (it’s hard to keep up with 3rd party vendors sometimes) Yes, I’ll go through the parts again. And yeah, I’ll create a list as well. (I’ve been meaning to to that, but it takes a bunch of time… something I don’t often have) =)
Love the idea of making it taller for larger birds… I went back and forth with height and tried to make it a little uncomfortable for my girls as some of them like to hang out in the doorway, preventing others from coming in) It all seemed to work out.
Thanks again for taking the time. I’ll have that list updated toot sweet.
Cheers,
//D
Hello Dave.
I was wondering what type of LED you used for the visual aid.
hi trey,
thanks for reminding me… i should’ve already posted that, but missed it. =)
i just used a red and green for a combo pack i purchased a while back: http://amzn.to/1GuIUSb (my aff link)
microtivity IL185 5mm Assorted Diffused LED w/ Resistors (5 Colors, Pack of 50)
please post some pics when you’re finished… would love to see it in action!
cheers!
Greetings, Dave!
I’ve looked high and low on your blog and elsewhere, and for the life of me cannot find out WHY you chose a 24vdc motor to drive your chicken door, as opposed to a 12vdc motor. Any torque issues that you know of with a 12 v-20-30 rpm motor? With a 12vdc motor I could make everything run off of a storage battery that is recharged by solar panel. I’d still like to use the L298N motor controller you show in your photos.
Your entire project has been a HUGH inspiration, Dave. Can’t thank you enough.
PS….FYI…Ludwig was just a middle name. That’s where the family affiliation ends. Can’t lay claim to something I don’t own…
hey joe,
thanks for the question. (and kind words… much appreciated) ya know, since i was lucky enough to have 120v down at the coop (i dug a trench many years ago when putting in sprinklers, not knowing what i wanted to do yet, but knew i wanted water & power in the back 40) i was just making certain there ~wouldn’t~ be any issues with torque/voltage. fact is, unless your door is going to weigh a ton, i can’t imagine that a 12v motor wouldn’t work. important note though: make sure your spool is not too big in diameter; it makes a giant difference. (larger diameter makes it tougher on the motor)
post some pics when you’re complete… would love to see it.
cheers, mate!
//d
Hello Dave,
Can’t thank you enough for this documentation and idfeas!!!!
I’ve been starting from scratch mostly (as a challenge to myself), but I’m also in the dark a bit in terms of a 12v motor. I want to make sure it’s strong enough to lift the door, but don’t want to end up buying something that’s really only strong enough to drive a little toy car. All of the torque specs are a bit greek to me, unfortunately.
Is there any guidance you might be able to provide?
Thanks!
Brent
Hi Brent,
Sorry for the late reply. I’m _pretty- sure a 12 motor will work (just don’t make your door too heavy) =)
I think something like this would work:
https://goo.gl/ouYDas (note the high torque and slow 15 rpm – don’t want to get it too fast or it turns into the door of death) =)
Hope that helps!
//D
Note: I’ve updated my code as of 02/05/15
Essentially, I got rid of the simpleTimer() and replaced with millis().
If you want to see the entire coop sketch >>
Dave, love the auto coop door plans. I am just getting started, so I copied your coop door sketch and installed arduino 1.6.0 along with the onewire and simpletimer code, but am getting this error immediately. I had hoped to get further into this before having problems. I wonder if the error is caused because your original program was created with an earlier version of arduino compiler. I have no clue what this error is talking about so can you help or point me in a direction? Thanks.
Arduino: 1.6.0 (Windows 7), Board: “Arduino Uno”
In file included from coopdoor.ino:5:0:
C:\Users\walterc\Documents\Arduino\libraries\SimpleTimer/SimpleTimer.h: In function ‘void setup()’:
C:\Users\walterc\Documents\Arduino\libraries\SimpleTimer/SimpleTimer.h:43:35: error: local class ‘class setup()::SimpleTimer’ shall not have static data member ‘const int setup()::SimpleTimer::MAX_TIMERS’ [-fpermissive]
const static int MAX_TIMERS = 10;
^
C:\Users\walterc\Documents\Arduino\libraries\SimpleTimer/SimpleTimer.h:46:36: error: local class ‘class setup()::SimpleTimer’ shall not have static data member ‘const int setup()::SimpleTimer::RUN_FOREVER’ [-fpermissive]
const static int RUN_FOREVER = 0;
^
C:\Users\walterc\Documents\Arduino\libraries\SimpleTimer/SimpleTimer.h:47:33: error: local class ‘class setup()::SimpleTimer’ shall not have static data member ‘const int setup()::SimpleTimer::RUN_ONCE’ [-fpermissive]
const static int RUN_ONCE = 1;
^
C:\Users\walterc\Documents\Arduino\libraries\SimpleTimer/SimpleTimer.h:91:40: error: local class ‘class setup()::SimpleTimer’ shall not have static data member ‘const int setup()::SimpleTimer::DEFCALL_DONTRUN’ [-fpermissive]
const static int DEFCALL_DONTRUN = 0; // don’t call the callback function
^
C:\Users\walterc\Documents\Arduino\libraries\SimpleTimer/SimpleTimer.h:92:40: error: local class ‘class setup()::SimpleTimer’ shall not have static data member ‘const int setup()::SimpleTimer::DEFCALL_RUNONLY’ [-fpermissive]
const static int DEFCALL_RUNONLY = 1; // call the callback function but don’t delete the timer
^
C:\Users\walterc\Documents\Arduino\libraries\SimpleTimer/SimpleTimer.h:93:42: error: local class ‘class setup()::SimpleTimer’ shall not have static data member ‘const int setup()::SimpleTimer::DEFCALL_RUNANDDEL’ [-fpermissive]
const static int DEFCALL_RUNANDDEL = 2; // call the callback function and delete the timer
^
coopdoor.ino:70:18: error: a function-definition is not allowed here before ‘{‘ token
coopdoor.ino:108:23: error: a function-definition is not allowed here before ‘{‘ token
coopdoor.ino:242:1: error: expected ‘}’ at end of input
Error compiling.
This report would have more information with
“Show verbose output during compilation”
enabled in File > Preferences.
hi walter,
thanks for the kind comments… much appreciated.
so the errors… ya know, i’m not certain, but look at the bottom of what you pasted:
coopdoor.ino:70:18: error: a function-definition is not allowed here before ‘{‘ token
coopdoor.ino:108:23: error: a function-definition is not allowed here before ‘{‘ token
coopdoor.ino:242:1: error: expected ‘}’ at end of input
Error compiling.
looks like errors in the syntax. you definitely want to check that out before anything else (lines 70, 108 and 242) it seems like you may have made some changes to the original code? if not, i’m not sure if there are perhaps some weird characters that may have appeared during the copy/paste process.
also, as of late, i’ve made changes to my code (here at home) and have moved away from simpleTimer. i’m instead using millis() (http://arduino.cc/en/Reference/Millis)
have a look at those lines of code (if often means there is a “}” brace is missing) and see why the compiler is barking at them.
i’ll try and post my very latest code (without simpleTimer) and see if that is possibly the issue.
cheers
Dave,
There are plenty examples of Arduino driven coop doors on the net but I have to say that your system and the detail in which you have gone into to explain it and help others like myself who are just starting out in the Arduino world is second to none. Thank you! I am in the process of adding a bunch of automated features to my coop which will all be based upon your original design, I will share everything I have once I am up and running.
Just a quick question, would it be possible to use 2 LDR’s and have a code that will only shut the coop door if both LDR’s are reading 0 (no light) and if so would you advise this/see any benefits?
Cheers
Hey Nemo… really appreciate the kinds words (makes it worth the amount of time it took to do it) =)
Yes, looking forward to your share.
Um, as far as two photocells, sure you could. I’m a bit unclear as to why you’d want or need to, but hey, why not?! =) Were you thinking to get multiple readings from different sides of the coop? Something else? I’ve found just the 1 is plenty for me. (and I use it to trigger other things as well) case in point, I just created another function that triggers on the internal lights during dusk then shuts off when the door is shut. (I just bought a couple of young Lavendar Orpingtons and they were not following in the others into the coop to roost and getting locked out) but I did notice they were attracted to the internal lights. (not the external, which kept them outside longer, after lock up) these low/internal star lights(http://goo.gl/bc0u4H) kept them curious/brave enough to follow the others in.
Thanks again for the comments,
//D
Dave – Excellent job, and thank you very much for you willingness to share your knowledge. I am brand new to electronics and I’m completely stoked to try this out. I’ve been reading up on circuits, breadboards, etc and I think I understand the basics. I’m still a little confused as to how to choose the proper resistors though. Would you mind briefly explaining why you use 10k Ohm 1/4 watt resistors?
Thanks for the nice words, DG…
Honestly, since it has been a while since I built the thing, I can’t remember exactly why I chose 10k 1/4 watt resistors. (but as I was building it I remember studying quite a bit and looked at each element carefully and read the specs… in this case the 2 switches and photocel) With the power source being the Arduino @ 9v) I made sure to protect each circuit with enough resistance so all components would operate correctly without frying. =)
I read a bunch here:
http://playground.arduino.cc/Learning/PhotoResistor, here: http://www.dummies.com/how-to/content/electronics-components-resistors.html and here: http://en.wikibooks.org/wiki/Practical_Electronics/Resistors
Cheers,
//D
Thanks for the reply and links. One more question if you don’t mind. I was looking at your homemade spool. Did you have to drill the female hex nut to allow for those set screws? Or were you able to find a female threaded hex nut that came with set screws?
Hi again, Dg…
Great question. No, I actually had to drill and tap the holes for the set screws. (and had to go to an Ace Hardware since Home Depot didn’tcarry anything that would word) wah waaaaah. =^ |
10K resistors are often used for pull up resistors for an input circuit to a microcontroller. There are several reasons this value is used: very common value (easy to find and do the math with), uses a small amount of current (0.5 mA) while still being relatively immune to noise, easily recognizable as a pullup (or down) value as it is so often used.
For a home circuit hacker, 1/4W is convenient to handle physically, easy to solder or breadboard, and yet big enough to actually see the color code clearly.
The power in a 5V circuit is 2.5mW, so you could actually use a resistor about 100 times smaller than 1/4W. It is just easier to handle the 1/4W size for the average guy.
What resistors are you trying to choose? If you want the series resistors for the leds, 220 ohm to 1000 ohms will do in a 5V cicuit. The smaller the resistance, the brighter your led will be. The pullup resistors can be 4.7K to 15K, which puts 10K in the middle of the range. Lower can be used, but the lower you go, the more current you draw when the switch is pushed or the pin goes low. Higher can also be used, but the higher you go, the more suscetable your cicuit will be to extraneous noise from things like motors, florescent bulbs, weders, etc. Than noise can cause unwanted things to happen in your project.
Hope This Helps,
-fab
fab… you rule, man. i really love the fact that you took the time to explain this for us. the 10k i used seem to work just fine and are allowing enough current for plenty of brightness. (for this project anyway)
thanks again for sharing.
cheers, mate!
Thanks Fab – Are the 10k resistors in the topswitchpin and bottomswitchpin circuits really pull up resistors? (see fritzing diagram) If I’m understanding all of this, Dave actually activates the internal arduino pull-up resistor using his code when he does this:
pinMode(pin, INPUT);
digitalWrite(pin, HIGH);
I’m just confused what the 10k resistors are doing in this case. Any guidance would be appreciated. I’m still struggling with some of these concepts.
Hey there, DG,
Thanks for the question… the resistors are 10k Ohm Resistors – 1/4 Watt (my amazon affiliate link: http://goo.gl/BVEflJ) These were put in place to make sure the current levels were at an acceptable level. (possibly overkill, but since I only had a limited amount of time to get this stuff done, I wanted to make sure I covered my bases so I didn’t spend time troubleshooting when I didn’t need to — like when I stupidly fried my stepper motor controller and Arduino Mega) =)
Nice coop! I am using the winter to expand what I’ve used for a year now. Based on Roger Reed’s code, but you might not know it anymore. I was going with a similar door design out of plexiglas, but soon found it was too brittle, so now I have rethought the lock. The sliding door is still acyrlic, but I will be using a bar attached to a servo across the top as a latch/lock. It is a bit more programming work as I will detach the servo and kill power to it after it is positioned. Currently I have just an inside light, inverted flower pot water heater, and egg box lights in play on an Uno. Phase II will advance to a Mega, have the above features as well as auto door, security loop, outdoor and pen area lights, outdoor temp to compare to the girls body heated coop, and forced ventalation. The water heater relay controlled outlet does double duty as a window fan control in the hot months. (unplug the heater light, plug in the fan), code is working great based on the return from a one wire DS18B20 monitoring the coop. I also want to have an indoor remote control rf linked eventually. The code is pretty sloppy due to a year of screwing with it to solve an ID 10T error in the TimeAlarms library. I neglected to modify my production file to the test bed parameters and it caused multiple re-writes until I found it! (cost me a year of screwing around!) Anyway, I’ll happily post the code somewhere if you’d like to see it…tell me where.
The girls and I are enjoying the 20F degree Ohio day today, and hopefully I can clean up the old code then migrate the cleaned version to the Mega and begin expansion after the year changes. In the spring I have only minor construction tasks to perform before I can get back to the automation building, so maybe by summer I”ll have an active door and security. For now, 2x a day I trudge out to control the pop door.
How is the door lock mechanism working for you now that it has some time and weather on it? I really like the idea of a single pull, but getting it “just right” seemed frought with longevity issues…like that is what I would do every year. It is not too late to go back to that design, so I wanted to ask if it has been a chore?
HNY!
Thanks for Sharing,
Dave
Hi Dave,
Thanks for all the notes… you’ve been busy.
Yeah, please share your code right here in the comments, so we can all learn from it (I’m big on sharing if you haven’t noticed) =)
Ya know, the door and the locks were over-built, (kinda common for me, even though my wife likes to tease me by saying I fix everything with 3″ lag bolts) so they’ve help up just fine in all weather and humidity. (they only thing I’ve done a couple of times was to rub bath soap on the moving parts as it really reduces friction. Other than that, no issues whatsoever.
Thanks again for writing!
//D
Hey Dave,
What attachment do you use for the motor? It seems to be some sort of spool you use to wind up the door. Is there a name for that attachment or is it made by hand? Thanks!
Hey there, Emilio…
Great question. I actually had to change it a few times. (all hand made) What finally worked was simply using a big bolt (so the strain on the motor wasn’t too great b/c of a large diameter… and then attaching the 1/4″ ply ends to keep the cord from falling off.
Thanks for writing in!
//D
Hi Dave,
I had left a comment last night under your contact section. I had a problem with the switches. I resolved this afternoon, I was just too tired yesterday to see the solution.
I am finding out as you mentioning that the micro switches can break easily. So I have ordered the Reed switches, one question I had was what kind off magnet did you use? I does not seem to come with one. Did you use one of those magnet strip that are used for alarm systems?
Thank you
Peter
Hi Peter,
To be clear the reed switches *are* magnets. They come in pairs. (1/2 is wired -~within the door frame~ the other 1/2 just gets drilled in and glued within the door)
Cheers!
I am building basically your design for my new coop. I am having some issues with connecting up the motor control board. I ordered from Amazon this board http://www.amazon.com/NEOMART-Original-Quality-Stepper-Controller/dp/B00E58EA90. So I am seen a different layout for the connections. I think I have it all worked out but the 5v pin on the motor control board appears to be an output (+5v power supply) rather then an input (load) to the board. Please see this link, http://arduino.stackexchange.com/questions/3682/question-different-ways-of-connecting-l298n-motor-driver-board-to-arduino-and-mo, as it seems that I can supply 24volts and it has an output connection of 5+ and not input requiring pin. I have a DC to DC converter connected to my 24 volt supply that outputs 9v to my Arduino Vin pin. I am wondering if you 5v output of your Arduino is connected to a 5v supply on the control module. This could cause you a problem if I read the specifications right. Some posts have indicated you could power your Arduino from the motor control board 5v supply but Vin requires at least 7v not 5v.
Hi Mark,
Great questions…
In short, I’ve added some closeup images of the exact wiring/setup of the board. (i had the same questions when I started.. so I went slow) =)
Take a look at those 4 images (below the Fritzing diagram) and your questions should be answered:
http://davenaves.com/blog/interests-projects/chickens/chicken-coop/arduino-chicken-door/
Note: the Stepper Motor Controller Board is indeed the l298n (the one in the pic might look different b/c I broke (fried) a couple of them while testing – but it’s definitely the same model… sometimes suppliers send the same product but with different layouts)
Notes on the wiring to make the board/motor work: (I used only 1 motor – Motor B)
5v (from arduino)
gnd (from arduino)
enab (to enable the motor b)
int1 (direction 1 – up)
int2 (direction2 – down)
24 v in to l298n board (vms *or* vcc in some controllers)
24v gnd in to l298n board (gnd)
motor b out + (24 volts to motor)
motor b out – (gnd)
Hope that helps,
//D
Hay Dave I am making progress on my coop controller. I have investigated the 5V connection on the server controller. It is definitely a 5v supply derived from the 24vdc on the servo bosrd. If you connect it to the 5V of the arduino then the two 5v supplies are hooked in parallel. As long as they are exactly 5.0 volts there should be no issue. But I am not taking a chance so I have not used the 5v supply on the servo, so I have no connection to it, and everything still works.
We have much snow now and this is the first day in weeks it has been above 10 deg F. Once it is warm enough I will be integrating my control system to the coop. I will be sending a copy of my code to you once it is complete for review. I have added control buttons to operate the door manually. I am using interrupts and I am still debugging the control aspect of this. Also I have created control status messages to a usb host that will convert to an Ethernet port that I have ordered. Also I have inside lights in the main area and the egg laying area that are controlled by reed stitches in the doors based on your light sensing technology. I have the controller , coop, and development system on Youtube. You have inspired much I am having way too much fun.
Wow… sounds awesome, Mark. Hurry up and make it warmer!! =) I know the feeling of waiting out the weather.
Looking forward to seeing your progress. (especially the control buttons… I’m thinking about doing that as well (for pretty much everything) Gotta plot out where to put a button console… then off to build a web version of the same control panel) =)
Cheers!
Hi Dave,
I’m starting my build based on your plans. I have a question about the stepper motor board. I have a different kind than you used and I’m confused on the exact wiring between the two. Here is a link to what I have: https://www.dropbox.com/s/yizzlu8twjh9ujf/photo%281%29.JPG?dl=0
Here is the ebay link where it was bought:
http://www.ebay.com/itm/L298N-Dual-H-Bridge-Stepper-Motor-Driver-Controller-Board-Module-High-Quality-/191359422736?pt=LH_DefaultDomain_0&hash=item2c8de91110
I’m having issues with the ena b, int 2 -b, and int 1 -b. Could you please explain this as the two boards are labeled differently.
Thanks for your great build.
Scott
Hi Scott,
Thanks for the kind words…
IN short, my answer is the same as for Mark:
I’ve added some closeup images of the exact wiring/setup of the board. (i had the same questions when I started.. so I went slow) =)
http://davenaves.com/blog/interests-projects/chickens/chicken-coop/arduino-chicken-door/
Take a look at those 4 images (below the Fritzing diagram) and your questions should be answered:
Note: the Stepper Motor Controller Board is indeed the l298n (the one in the pic might look different b/c I broke (fried) a couple of them while testing – but it’s definitely the same model… sometimes suppliers send the same product but with different layouts)
Notes on the wiring to make the board/motor work: (I used only 1 motor – Motor B)
5v (from arduino)
gnd (from arduino)
enab (to enable the motor b)
int1 (direction 1 – up)
int2 (direction2 – down)
24 v in to l298n board (vms *or* vcc in some controllers)
24v gnd in to l298n board (gnd)
motor b out + (24 volts to motor)
motor b out – (gnd)
Hope that helps,
//D
Dave,
Thanks for sharing your valuable insight and work with the rest of the world. I purchased the recommended parts and strictly followed the wiring diagram that you have posted and after adding the Simple Timer.h everything is up and working perfectly. I am powering my system via a 12v Battery charged by a solar panel, and I have followed the mechanical design posted by sciencejunk http://www.youtube.com/watch?v=4BuGN4ag_fk#t=18, to open and close my door. I would like to add and led that would trigger once the door contacts the lower reed switch indicating that the door is actually closed so that my wife could visually confirm that it is closed after dark. ( I work nights so often gone before it gets dark) for me the wiring is strait forward and easy to understand by I am completely clueless on where and what code I would have to add. Do you have a sample of this from the extra led’s that your have on your own system?
Thanks!!
TX Randy
Sure thing… it’s exactly what I have done: (I guess I need to update the latest code) =)
Here’s the images of my visual aid (red for open, green for closed)
http://goo.gl/uaSlS0 (slideshow on G+)
Hereyago: (obviously need to insert these snippets in the correct places within the script)
const int coopDoorOpenLed = 40; // led set to digital pin 40
const int coopDoorClosedLed = 41; // led set to digital pin 41
// coop door leds
pinMode (coopDoorOpenLed, OUTPUT); // enable coopDoorOpenLed = output
pinMode (coopDoorClosedLed, OUTPUT); // enable coopDoorClosedLed = output
// coop door status: red if open, green if closed, blinking red if stuck
void doCoopDoorLed() {
if (bottomSwitchPinVal == 0) { // if bottom reed switch circuit is closed
digitalWrite (coopDoorClosedLed, HIGH); // turns on coopDoorClosedLed (green)
digitalWrite (coopDoorOpenLed, LOW); // turns off coopDoorOpenLed (red)
}
else if(topSwitchPinVal == 0) { // if top reed switch circuit is closed
digitalWrite (coopDoorClosedLed, LOW); // turns off coopDoorClosedLed (green)
digitalWrite (coopDoorOpenLed, HIGH); // turns on coopDoorOpenLed (red)
}
// else if (topSwitchPinVal != 0) && if (bottomSwitchPinVal != 0) { // if bottom and top reed switch circuits are open
// doCoopDoorLedError(); // blink the coopDoorOpenLed
// }
// }
else {
digitalWrite (coopDoorClosedLed, LOW); // turns off coopDoorClosedLed (green)
digitalWrite (coopDoorOpenLed, LOW); // turns off coopDoorOpenLed (red)
}
}
Hope that helps!
//D
Hello Dave,
for some reason my previous question disappeared/was not answered.. i give it a second try.
Today I finished the door construction (https://www.facebook.com/video.php?v=10204674297042598&l=3527383548791132418), so I’m ready for the mechanics/electronics.
2 questions:
– Is an Arduino MEGA really necessary, or could a UNO also fit ?
– As I can not buy the type of DC motor you mention here in Belgium, what’s the momentum of that motor (in Nm)? (I cannot find any spec on that for your motor….) What’s the approx weight of your door?
Thank you for your help!
Jan VAN HYFTE
Hi Jan,
Looks great! (and thanks for the FB Credit)
The Uno can definitely work. I just needed the Mega because I used more pins for the other automated elements of the coop.
The motor, um… I’m not sure what “Nm” means… is that torque? The motor I used was rated at 20rpm (revolutions per minute) Here’s a direct link to Amazon (not sure if the specs would help?) http://goo.gl/uRsxpL
The weight of the door, I’m ~guestimating~ is 2 lbs.
Hope that helps at least a little.
Cheers!
Un
Hi David,
I have been reading through your material, and it sure looks great!
One question though, being an Arduino newbie: Why a MEGA and not a UNO?
regards,
Jan
Hi Jan,
Thanks for the kind words… much appreciated.
The reason I used the Mega was because I did much more with the coop than just the door, (overview video: http://goo.gl/OFJzDd ) so I needed more pins. If you’re just doing the door you should be fine with the Uno.
Cheers!
Hi Dave,
Would it be possible to use an Arduino Uno instead of the Mega? Woud any of the wiring/code change?
Robert
Hi Robert,
Yeah, the wiring would remain the same, except you’d need to insert your wires into different pins on the Uno as the Mega has more of them (and if you notice, I’ve used some of the pins (26,27) which the Uno doesn’t have) The rest would be exactly the same.
Cheers!
Hello, I am having an issue finding the ports shown on the fritzing diagram on my own motor driver. For instance, the diagram says vms and my motor driver says vcc. Are those the same? Another problem I am having is finding the motor b out – and +. Here is the a link to the picture AZ81HMQB9VIu.
Thanks for any help,
Jared
Hi Jared,
Thanks for the question…
(the “AZ81HMQB9VIu”you posted didn’t link to anything, but I’ve posted 3 detailed images for you back on the site (look under the Fritzing Diagram)
http://davenaves.com/blog/interests-projects/chickens/chicken-coop/arduino-chicken-door/
PS,
VMS/VCC means the motor supply voltage (so connect that to your power supply ~+/positive~ for the motor, the gnd to ground)
Hope that helps,
//D
Hello, I recently found your post about creating an automatic chicken coop door and thought it would be a great idea to follow it, and build my own automatic chicken coop door. The only issue issue is I am a bit of a novice at the whole wiring/arduino/electronics and am having trouble getting it to work. Through my troubleshooting I have, I think, narrowed the issue down to my wiring connection to the stepper. Is it possible for you to post a picture of the wiring?
Thanks for the help,
Jared
Hi Again, Jared.
Here’s the link again (look under the Fritzing Diagram)
http://davenaves.com/blog/interests-projects/chickens/chicken-coop/arduino-chicken-door/
Cheers!
Hi Dave!
The roles in this household seem to have somehow reversed. The son (ie: me) is having to do the Arduino coop automation.
A quick question about the motor: does it pull the hatch up, hold it, then switch off until it needs to switch back on and lower the hatch? Just wondering as I was going to use a full servo I have (basically a motor), but I can’t think of a way to get the hatch to hold open without leaving the servo running holding the door up.
Any advice would be much appreciated. If I get my automation working I’ll no doubt post it on Instructables.
All the best!
Ronnie
Hi Ronni,
Haaaaa… well someone has to do it! =)
The way I’ve programmed and wired it (video has a better explanation: http://goo.gl/CAQ8fU) is the motor (http://goo.gl/gQwQsA — not a servo… I don’t think a servo can handle the weight?) only opens when the photocell reads in enough light and stops when it hits the top reed switch, then spins in the close direction and stops at the bottom reed switch) So the motor simply stops (and the dorr just hangs by the cord wrapped around the spool) and waits for the next instruction. Yeah, as you mentioned, I wouldn’t try to run a motor constantly… it’ll burn out.
Hope that helps,
//D
Hi Dave. Great site! I’m in the process of automating the door for my own coop using a Raspberry Pi and have been using your project as a reference. I have a motor similar to the one you used. What was your source for the spool? My normally reliable methods of Google Search Fu have come up short and I’m having a hard time finding something similar. Thanks!
hi scott,
thanks for the question and the kind words…
the spool was completely homemade. i checked a ton of places and never really came up with a good solution, so i just fabricated one out of a bolt, screwed into a threaded female hex nut, set screws and 1/4′ plywood: http://davenaves.com/blog/?attachment_id=6360
i still would like to find something nicer, but this works just fine for now.
thanks again for writing in. post some pics of your project when you can. would love to see what you’re doing.
//d
Dave-
There’s a saying about putting a thousand monkeys and a thousand typewriters in a room for a thousand years and they’ll eventually bang out the script for Hamlet. I eventually stumbled upon the correct term for the part I was looking for: it’s a mounting hub. Pololu has them as well as mounting brackets for those 37mm motors:
http://www.pololu.com/product/1083
http://www.pololu.com/product/1084
I was stumbling on getting the motor connected to a spool, but with that hub I can just make my own out of plywood (as you did). Here are some pictures of the coop I built: http://imgur.com/a/hdUmU. Currently, the roost door is operated manually via the rope. The plan is to automate the roost door as well as build an identical door into the bottom panel of the main door to the coop. This way, I can let the chickens out at dawn when they start complaining, but keep them secure in the coop until it gets a little brighter and the threat of foxes and raccoon subsides a bit.
Thanks again for the inspiration!
hahahahaha… “thousand monkeys” love it!
and aaaaaaaaaaah yes! the mounting hub… thanks for the clarification. yes, when i was trying to track something down, i was searching for “small motor mount couplers” (images: http://goo.gl/vqh4m6) i purchased a couple and neither of them worked well, (weren’t heavy duty enough) so i finally just found a threaded hex nut in my box-o-parts, tapped my own threads and purchased the set screws. so far so good. (http://davenaves.com/blog/?attachment_id=6357)
i love your coop… really nicely done. loving the poop drawer and the blue color rules! the feeder… do i see 2 filling stacks attached? great idea.
also, not that you asked, but since your coop is currently sans-poop, i’m assuming you don’t yet have chickens? if not, to save you some “fix it in a hurry” time (and effort on your chickens’ part) you might want to add some additional rails to your ladder. (like keep them 3″-4″ apart… the chickens can’t take big steps and with their claws, it’s like walking uphill in ice skates) =) my girls and i learned the hard way.
anyway, really appreciate you sharing… i dig the progress, brother.
cheers!
If I still worked in the machine shop, I would have just grabbed some scrap and made my own part, but that was a long time ago and my access to (and honestly, my need for) those tools are limited these days. Still, it would have saved many hours of frustrated Google searching.
Thanks for the kind words about the coop. I’d like to say that I came in under budget and ahead of schedule, but my wife would strongly disagree on both counts. The pictures are from last summer before the hens moved in. Sadly, the coop doesn’t quite look like that anymore. Chicken poop has a way of changing the character of a place. I have a feeling I should have charged more for the damage deposit. You were right about that ramp. Chicken feet were definitely not designed for that sort of geometry. I reworked it a bit and they seem to be much happier. Yes, the feeder is essentially the same design as yours, but with a wye piece near the bottom and a second stack for extra capacity. It lasts our three chickens a couple of weeks. There’s a similar system on the other side for water, but that got installed pretty late in the fall and the girls never figured out the nipples. I didn’t have a way of heating it over the winter, so it’s been out of commission until the weather warms up. Hopefully they’ll figure it out in the spring, cleaning the water pan out every day is getting old.
I’ll post up a video of door(s) in action when I get them automated. In the meantime, I’ll be studying your controller box for layout ideas. Your tidy wiring would make the PLC electricians I used to work with proud.
hahahahahaha! (our wives must’ve called each other) =)
i *wish* i had machine shop skills… i have to make do with hand grinders, dremels and angle iron.
indeed, now poop changes the character of all the hard work. (but makes for great composting)
glad to hear the girls had you change the ramp… i’m sure they were subtle. =)
heating/water… not sure if you saw what i did, but i finally got it figured out for both interior and exterior. (and i’m about to change out the exterior *again* with a single fluorescent bulb instead of the flood light so i can hide it under the stairs with a 1×6 cedar plank) i have a simple thermometer hooked up via the Arduino which turns on a 120v relay to turn on just a couple of light bulbs. (just zip cord and receptacles – photos forthcoming) the interior heater sits right under the fount waterer/pipe within a cinder block with a tile top (i replaced the watering cups b/c interior shavings kept clogging them – i’ll probably plumb them to the right of the nipples – just like yours only some of the girls use them) here are a few pics of the work in progress: http://davenaves.com/blog/projects/automatic-chicken-watering-system/
looking forward to seeing your vids. and thanks for the kind words with the cable management… took me a while, but i really wanted to keep it neat (partially b/c of my dad’s anal genetics) but also so i could track down my mistakes. insider hint: use hot glue over the breadboard when you’re certain your connections are good. it’ll keep them seated nicely.
cheers, mate!
Funnily enough, I was keen to see the spool in particular in your parts list. That’s the part that I’m having trouble finding a good part for. A Google search for spool, drum, winder, spindle, bobbin or hub doesn’t really yield much useful.
Hi Craig,
Yeah, I had a hard time as well. I had to create one: closet pole and 1/4″ ply. =)
Cheers!
would anyone be intrested in my progress. i have question dave i see you used a few Libraries wondering what they do.
i’m sure most every chicken nerd like us would be interested. if you have any links, please post them (even if they aren’t complete) that’s what makes them great! =) ah yes, the other libs… (i’m including all of them from the main coop page/code: http://davenaves.com/blog/interests-projects/chickens/arduino-chicken-coop-controller/)
they are fairly self-explanatory: // load the SimpleTimer library to make timers, instead of delays & too many millis statements // load the onewire library for thermometer // load the servo library // load the liquid crystal library
#include
#include
#include
#include
– simpletimer is used to avoid using “delay” in the code which shuts down the entire script (and if there are many, the script won’t work)
-onewire is used to make the thermometer work
– servo is used to control the servo motor attached to the webcam (but i’ve since changed and am now using a different ip cam which can be contolled through the web)
liquidcrystal is used to control the lcd (which i currently have showing the internal temp of the coop and the state of the door ~open or closed~
cheers!
i plan on showing off my work but its a slow process and maybe it could help someone just like your info did
thanks again
awesome… looking forward to seeing it! pay it forward!! =)
i am working with different parts of the code for my project. i figured out how to read the numbers for the photo sensor and as soon as weather gets better i will go outside to get some real numbers in day and evening. i have my other arduino with a arduino motor shield and programing the code to get the motor to go in both directions but i think it would be easier if i used my 2 relay board to do same thing with less commands seems like i would turn on one relay with a pin to go one direction and the other relay to go in the other direction but since i am already wired up for the motor shield i will keep at it but what do you think? . i have the door built and have to moung the motor and make sure everything is smooth .
yeah, i’d say it’s really a personal preference at this point. for me, i’m just a big fan of the l298n motor driver controller (http://goo.gl/6XL6Gc). pretty straight forward and you can control speed and direction easily with very little code. the other code that takes a bit is for debouncing and thresholding the light levels. i’d love to take a look at what you’ve done when you’re finished.
thanks for the comments, walter.
cheers!
whats up dave i am the one starting an arduino chicken door and am still watching your videos but i have one question and am woudering what are the demintion of the area that the chickens walk into and the rest i will make to that size. i already have what i need and will use an arduino motor shield and micro swithches because i seen them run thousands of cycles at work and never seen one fail. i programed a lot in gw basic and this c++ seems very picky but have figured out the phot sensor in a few lines of code. the only thing i will add will be a bright led when the door is closed so my son can look out and know the door is shut . thanks for sharing your project
hey there, walter!
thanks for the question. in short, the net dimensions are 10″ x 10″. the reason i chose this size is that sometimes one or some of the girls like to block the entry to the coop while the others are trying to get in. not sure why… there’s always some sort of pecking order issue with these girls. =) so i wanted to have an opening that wouldn’t be too “comfortable.” (can’t stand up, no real room to roost) so far so good.
i’d love to see what you’ve done with your coding the photocels. (the big deal for me was twilight) the cel reads so quickly with made the door jump around, so for me, it was about reading every 10 minutes (to reduce the chance of my threshold readings) and then debouce. after much testing/frustration, i got it working exactly the way i wanted.
love the bright led idea… exactly what i did: https://plus.google.com/110347565471002804229/posts/3Sy5v8SFL8d
(great minds) =)
thanks again for the questions,
//d
Hello, I am looking for code that does not use the simple timer. I have tried to un comment the simple timer. but the sketch wont work without it. The photocell stops sending info to serial. Do you have any links to code that only uses the photocell to open and close?
Cheers, great SITE AND VIDEOS!!
thanks, xian…
did you get my notes out on youtube? if not:
the sketch will definitely work without the simpleTimer, but you have to make sure to comment out lines:
3, 61, 88 and 208 and then add “readPhotoCell();” to the loop.
but know this: without the timer the photocel readings fluctuate too much around dusk and dawn (which is why i have it set to check every 10 minutes) and the door jumps around and often (even with the debouncing) the door jumped past the switch and the motor kept running and just became stuck.
hope that helps.
//d
ok, Great thanks. I am have been trying to download the simple timer libraries from Arduino site for days now. I keep “stray errors” and the simple timer sketch can’t compile. Still researching simple timer libraries and functions.
int = great site thanks
hey there, xian,
thanks for the comment… sorry for the late reply, must’ve missed it.
not sure why you’re having trouble. all you need to do is copy the text from this page: http://playground.arduino.cc//Code/SimpleTimer?action=sourceblock&num=2 and save as “SimpleTimer.h” then add it to your arduino libraries, (how: http://arduino.cc/en/Guide/Libraries#.UxYl2_BX-uY)
hope that helps.
Great, thank you! After cooking on H-bridge, I ordered the L298 and got it all wired and code working! But the motor wont cycle, it just stutters and the red led on L298 is slightly blinking. When I hook up the power supply direct to the motor it cycles no prob. I also noticed that when I unhook one of the motor directional pins the LED on L298 oscillates less? Thank you for helping with my first big Arduino Project. I have lots of pics to post.
thank again
hmmm… just know that these are a bit finicky and i actually burned one out my first time through. do you have an example of the code you’re using? or are you using the code i posted?
cheers!
Hello,
I am using the code off your site. I wrote some simple code to control the motor. The DC motor and the red LED on the L29 stay on and it send a consistent 12v. When I up load your code the LED blinks and
it sends 7 volt spurts. I dble checked the pins and connections. I ran the test twice and with simple code the meter read 12v. I am using a Arduino Leonardo.
thank again
my chickens are 6 weeks old now…..come on coop door!!
i know all about the urgency… my girls had to wait almost a year & a half before getting their door. =)
really hard to know why your motor and leds are doing that… do you have additional “delay” within the code? kinda sounds like it.
Hi,
Great article, it’s given me loads of ideas. I’m creating an automatic coop door opener for my 3 silkie bantams.
I’m going to use a raspberry pi, to hopefully control a door motor, read light levels, log temperature, green & red door status LEDs, run a data logger and chicken cam.
Hopefully I’ll get an exception report via email if door fails to open in the morning or shut in the evening, may even take a photo of the inside of the coop after closing to check the ladies are inside.
I’ll be sure to post the results, thanks for sharing your work.
Chris
Hi Chris!
Thanks for the comments and kind words. Your coop sounds like it’s going to be awesome and your chickens are going to as spoiled as mine! Ya know, I’ve been hearing about the Rasberry Pi for a while now and I know nothing about them… time to look!) =) I love your ideas about email reporting and photos inside the coop.
Not sure if you’ve seen the rest of my coop site? (http://davenaves.com/blog/interests-projects/chickens/pollo-palace-2/) If not, perhaps some of the other elements may be of help for what you’ve described. Funny you should mention door status LEDs, I *just* installed some a couple of days ago ( https://plus.google.com/b/110347565471002804229/110347565471002804229/posts/3Sy5v8SFL8d ) And last night I added more code to ~flash~ the red led if an error occurs. (door stuck, etc.)
Yes! I would love to see your progress… thanks for sharing.
Cheers,
//D
Soon after I messaged you on the Arduino forum, I stumbled upon the video in a search. Very nice. I don’t have time tonight to review the site, but it looks nice so far, and appears to be up and running!
Merry Christmas (if you do that!)
Cheers! (if you don’t!)
Dave
Thanks for the comments, Dave!
Glad you found the vid(s) – good to know some of my seo still works. =)
Yes, actually everything has been working flawlessly thus far. (a bit embarrassed how long it took me to get it right – but I had to also run my business while I sporadically ran out to the coop a million times to get it all hooked up and running)
When you have time, would love to see how your project is coming along… pics, text, code, smoke signals)
=)
And a very Merry Christmas right backatcha, my friend.
//D